|
OCTOBER 13
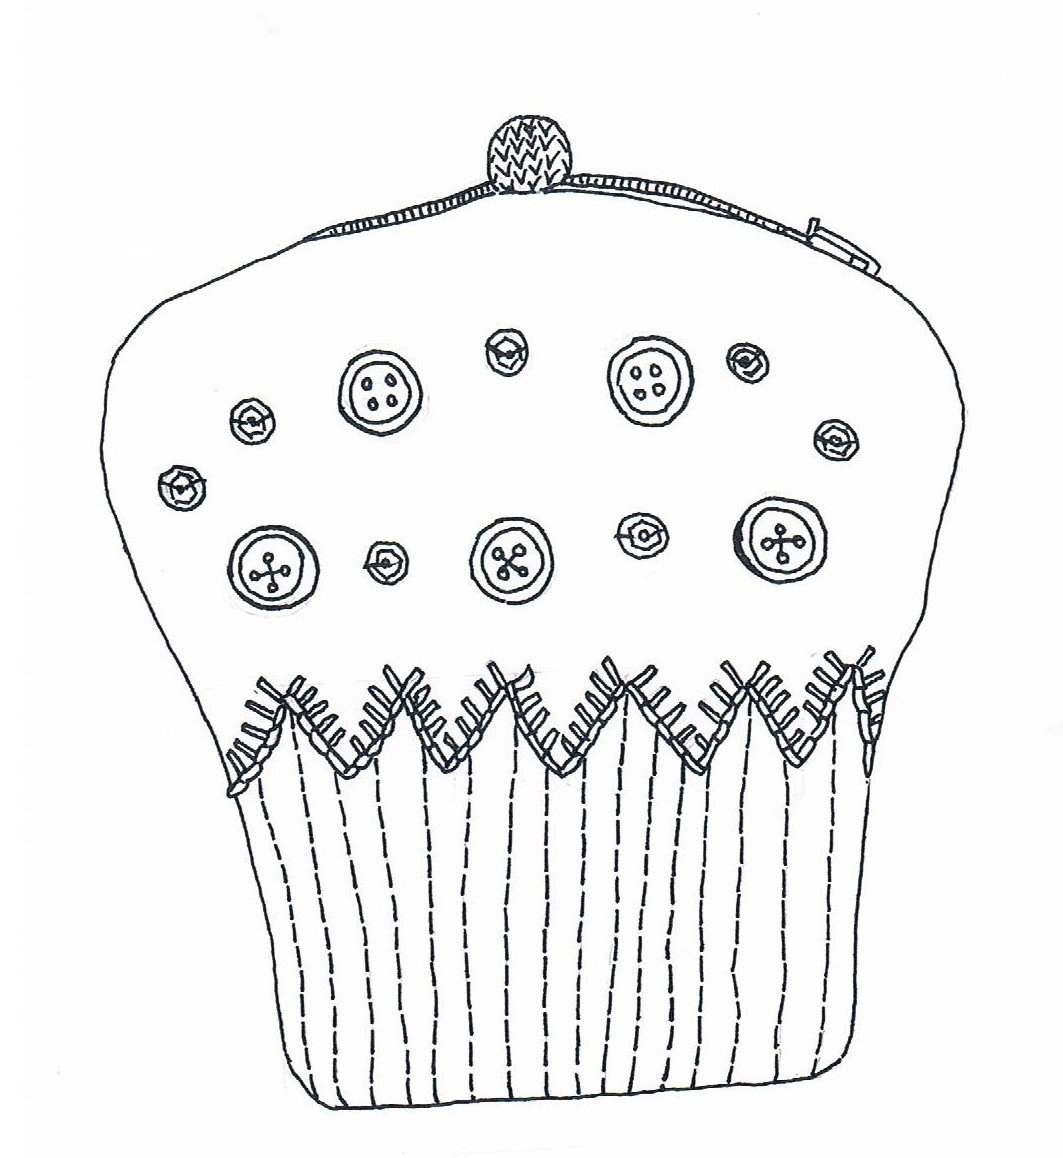
This little purse was made from scraps of felt, a few old buttons from a shirt, sequins and some remnants of matching spotted cotton for the lining. Children would love it as a stocking filler.
INSTRUCTIONS
Materials: 2 pieces of pink felt for the icing shapes, each piece 3 ½” (9cm) x 5 ½” (14cm); 1 piece of beige felt 3 ½” (9cm) x 1128cm “(14cm) for the cup-cake base shape; 1 x 5” (13” cm) cotton lining material; 1 skein each of 6-strand embroidery silks in pale pink and gold; an oddment of cotton knitting yarn; 10 mother-of-pearl buttons from old shirts; 14 sequins; matching sewing threads; 1 x 5” chocolate brown zip.
Needles & Notions: embroidery needle; small embroidery scissors; pinking shears; fine sewing needle; dressmaking pins; 2 x size 12 (2 ¾ mm) knitting needles; a small crochet hook; paper for cutting out patterns; tracing paper and pencil.
Method
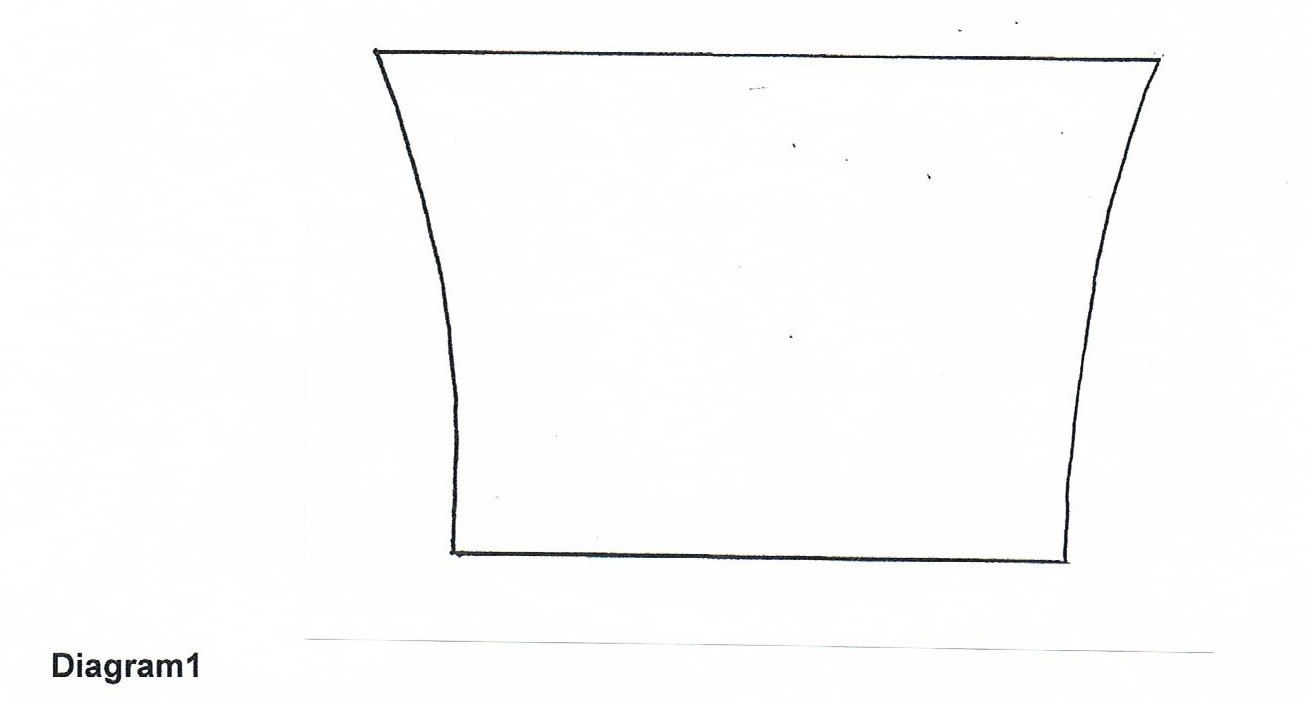
- Cup-cake base of purse: Make a pattern by tracing Diagram 1 onto the tracing paper with the pencil and then transfer this by drawing over the shape on the reverse side of the design onto the folded-in-half piece of beige felt. Cut out using the embroidery scissors.
- With 3 strands of the golden embroidery silk and the embroidery needle work vertical lines in back stitch to form the creases in the paper case.
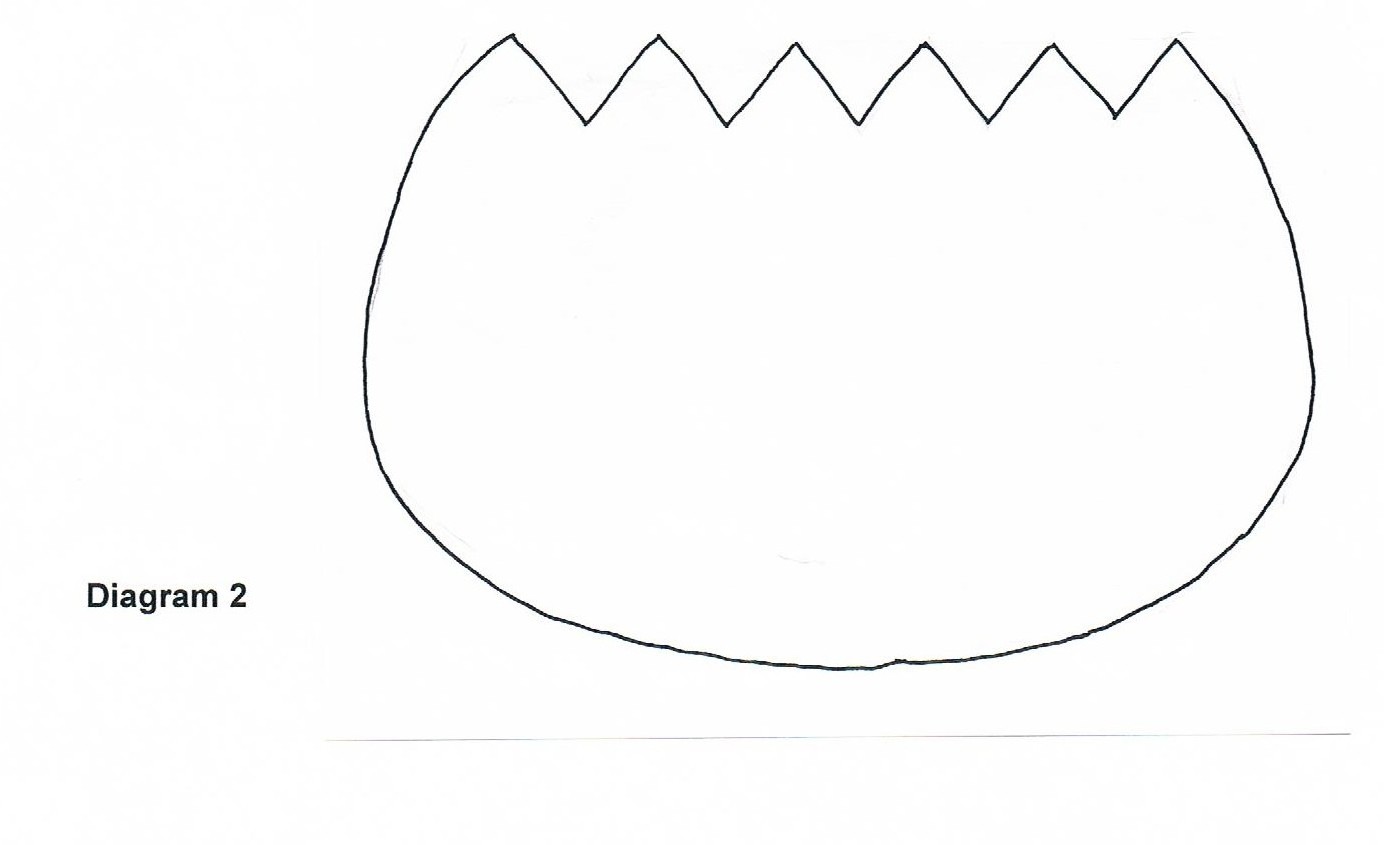
- Icing on top of cup-cake purse: Make a pattern by tracing Diagram 2 onto the tracing paper with the pencil and then transfer this by drawing the shape over the reverse side of the design onto the 2 pieces of the pink felt, each piece placed on top of the other. Cut out using the embroidery scissors, carefully cutting the zigzag shapes at the bottom.
- Fold over the embroidered cup-cake base and pin each piece of the icing shapes to the top and bottom of the base.
- Using blanket stitch and 3 strands of the pink embroidery silk attach the icing shapes to the front and back of the base. Fold over the top of both sides of the pink icing and hem stitch with matching thread to create a recess for the zip to be set in later on.
- Fold over the top of both sides of the pink icing and hem stitch with matching thread to create a recess for the zip to be set in later on.
- Using matching sewing threads sew 5 buttons and 7 sequins spaced as shown in the illustration to each side of the back and front of the purse. Turn the purse inside out.
- Using matching sewing thread and back stitch, sew the side seams together to form the purse, but only sew 1 ½ “ (4cm) of the side seams of the top of the icing section to allow the zip to be set in. Pink the seams.
- Insert the chocolate zip by recessing it below the hemmed top of the pink felt icing shapes. Pin, then tack (baste) into place making sure it fits neatly then sew in firmly by using matching pink thread.
- Prepare lining by folding lining fabric in half and then trace the shape using the tracing paper and a pencil. Place the cup-cake purse shape on top of the lining and allow a (1/2 “) 1cm all over for the seams. Pin to fabric then cut out the lining material. Sew side seams together, joining WS to WS if there is a WS. Leave the top of the lining unsewn then pink the seams.
- Slip the lining shape into the cup-cake and using hem stitch sew neatly to the top of the zip.
- Make a bobble: Using the knitting needles and the pink cotton knitting yarn cast on 3sts. Row 1: K3. Row 2: P3. Row 3: Inc 1 st at each end, k the 3sts in centre (5sts). Row 4: P5. Row 5: inc 1 st at each end, k the 5sts in centre. (7sts). Row 6: P7. Row 7: K7. Row 8: P7. Row 9: K2tog, k3, k2tog. (5sts). Row 10: P5. Row 1l: K2tog, k1, k2tog. (3sts). Row 12: P3. Row 13: cast (bind) off 3sts. Then, using the crochet hook and the same thread, in chain st, make a chain that measures 2” (5cm) long.
- With the embroidery needle and the pink cotton thread used to make the bobble, gather the knitted shape to make a bobble and with RS of the st st knitting showing, sew firmly to one side of the pink felt above the zip.
- Sew the chain st length to the other side of the pink felt above the zip and form into a circle that allows the bobble to pass through. Sew the other end of the chain to the same side that the chain stitch was sewn on.
Finishing: Press gently with a warm iron over a damp cloth.
|

|
SEPTEMBER 2013
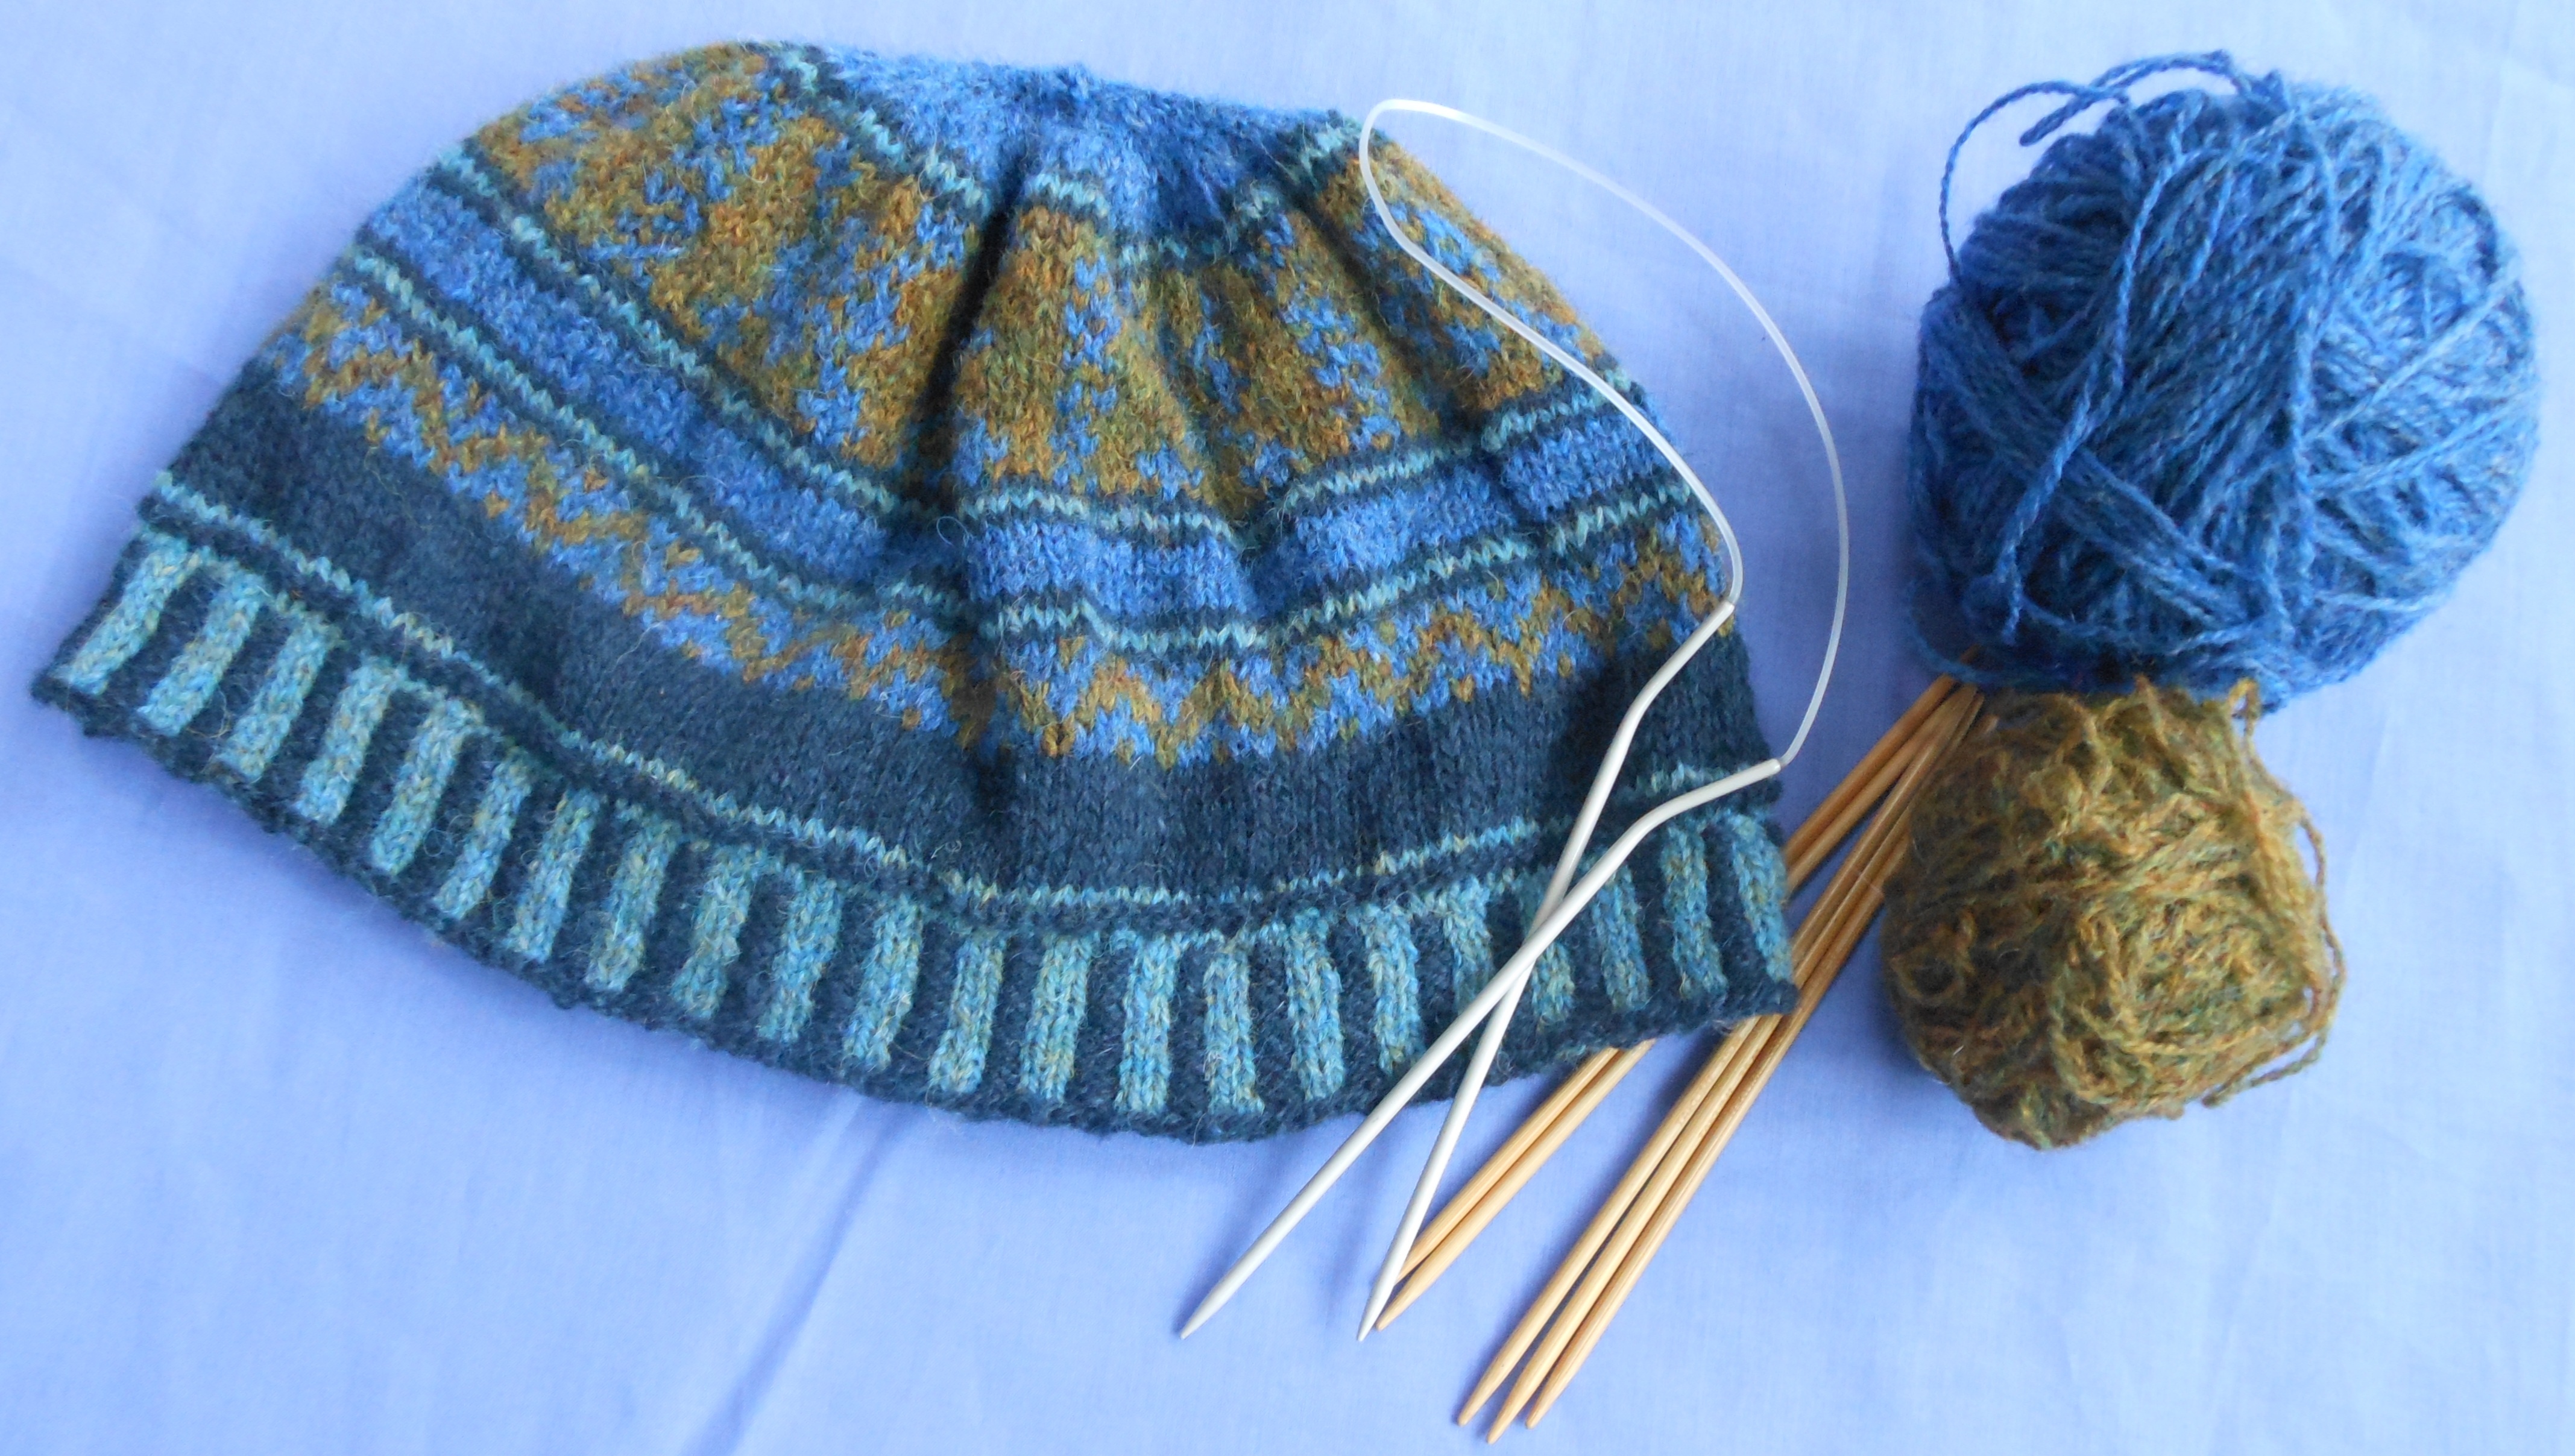
FAIR ISLE BEANIE
The approach of autumn always makes me want to get my knitting needles out. I love the traditional knitting patterns created in the Fair Isles and over the years have been inspired by The Fair Isle Knitting Handbook by Alice Starmore whose work I’ve long admired. Do read it, as it’s so clear on how to make the most beautiful items even if you’re a first time Fair Isle knitter. This year I designed this little hat using simple Fair Isle two-colour patterns that use up oddments of wool. It’s ideal for country walks in the Peak District where the unpredictable weather can often be similar to that in the Shetlands!
Size: One size to fit a 58cm (23”) circumference head. Depth from top of crown: 20cm (8”)
Materials: 2 oz (50g) each of 2-ply jumper wool in the following colours: Navy (A), turquoise fleck (B), olive (C) and blue (D).
One pair size 12 (2 ¾ mm); US 2 circular knitting needles; one pair size 10 (3 ¼ mm; US 3) circular knitting needles; one set of 5 small length size 10 (3 ¼ mm; US 3) double-pointed knitting needles. Tape measure, scissors and darning needle
Tension gauge: 16sts x 16 rows to 5cm (5”) measured over pattern using size 10 (3 ¼ mm) needles
Welt: On the size 12 (2 ¾ mm; US 2) needles, cast on 180 sts in A.
Round 1: K2 in A, k2 in B, stranding the yarn at the back.
Round 2: P2 in A, k2 in B to end. Repeat this 2 x 2 rib pattern for 10 more rounds. Change to size 10 (3 ¼ mm; US 3) circular needles.
Round 13: K in B
Round 14: K in A
Round 15: P in A.
Round 16: K in B
K 7 more rounds in A then K pattern in colours as shown on squared paper. Start patterning in K at base of design in C and D stranding yarns loosely at back to avoid puckering. (180 sts)
Shape crown as follows:
Next round: In D, K 2 tog to end of round. (90sts)
Next round and each next alt round : K in D
Next dec round: In D, K 2 tog. (45 sts)
Change to set of double pointed needles as these are easier to use as the sts dec.
Next dec round: In D, K 2 tog to last st; K 1. (23sts)
Next dec round: In D, K 2 tog to last st, K1. (12 sts)
Next dec round: In D, K 2 tog (6sts) Cast off.
Making up and finishing: Darn in all loose ends neatly and close hole at crown. If necessary, in time thread a fine length of black elastic cord at inside edge of welt if beanie stretches after washing and with wear for a closer fit. |

|
AUGUST CRAFT 2013
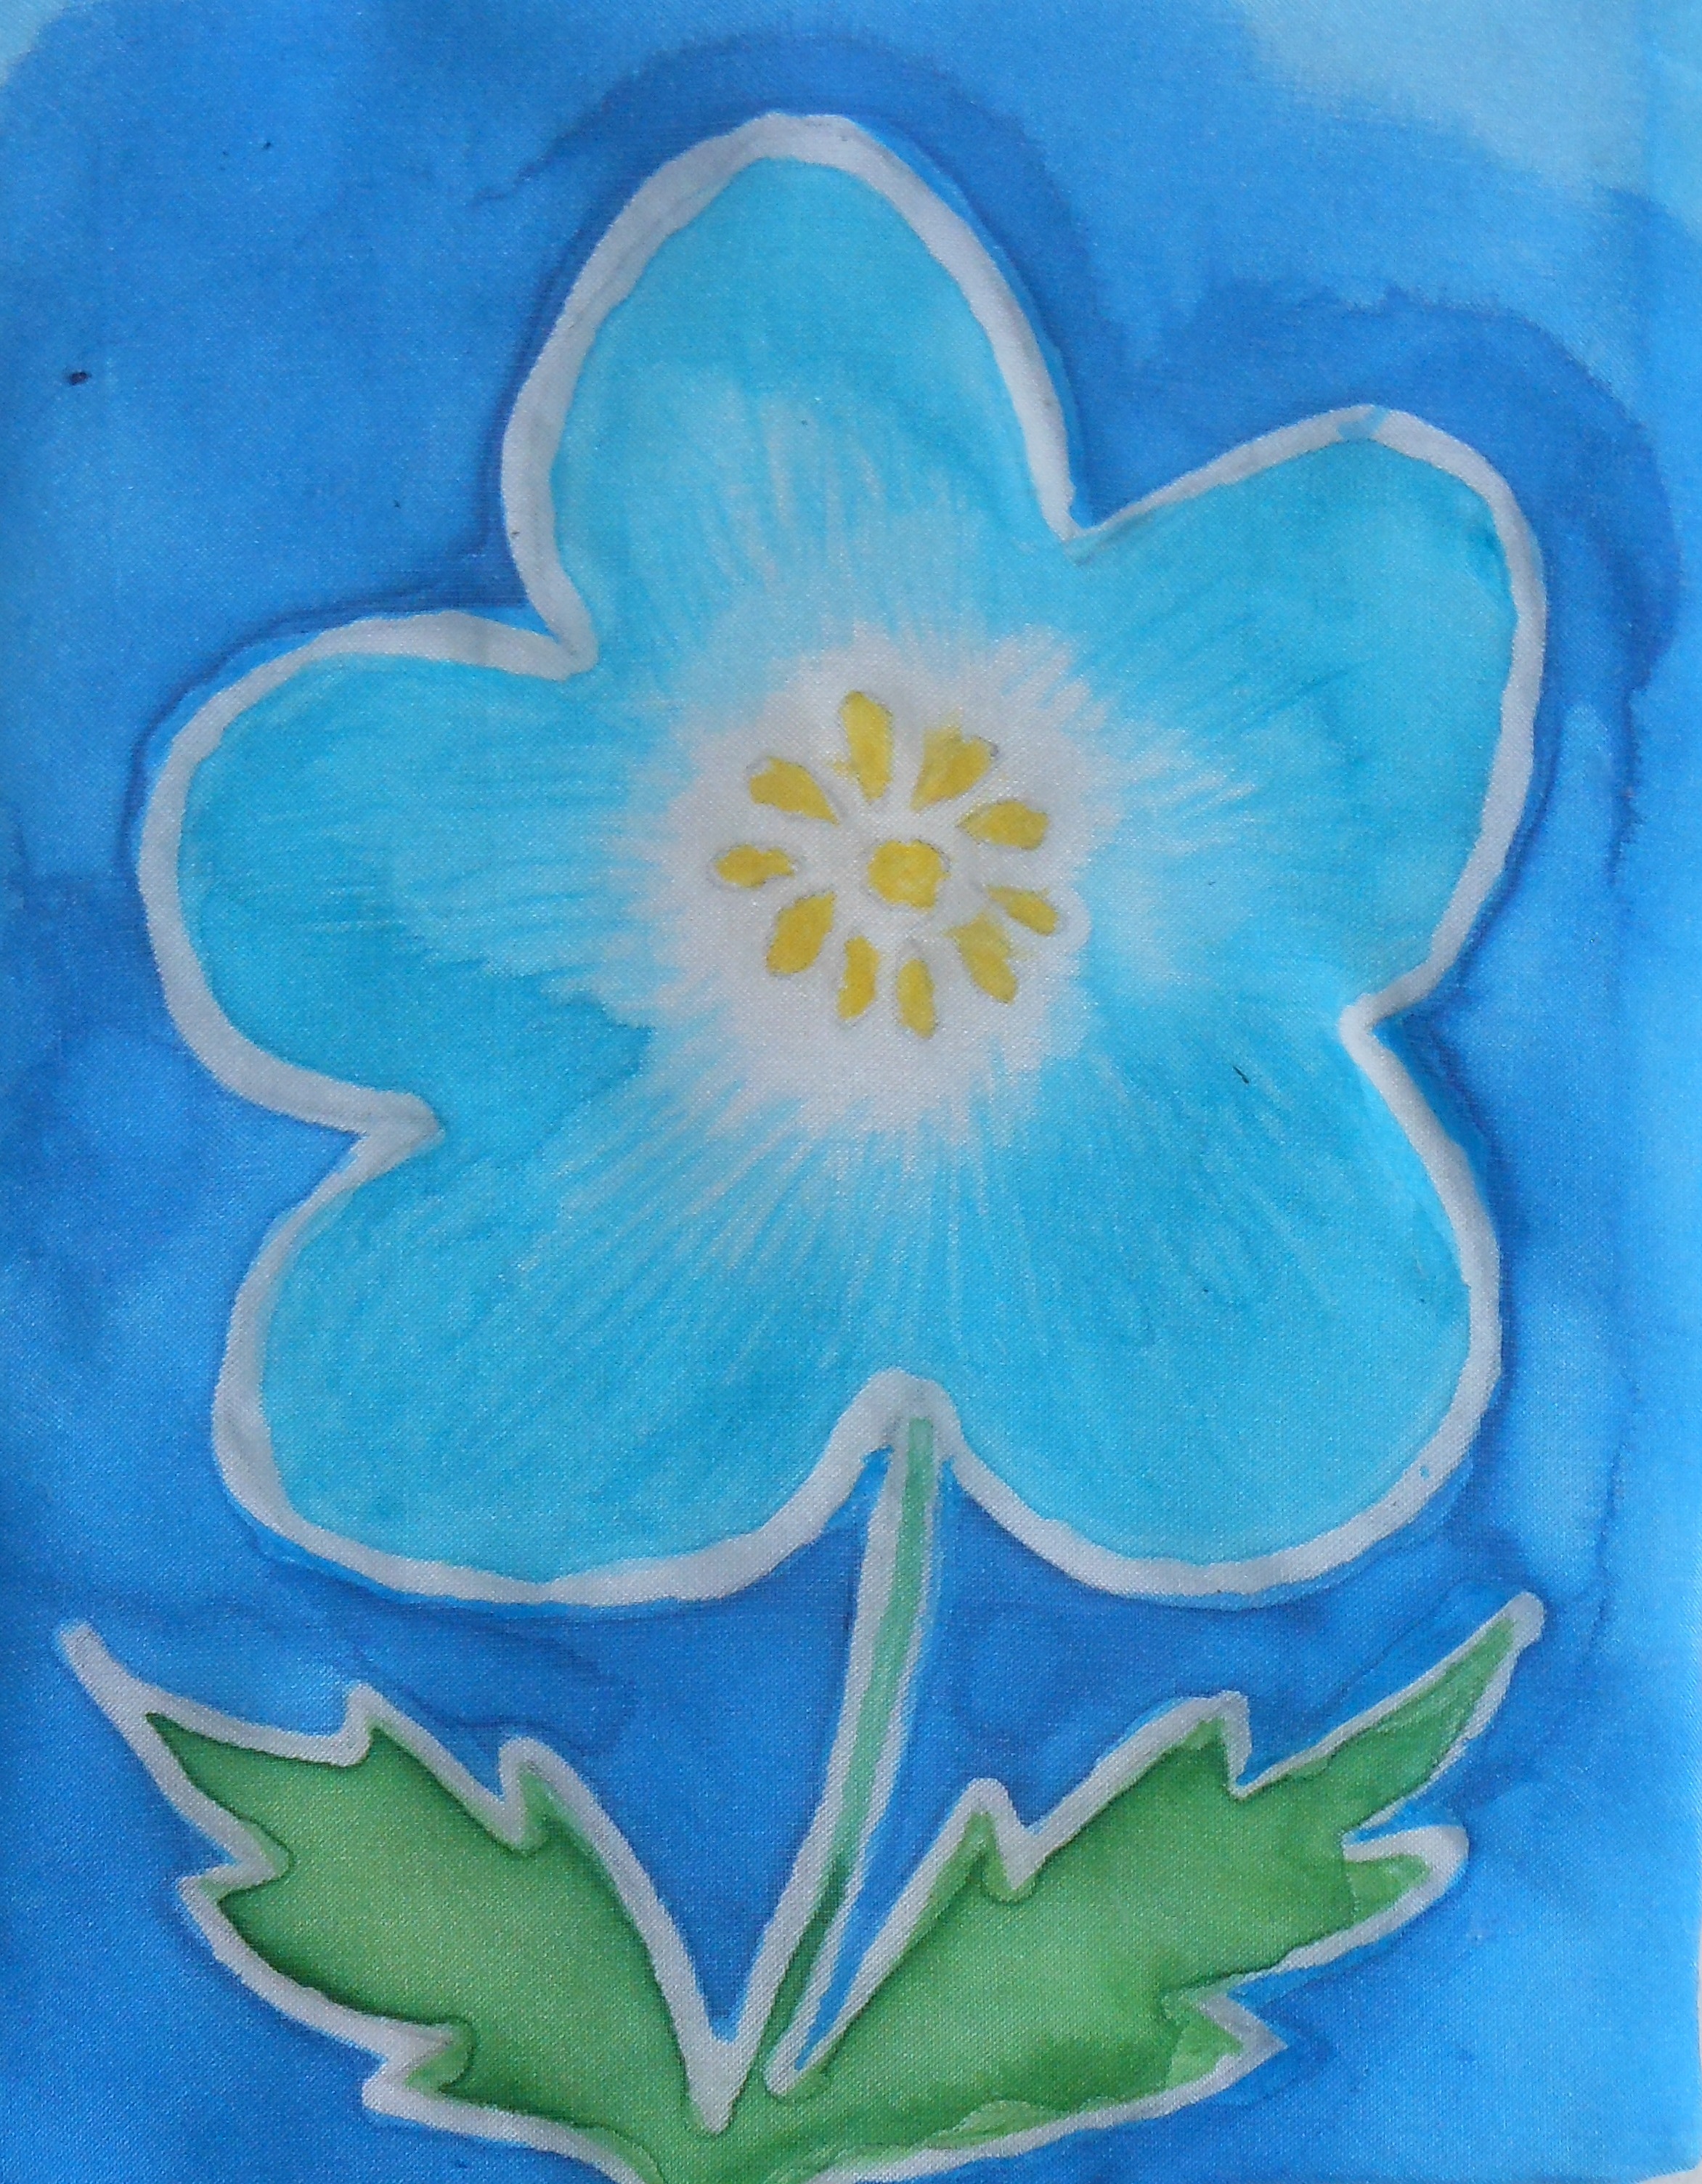
There’s something about summer that makes me want to paint on silk, I’m not sure why. Perhaps it’s the petals of all those flowers blooming in the garden, or the delicate texture of silk that reminds me of butterfly’s wings that inspires me to work in this medium once more.
If you’ve never tried this craft you could begin with a small project like this card. The materials you’ll need are all available from on-line craft suppliers such as Rainbow Silks. www.rainbowsilks.co.uk
A piece of white Habotai silk large enough to fit a small frame
Small wooden silk frame. Mine is specially made and is size 18cm (7”) x 31cm (12”)
3B pencil
Silk pins
Double-sided Sellotape
Tube of clear outliner (water-based Gutta)
Water-based silk paints in yellow, blue and turquoise and a small glass jar to mix paints
Round watercolour brush No 8 for large areas and smaller pointed watercolour brush No 6 for smaller detailed areas
White backing paper to trace over
Tracing paper
A piece of white drawing paper size 10cm (4”) x 13cm (5 ¼ “)
Copydex or Pritt glue
A piece of white card 15cm (6”) x 22cm (8 ½ “)
- Cut silk to the size you want. For this blue poppy design I used a piece 20cm (8”) x (33cm) 13” which was large enough to pin to my frame allowing some over at the edges
- Draw the flower shape on a piece of drawing paper and outline it on the back
- Turn the flower shape over again and transfer the design onto some tracing paper
- With Sellotape attach tracing paper with design on it right way up to silk, then lay silk and tracing paper over piece of white drawing paper onto a flat work surface so you can clearly see what you are doing. With pencil draw over the outline of the flower to transfer design onto silk. Remove tracing paper and underneath piece of paper.
- With silk pins attach silk to frame. The silk is now ready to be painted.
- Place frame over a piece of paper to catch any drips of silk paint.
- Using the gutta tube, outline the pencil lines of the flower, stem and leaves with gutta nozzle
- When dry, colour in the flower using the smaller pointed brush. Begin with the small stamens in yellow, keeping within the outline borders. Wash brush in water immediately after use
- Next, using turquoise and larger brush, paint in the petals, leaving a white space around the yellow stamens. Wash brush in water immediately after use
- Next, with blue and larger brush, paint in the background. Wash brush immediately after use
- Pour a little blue and yellow paint into the small glass jar and using the small brush mix together to make green. Paint the leaves and stem with the small brush and green
- Leave to dry then wash out the gutta in water. The painted areas remain. Iron then with pinking shears cut silk to 13cm (5”) x 16cm (6 ½“)with flower evenly spaced within this area
- Cut a piece of white paper to size (10cm) 4” x (13cm) 5 ¼. Fold the painted silk over the paper and glue carefully with small mitred corners at the back
- When the silk has dried to the glued paper, cut a piece of card 14cm (5 ½ “) x 23cm (9”) and fold over in half. Stick the paper-backed silk to the front of the card.
- If you have a mounting card cutter you could display the silk under the mount if you prefer. I’ve shown how to make a card without a mounting cutter in case you don’t have one.
|
|
JULY 2013
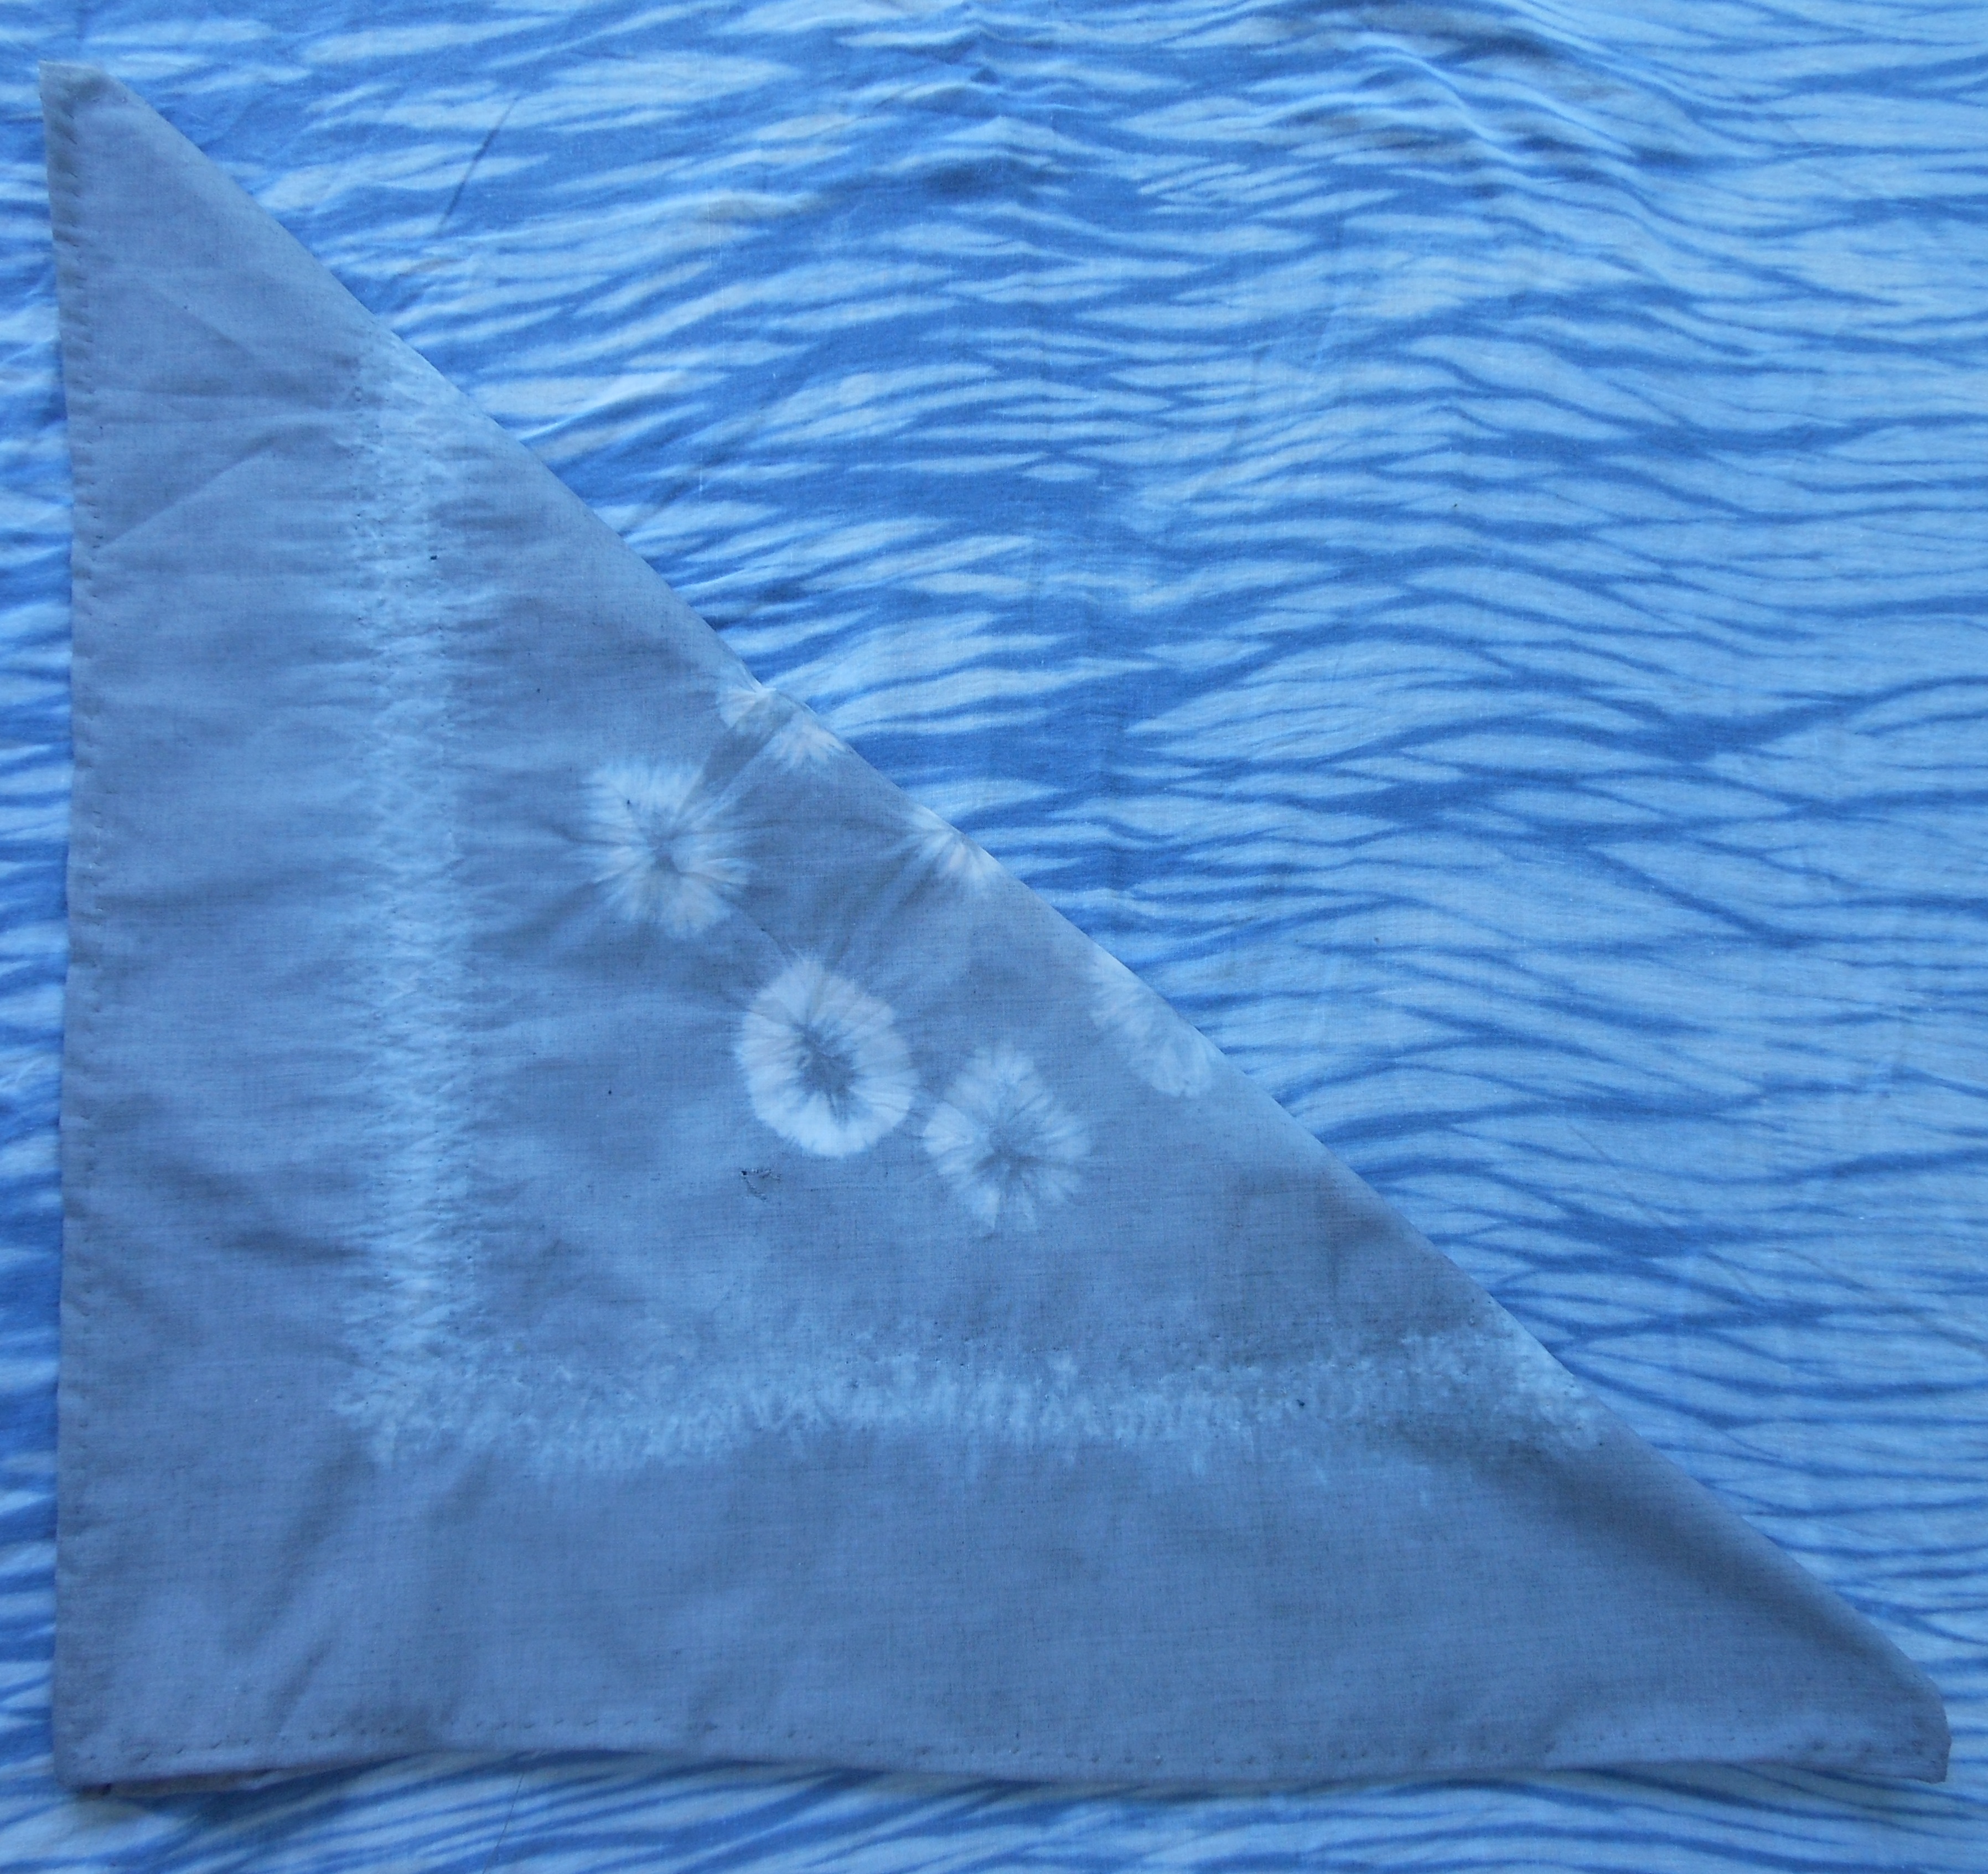
TIE-DYED BANDANA
This month I decided to do some tie-dying, one of my favourite summer crafts as you can peg out the dripping cloth bundles on the washing line to dry in the garden.
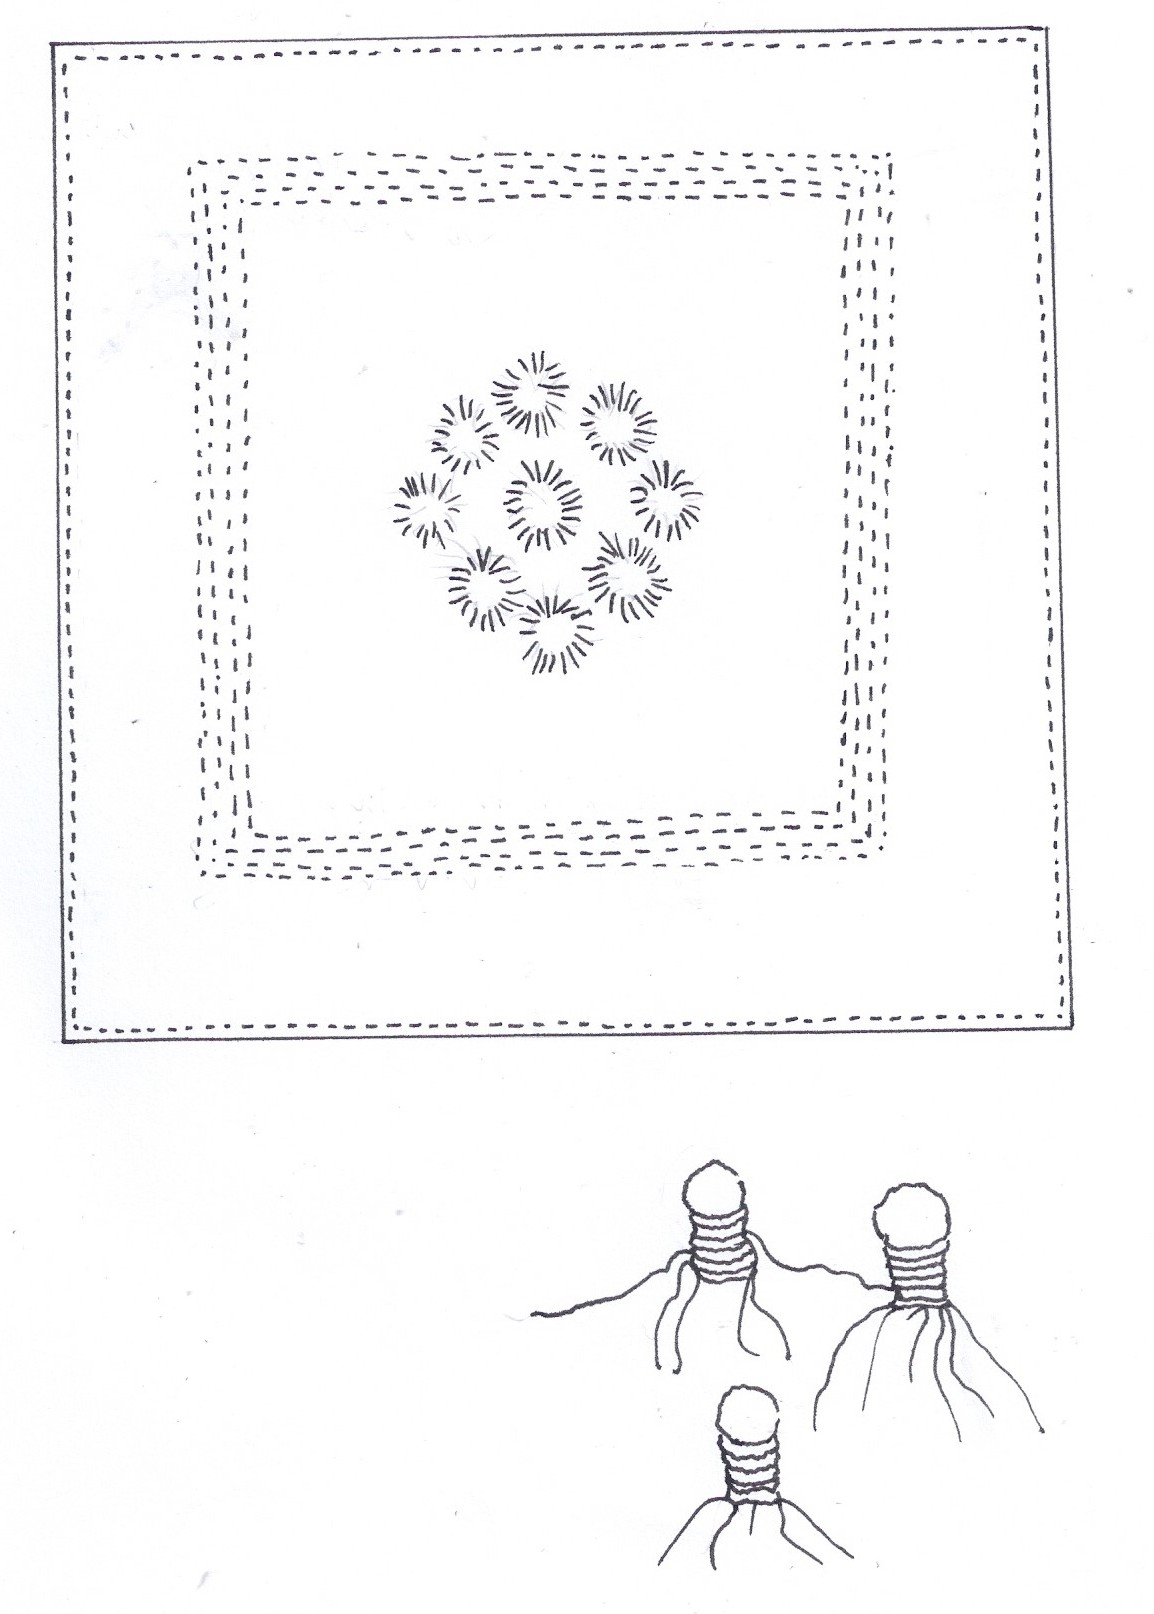
Tie-dyeing is a simple craft as all you need is some fabric, some sturdy thread (button-hole thread is good), a few dried peas and some fabric dye. I used Dylon Jeans Blue, salt and a square of white cotton to make a bandana. I used two techniques: tying the fabric round the peas for the star-bursts and running stitch for the borders. See the sketch attached.
- Cut a piece of cotton into a rectangle (20”) 50cm.
- Sketch out in pencil the design you want onto the cloth.
- First place the peas under the fabric and wrap round with button-hole thread as shown in the diagram, and tie fast with a firm knot, a reef knot if you know how.
- The next technique is known as trikit. With a large-eyed sewing needle and more button-hole thread sew 4 rows of running stitch to make the border. Make a knot at the end of each thread for each separate row and leave plenty of thread over so you can pull the rows tight.
- When all the running-stitch rows are complete, pull them very tightly so the effect is like smocking. Then carefully wrap the running-stitch border areas round in one large wodge with more button-hole thread to further prevent the dye penetrating the fabric.
- Immerse the cotton bundle in a bowl of water.
- Following the instructions on the Dylon packet, using rubber gloves dissolve the dye in 500ml of warm water in a Pyrex jug.
- Fill another dishwasher-proof bowl with 6 litres of warm water and add 250g (5 tablespoons) salt to it, then add the dye from the jug. (This makes enough dye to dye up to 225g fabric e.g. a shirt so you could use the dye-bath to dye other items at the same time.)
- Submerge the bundle and stir for 15 minutes then leave to soak for another 45 minutes.
- Remove the bundle and rinse in cold water, then peg out to dry.
- When the bundle is dry, cut all the button-hole threads away with a stitch un-picker or sharp embroidery scissors and remove the peas. Take great care when cutting the threads not to snag the fabric. Then remove the thread from the borders in the same way and pull the puckered smocking area flat.
- Finally hem the 4 edges of the square with matching sewing thread. Then iron flat and voila you have a bandana to wear this summer!
The bandana was photographed folded over and placed on a trikit dyed sarong. |
 |
JUNE 13
ROSE HAIR BOBBLES. These make-your-own rose decorated hair bobbles using up left over bits and pieces will delight any little girls who love wearing pink. The instructions are given for 1 hair bobble for a pony tail, but make 2 for bunches by doubling the specified quantities.
Materials: Remnant sized 10”(25cm) x 10” (25cm) of pink gauze or net; oddments of gold silk knitting yarn (approximately 60” (152cm); lengths of stranded gold embroidery thread (approximately 60” (153cm); fine sewing thread to match the gauze; elastic undecorated hair bobble.
Needles and Notions: I pair UK size 12 (2 ¾ mm) US size 2 knitting needles; embroidery needle with wide eye; fine embroidery needle for sewing thread; embroidery scissors; paper to make petal template; dressmaking pins.
Abbreviations: K = knit; p = purl; p2tog = purl 2 together; p3tog = purl 3 together; st(s) = stitches; yo = yarn over needle to make a stitch; sl1 = slip st onto other needle; psso = pass slipped st over.
Method:
Make petals:
(i) Draw a petal-shaped template onto paper 2 ½ “(6cm) high and 2” (5cm) across and cut
out.
(ii) Fold the pink gauze over to make 8 layers.
(iii) Pin petal paper template onto these layers of gauze and cut out 8 petals from the edge of the template. Repeat this step until you have cut out 16 petals.
(iv)Thread the sewing needle with matching pink thread. Arrange 8 petals into a circular shape and sew together in the centre. Repeat this step with the remaining 8 petals then sew the first 8 petal flower ring onto the other 8 petal flower ring. Leave aside.
Make central bobble:
Using UK size 12 (2 ¾ mm) US size 2 knitting needles and gold silk knitting yarn cast on 3sts.
Row 1: K1, (k1, yo, k1,yo, k1) into the next st, k1. (7sts).
Row 2: P7
Row 3: K7
Row 4: P1, P2tog, p1, p2tog, p1 (5sts)
Row 5: k1, sl1, k2tog, psso, k1. (3sts)
Row 6: P3tog.
Cut off thread, leaving 10” (25cm) then thread this through the loop of the remaining stitch, and into the eye of the wide-eyed embroidery needle and sew firmly onto the gauze flower.
Make stamens: Thread gold embroidery strands through wide-eyed embroidery needle and in stem st sew two circles of stamens around the central bobble, approximately 30 stamens each circle.
Making up and finishing:
Neaten all stitches at the back of the flower then sew the plain elastic bobble to the back of the flower. Cut out a circle of gauze 2 ½ “(6cm) in diameter, and pin to back and turning in the edges cover the stitches at the back of the hair bobble. Fluff up the gauze petals into a rose shape. Hand wash in warm water and gentle soap flakes if necessary after wearing
|
|
MAY 2013
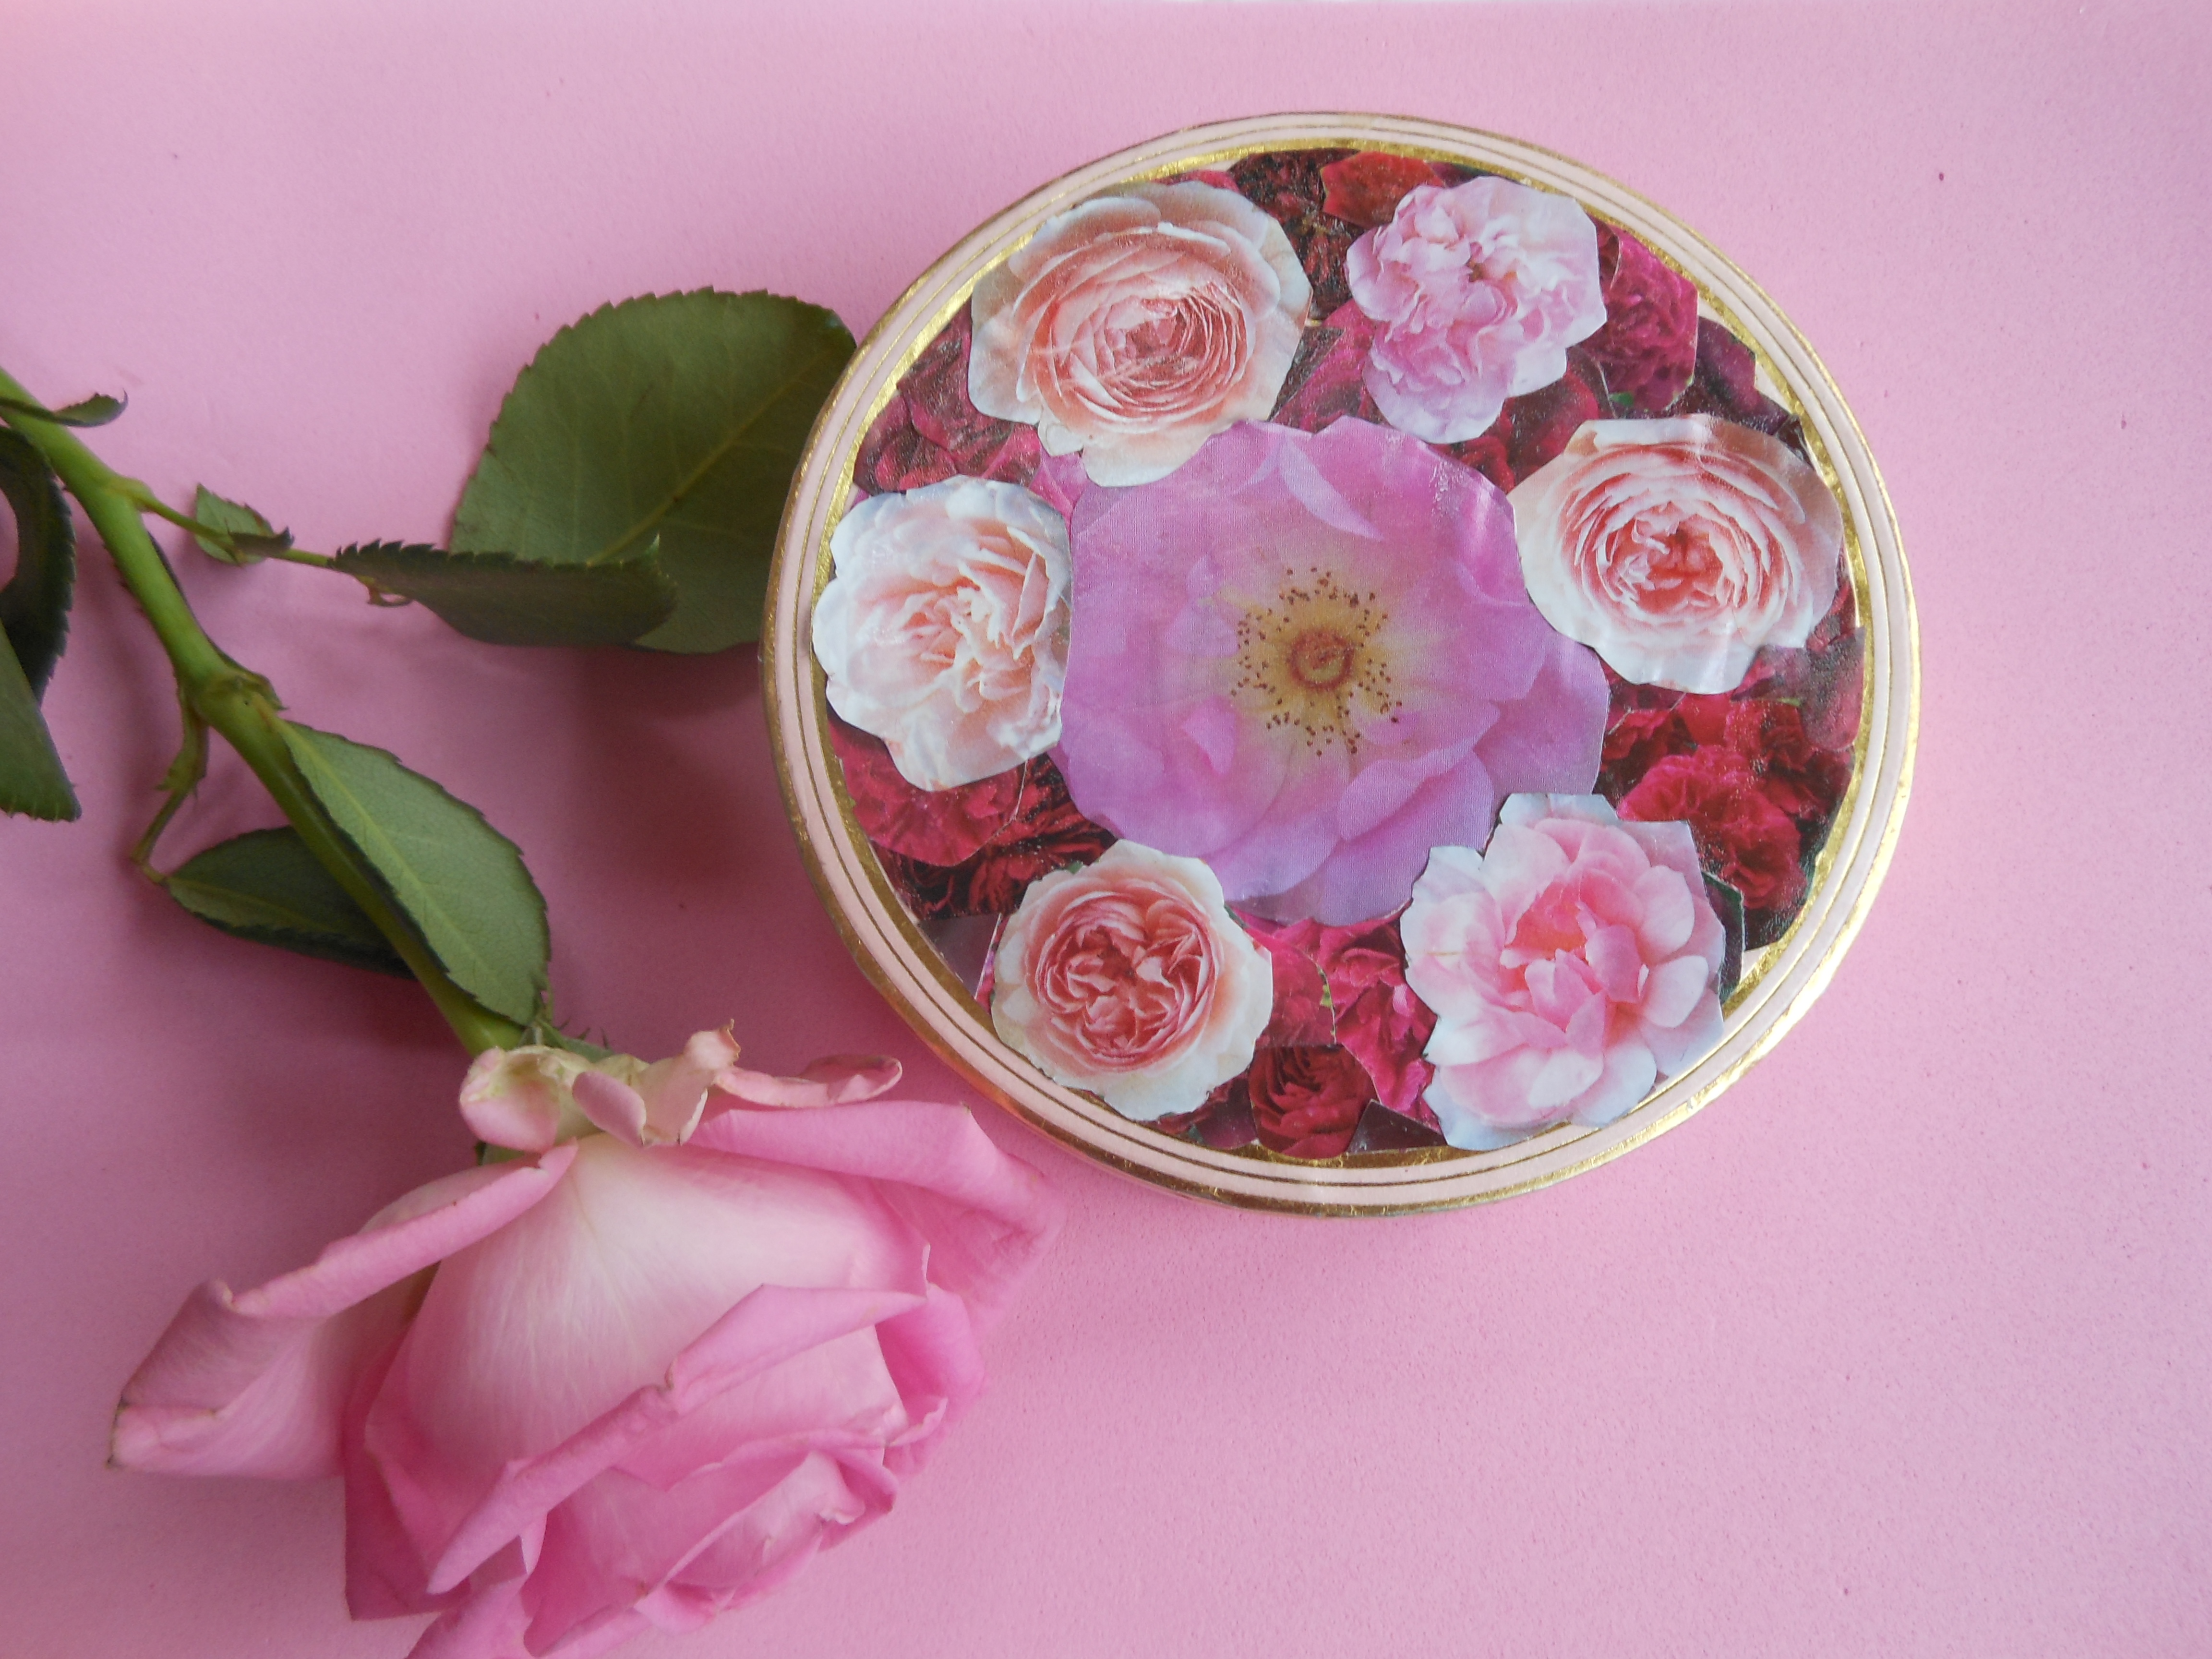
DECOUPAGE
Following on with paper craft techniques from April’s paper mosaic collage, this month’s craft features decoupage which was very popular in Victorian times. Decoupage means ‘cut paper’ and is ideal for making something beautiful from something that would have otherwise be discarded.
For this project I found an empty sweet box and decorated it with pictures of roses cut from an old rose catalogue. I stuck them on top of the box with Prittstick glue and varnished it with a clear varnish to protect the images. My little granddaughter uses it to keep her earrings in now she’s old enough to wear them. |
 |
APRIL 2013
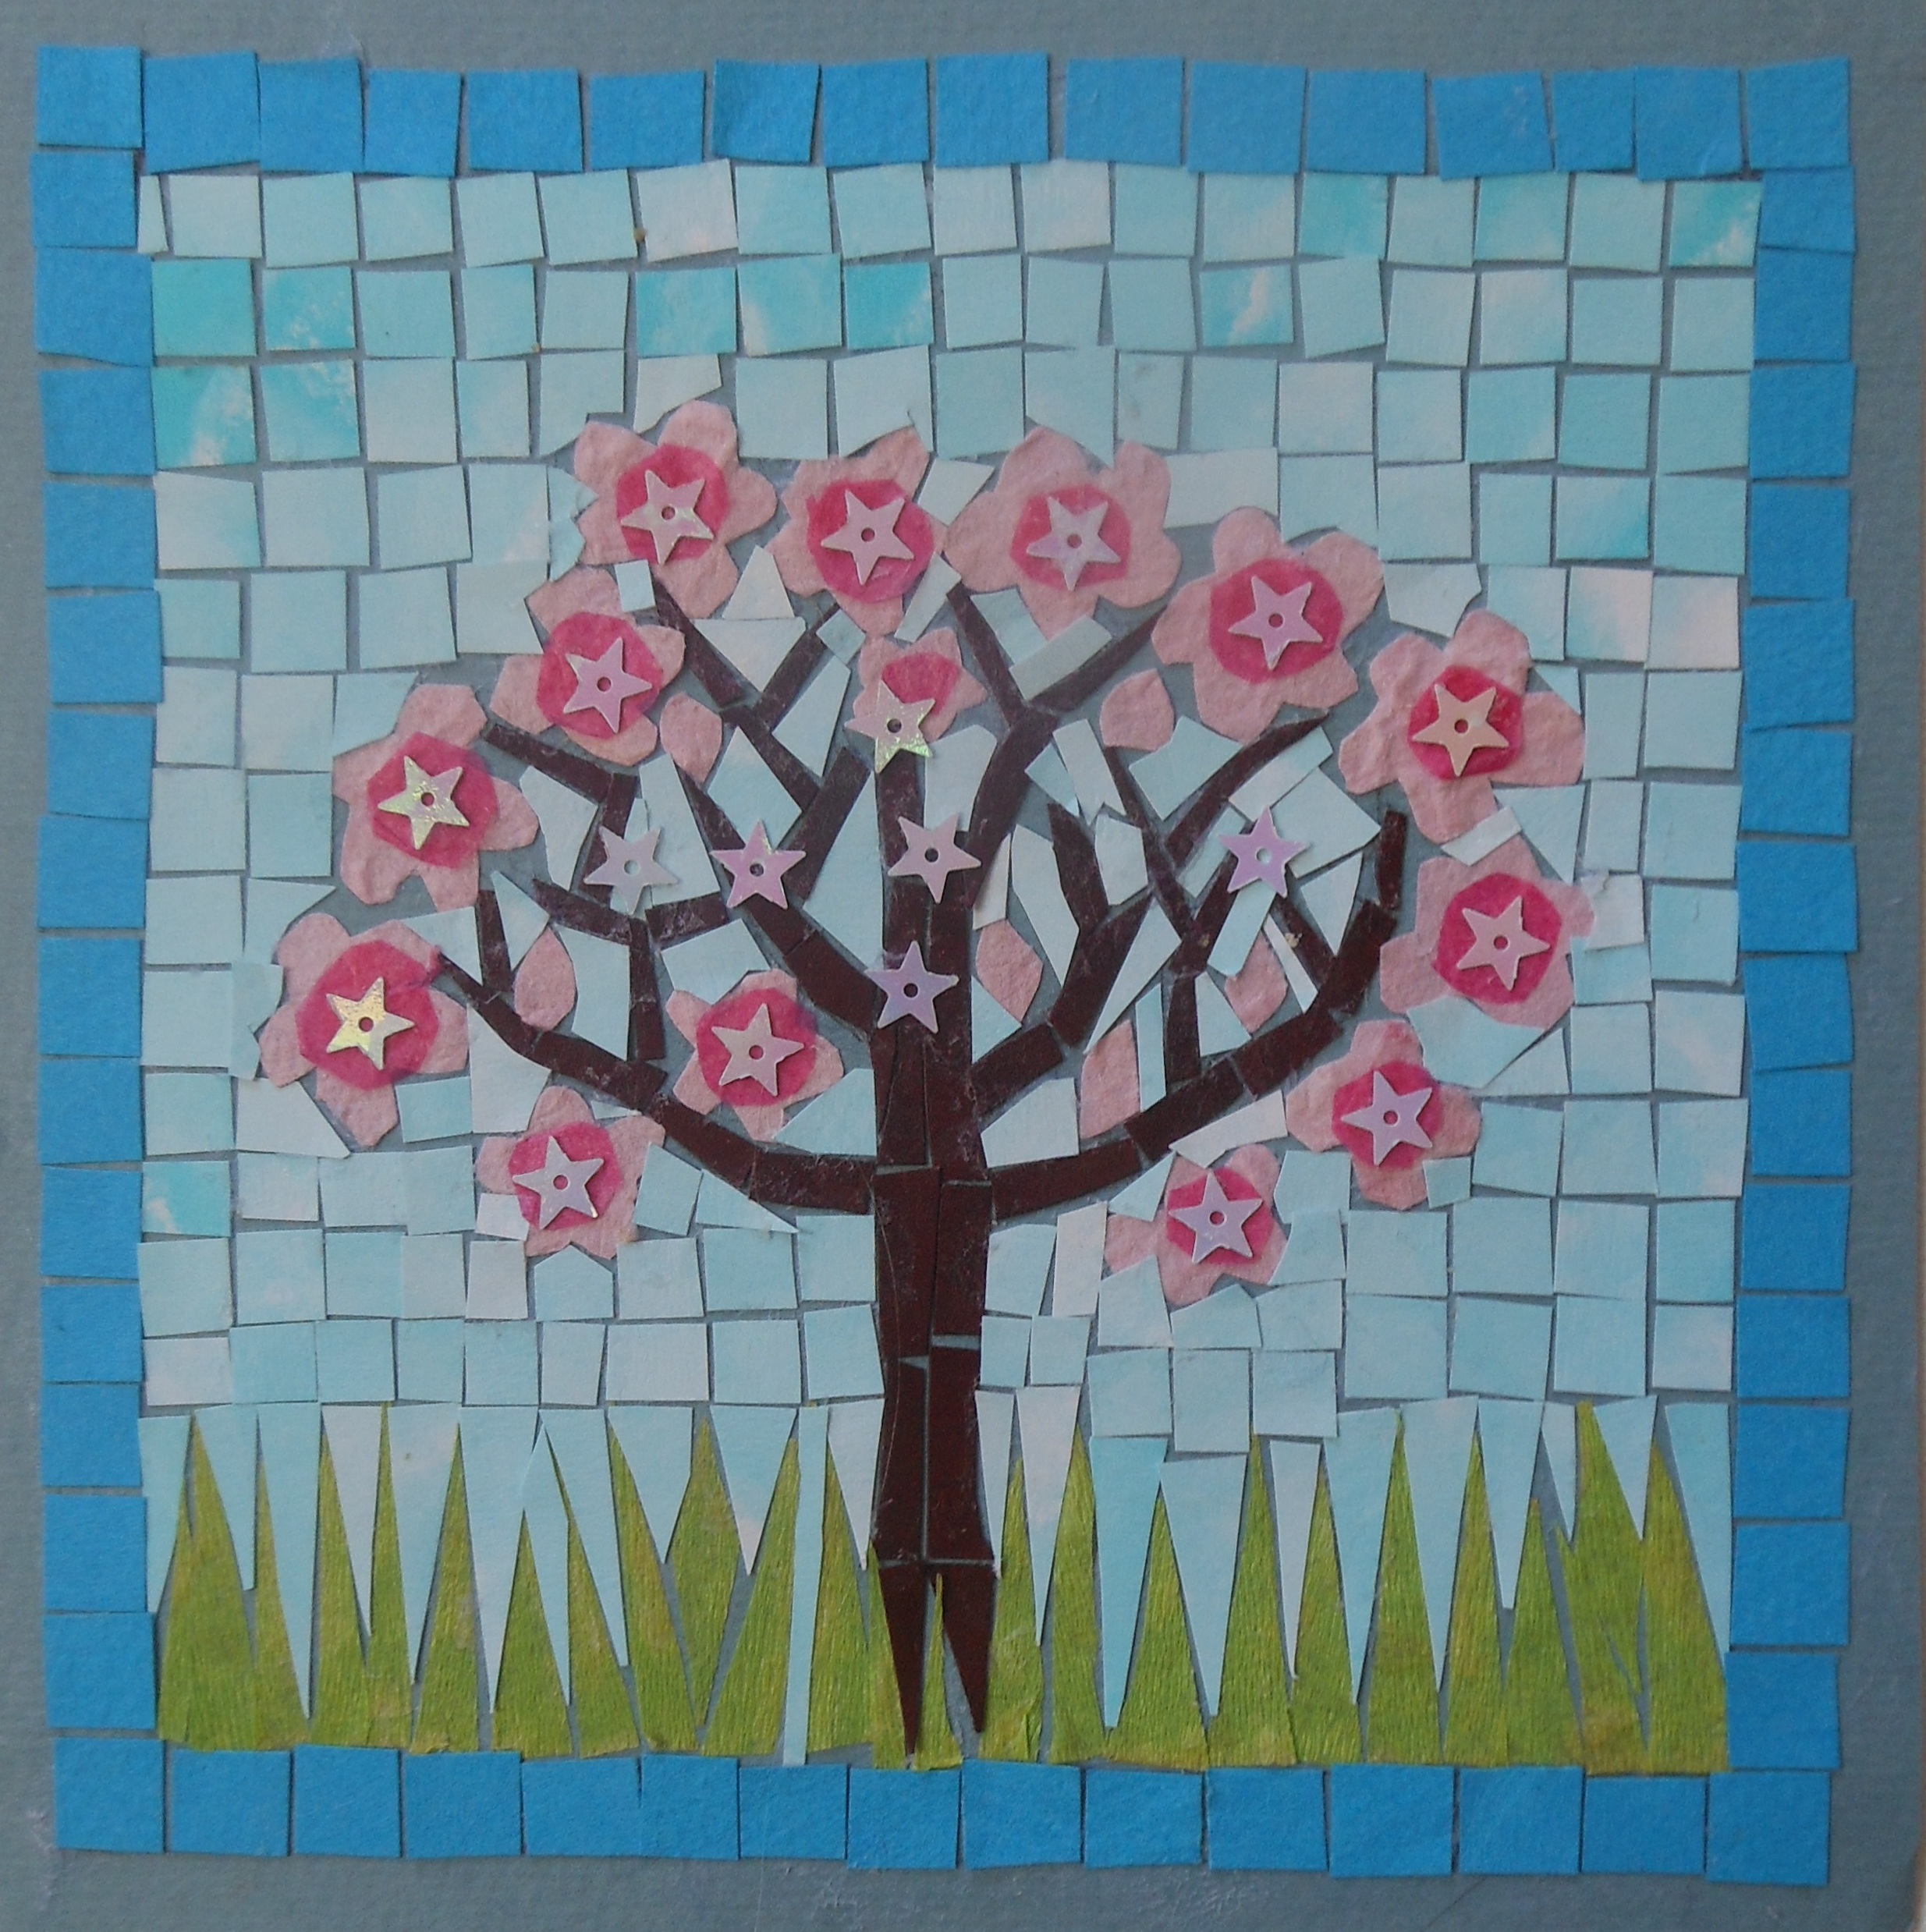
PAPER MOSAIC COLLAGE
After the coldest March for half a century the blossoms on the fruit trees are delayed this year. Yet once the weather improves, the trees will be covered in beautiful flowers and the bees will hopefully re-appear. I created this little design to celebrate spring and for children to make during the Easter holidays. I often used this craft when working as an art therapist in hospital. I found patients really enjoyed it. It helped them feel confident enough to try it even if they had no previous arts and crafts experience. We displayed their work in the hospital corridors for the public to admire with the result their self-esteem greatly improved.
Collages are easy to make from odd pieces of coloured paper and this craft can turn you into a magpie, compelling you to save gift wraps and off-cuts of packaging. All you do is sketch your design out on the background paper of your choice then cut out paper shapes. Glue them in place with simple-to-use glue; I used Prittstick for this example. It does need some patience to complete, rather like doing a jigsaw, but it’s something you can keep coming back to. After you’ve glued the basic shapes in place, you can emphasise the design by adding extras, as I did with little shiny stars you can buy from any craft shop. When completed, you can either frame it or make it into a greetings card.
See more examples of my paper mosaics in the Sacred Art section of my website. |
|
MARCH 2013
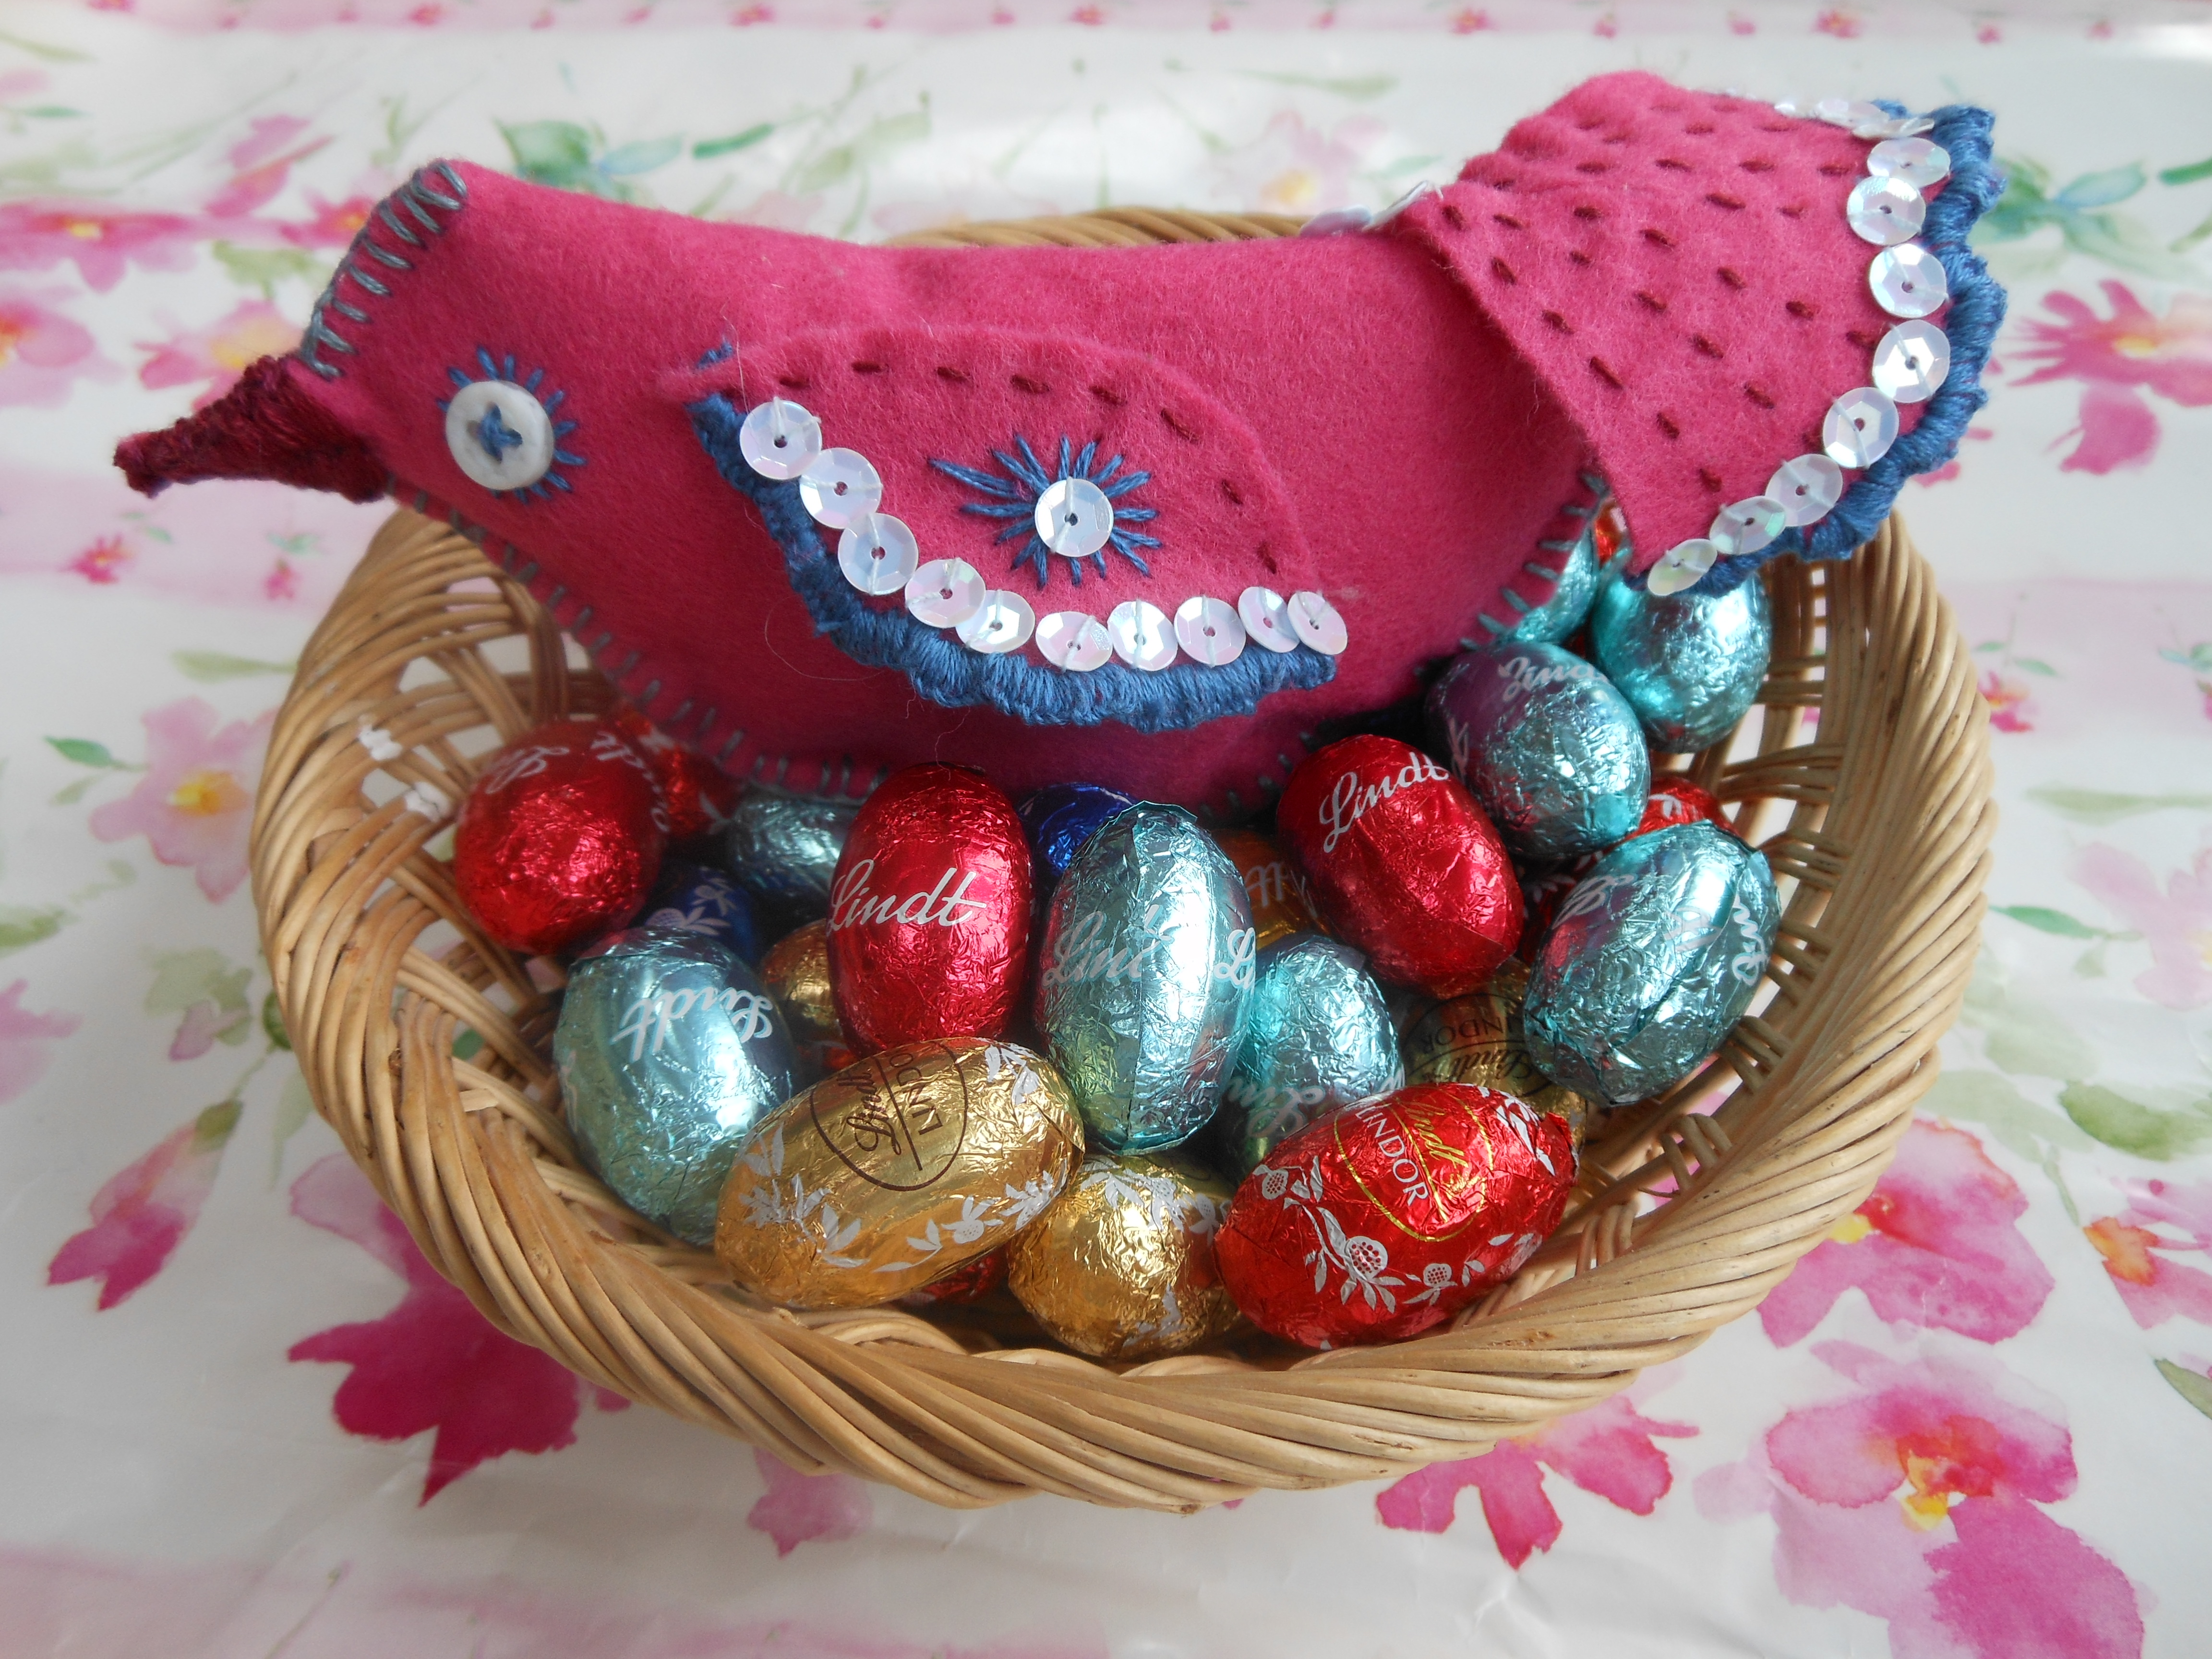
SPRING BIRD
Spring and Easter are almost here so here’s a sparkly little bird to make to nestle on a basket of tiny chocolate eggs.
Paper to make patterns
Felt in a single colour or various colours if you prefer a more colourful bird.
Embroidery threads in a variety of complimentary colours
A few sequins and two buttons
Sewing cotton
Dressmaking pins
Embroidery needles
Cotton wool wadding
A little basket
Some chocolate eggs
- Working from the shapes below of (a) bird’s body (b) bird’s tail and (c) 2 bird’s wings, make your own paper patterns. Cut these out and pin to the felt, then cut out the felt shapes.
- Embroider the tail first, using two colours of three strands of embroidery thread and buttonhole stitch and running stitch then sew on the sequins with sewing cotton. Then embroider the 2 wings to match. Next, embroider the bird’s body by embroidering the bird’s eyelashes in a daisy shape and then sew on the button eyes with sewing cotton. Finally embroider its beak with buttonhole stitch.
- Next sew the wings to each side of the bird’s body with running stitch, and then sew the tail at the back of the body, finishing the join with 3 sequins.
- Fold the bird’s body over and stuff the cavity with cotton wool, Then sew the 2 sides of the bird’s body together using buttonhole stitch, and finally sew the tops of the bird’s head together with buttonhole stitch to match.
I photographed this bird on a little basket of eggs but you could fill the basket with cotton wool or moss.
|
|
FEBRUARY 2013
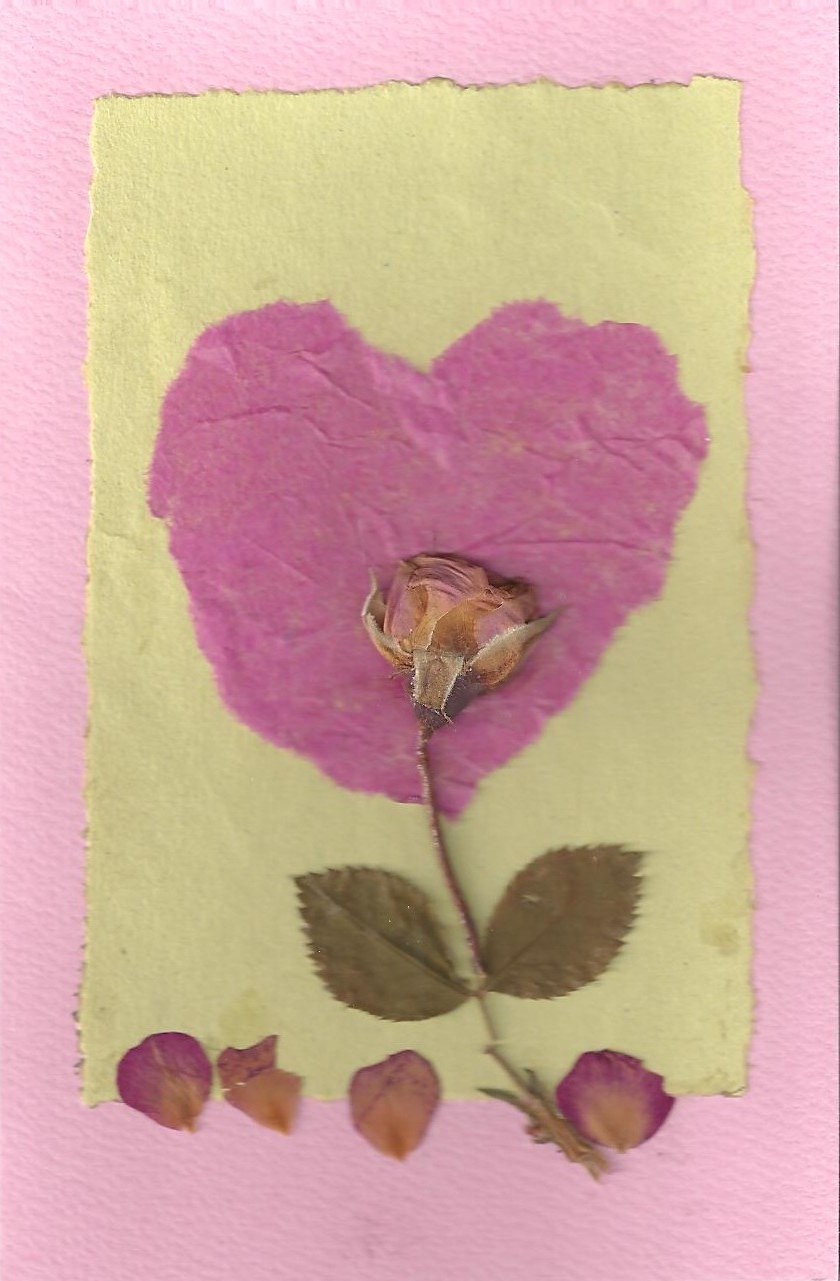
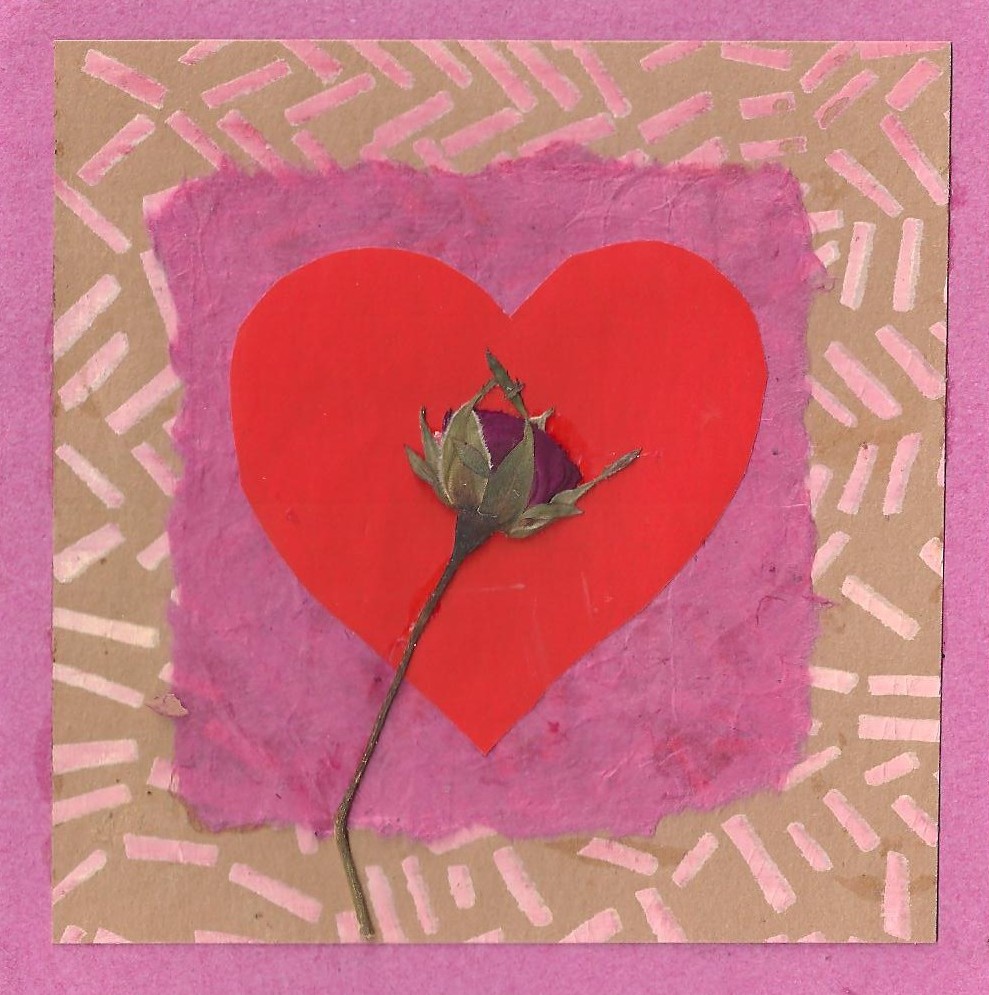
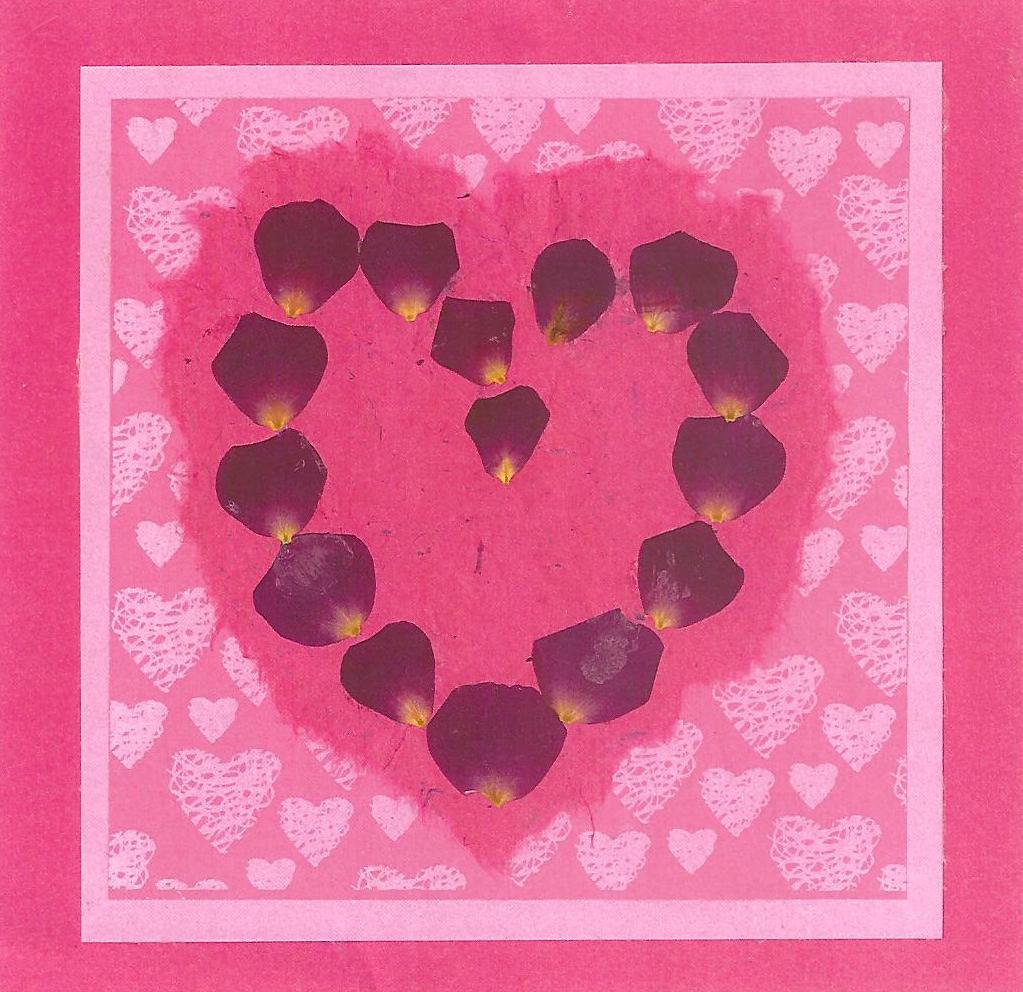
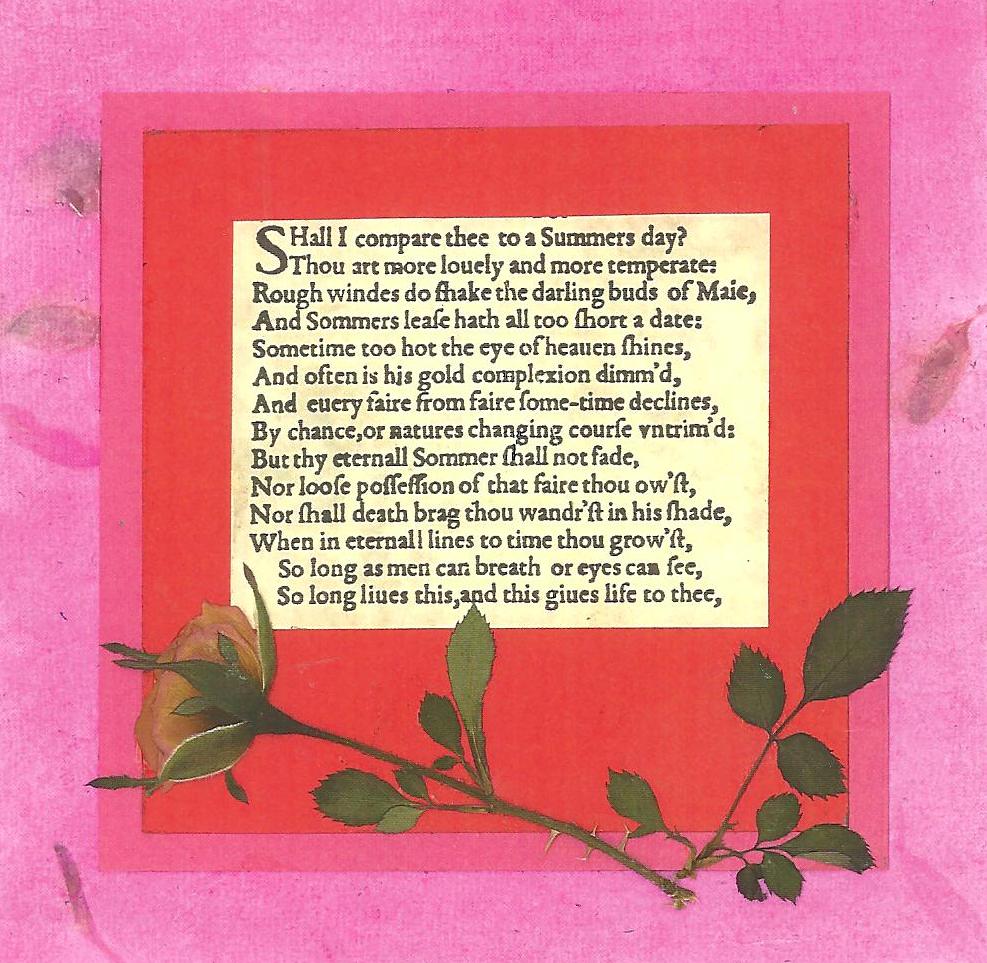
Why not show your loved ones you really care about them by making them something special this month? Hand-made Valentine cards can easily be made to your own designs and with a bit of imagination can be created from all sorts of materials found around the house. Left over gift-wrap, paper lace, ribbons, fabrics, pressed flowers, card and papers from previous art projects can all be used. Text can be as soulful, jokey, poetic or witty as you choose.
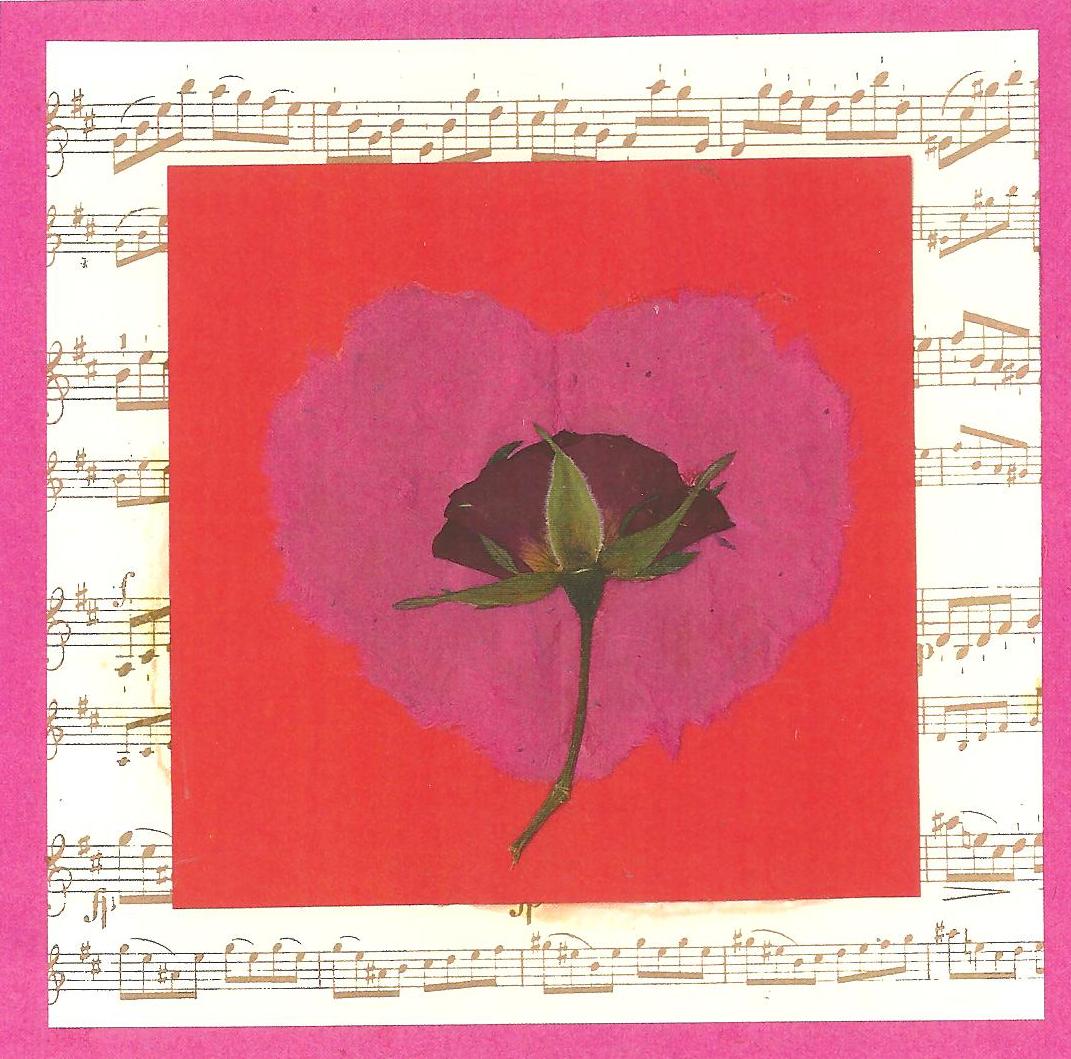
Here are some I made out of just these kinds of materials using rose buds and petals I’d pressed in the summer. One design uses sheet music and another has a Shakespeare love sonnet as a background for the roses.
|
|
JANUARY 2013
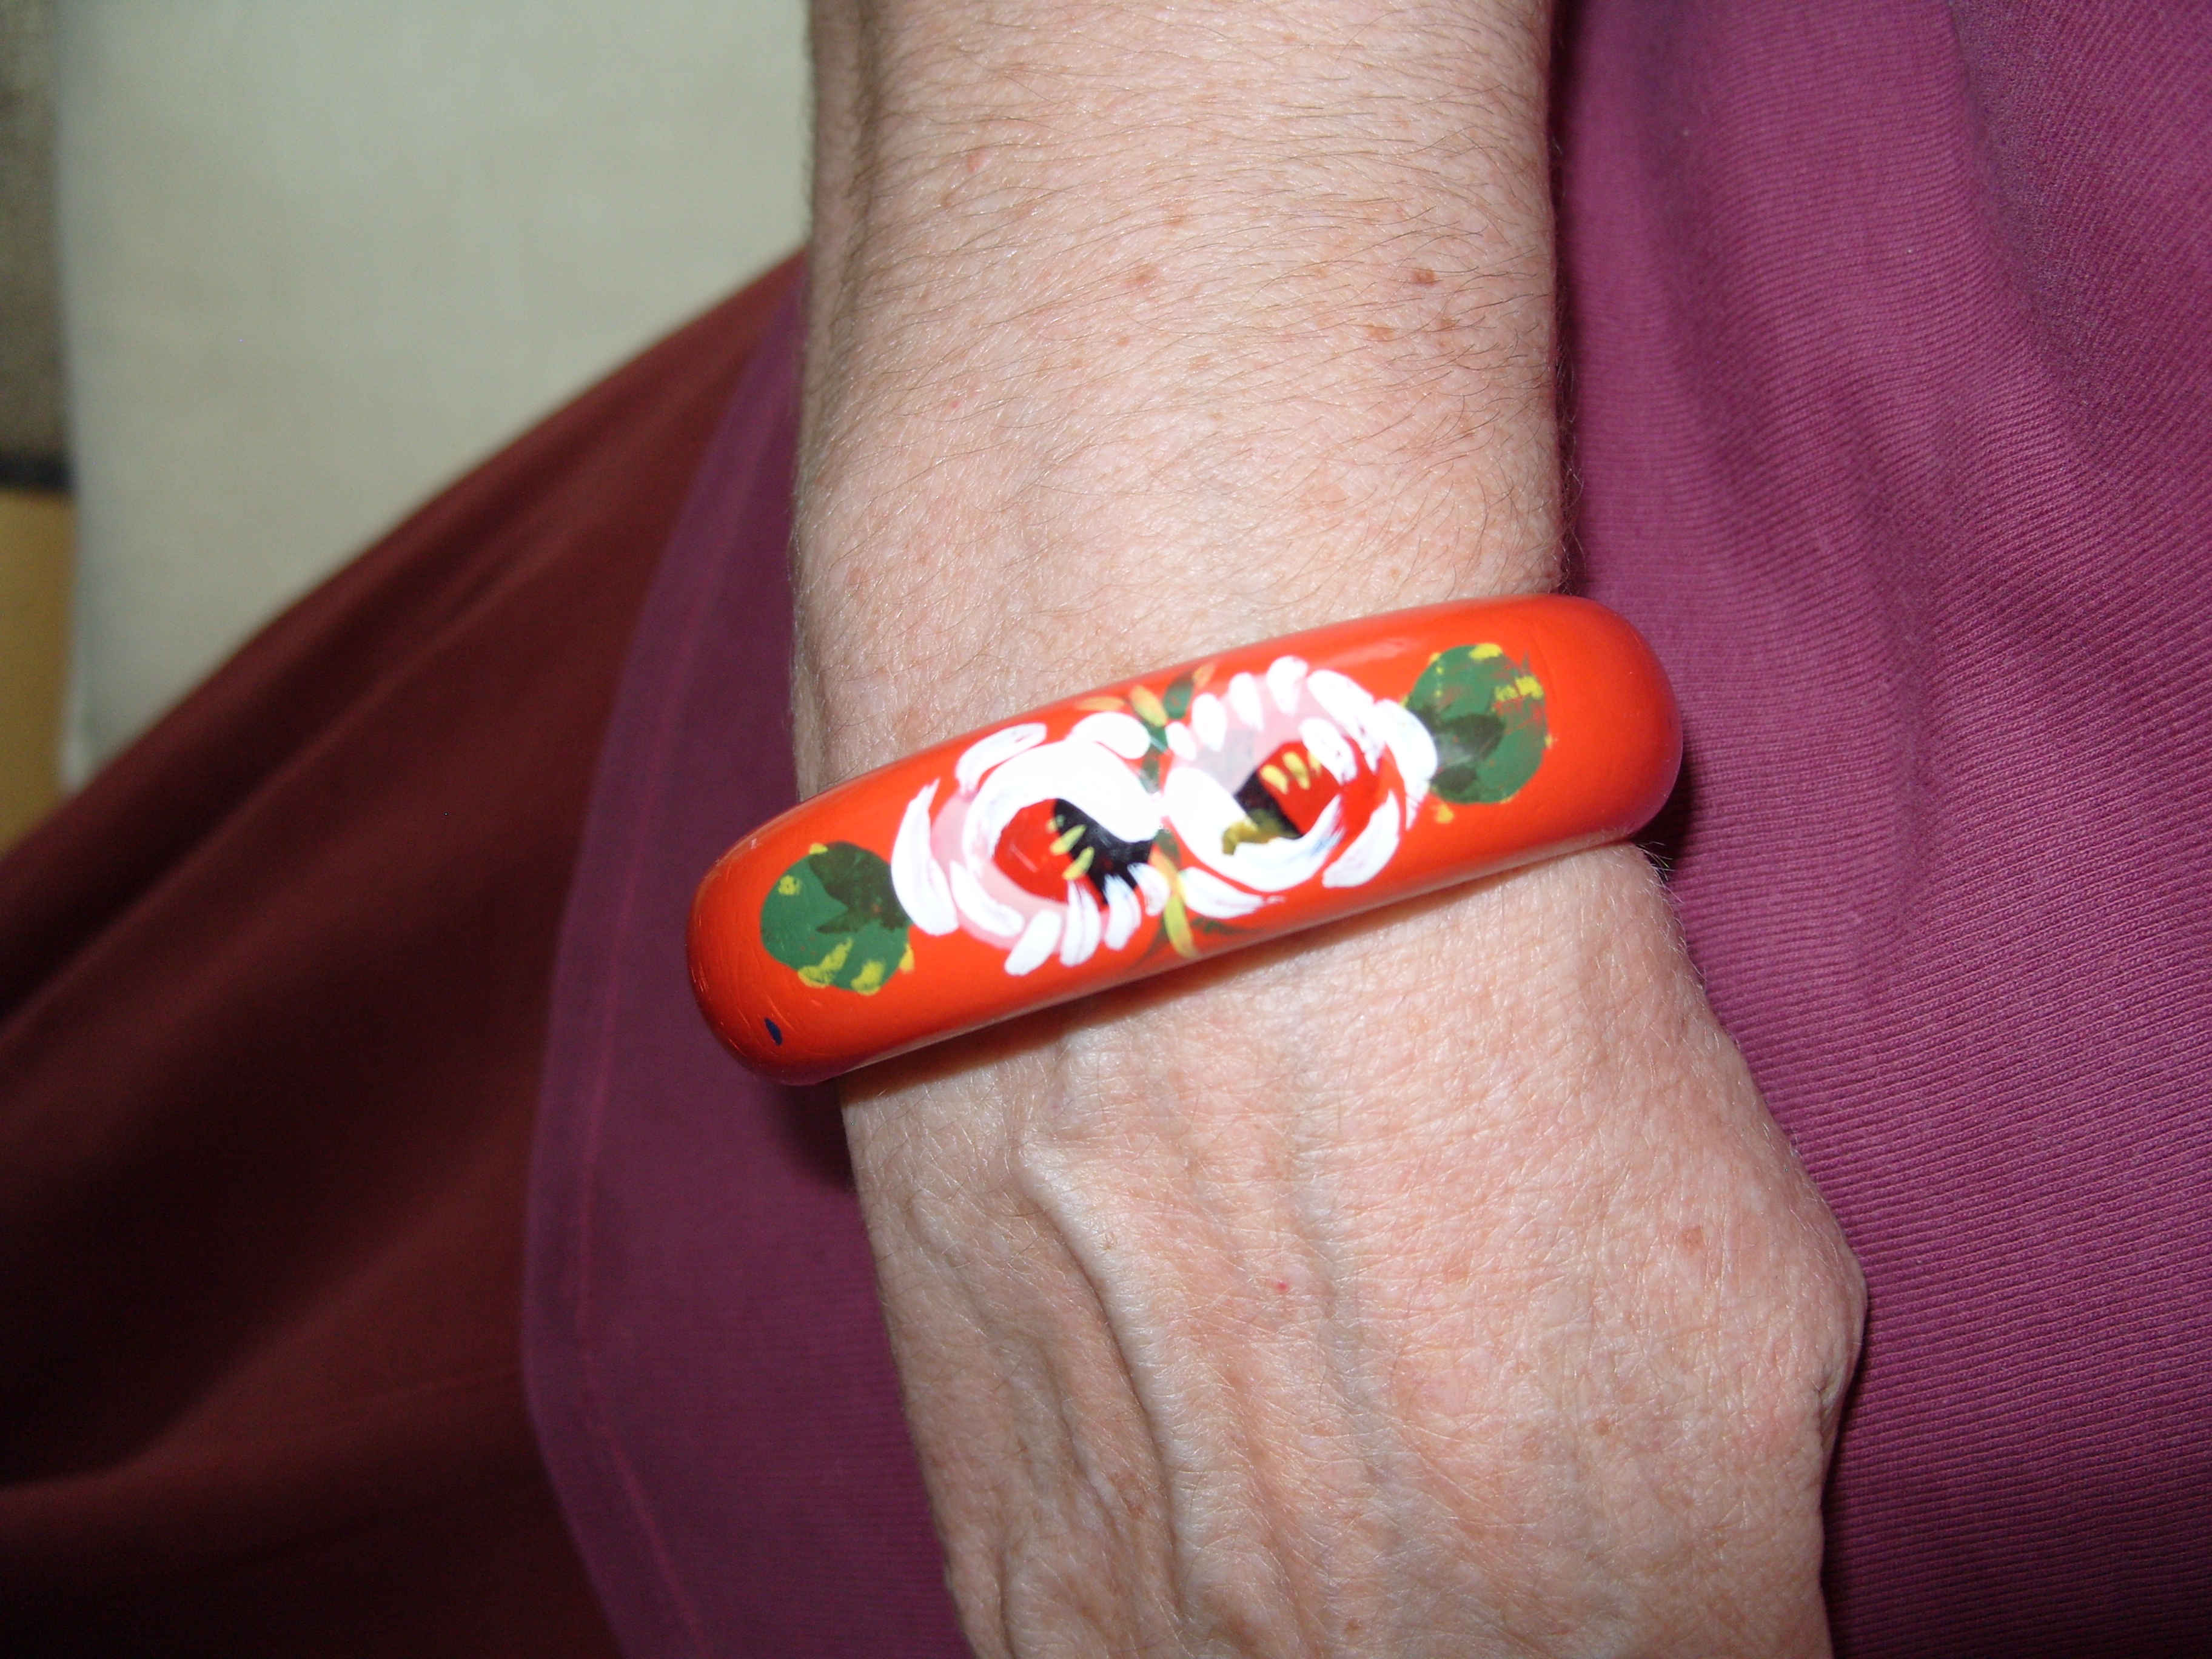
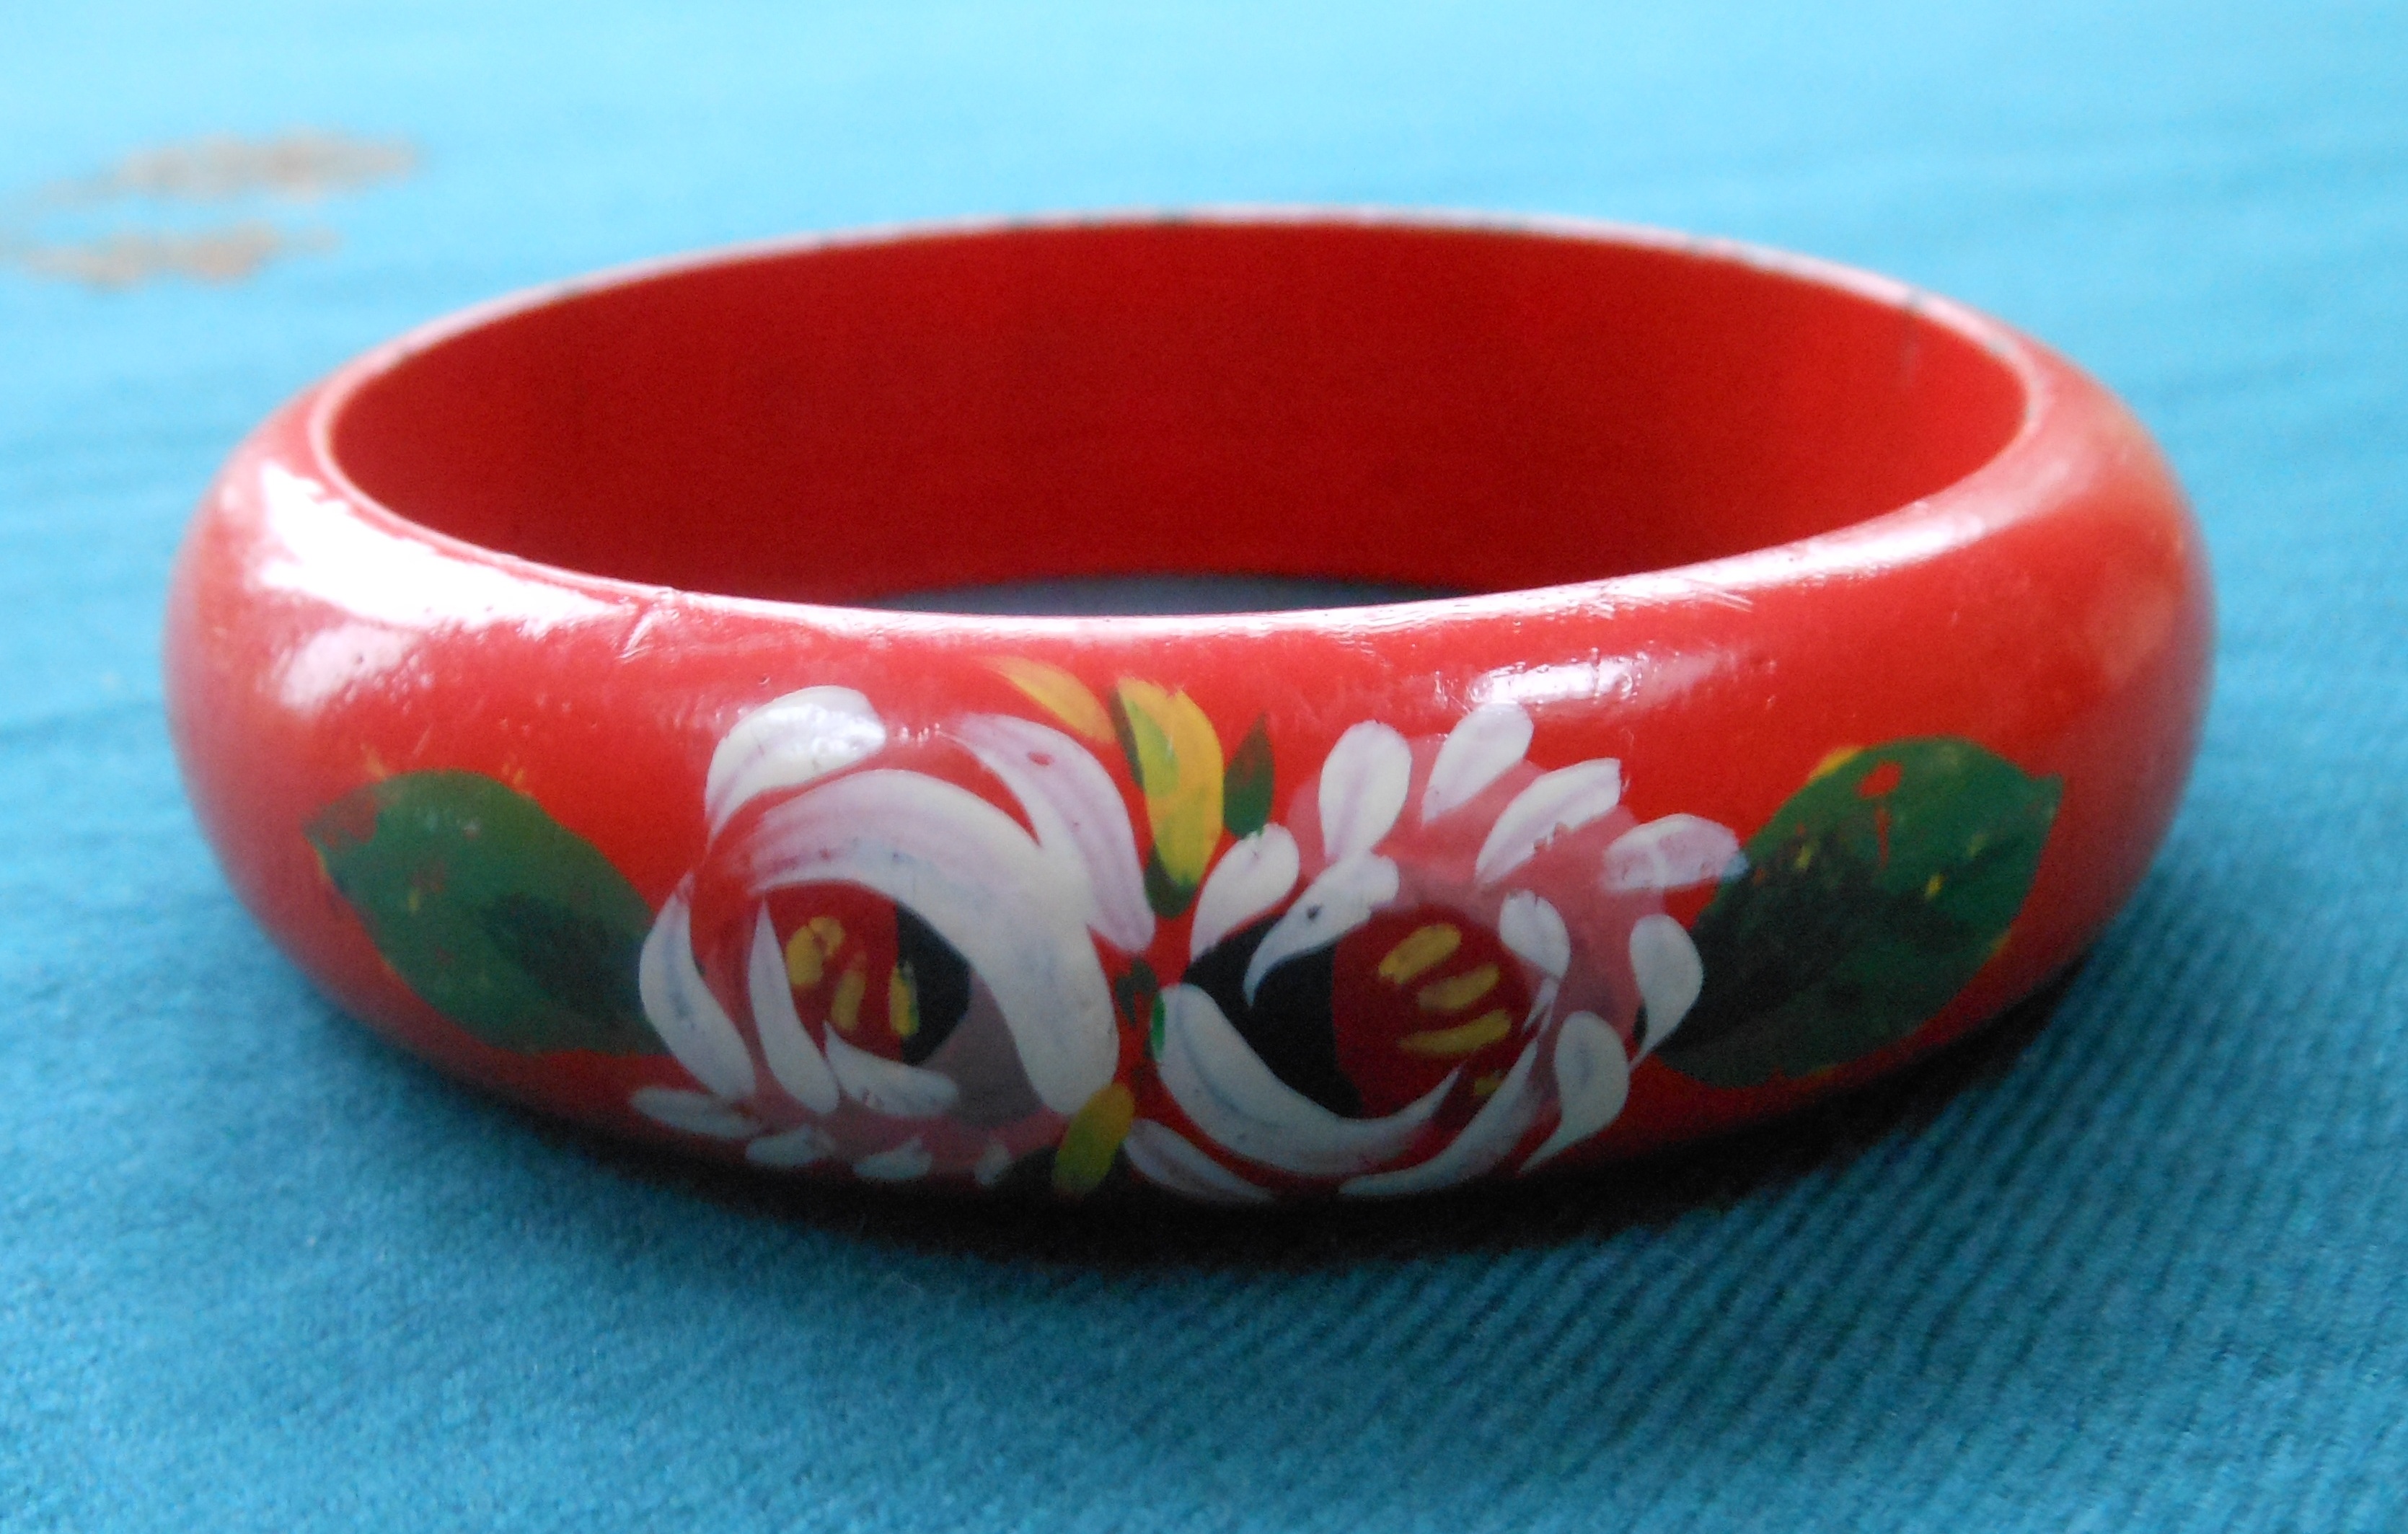
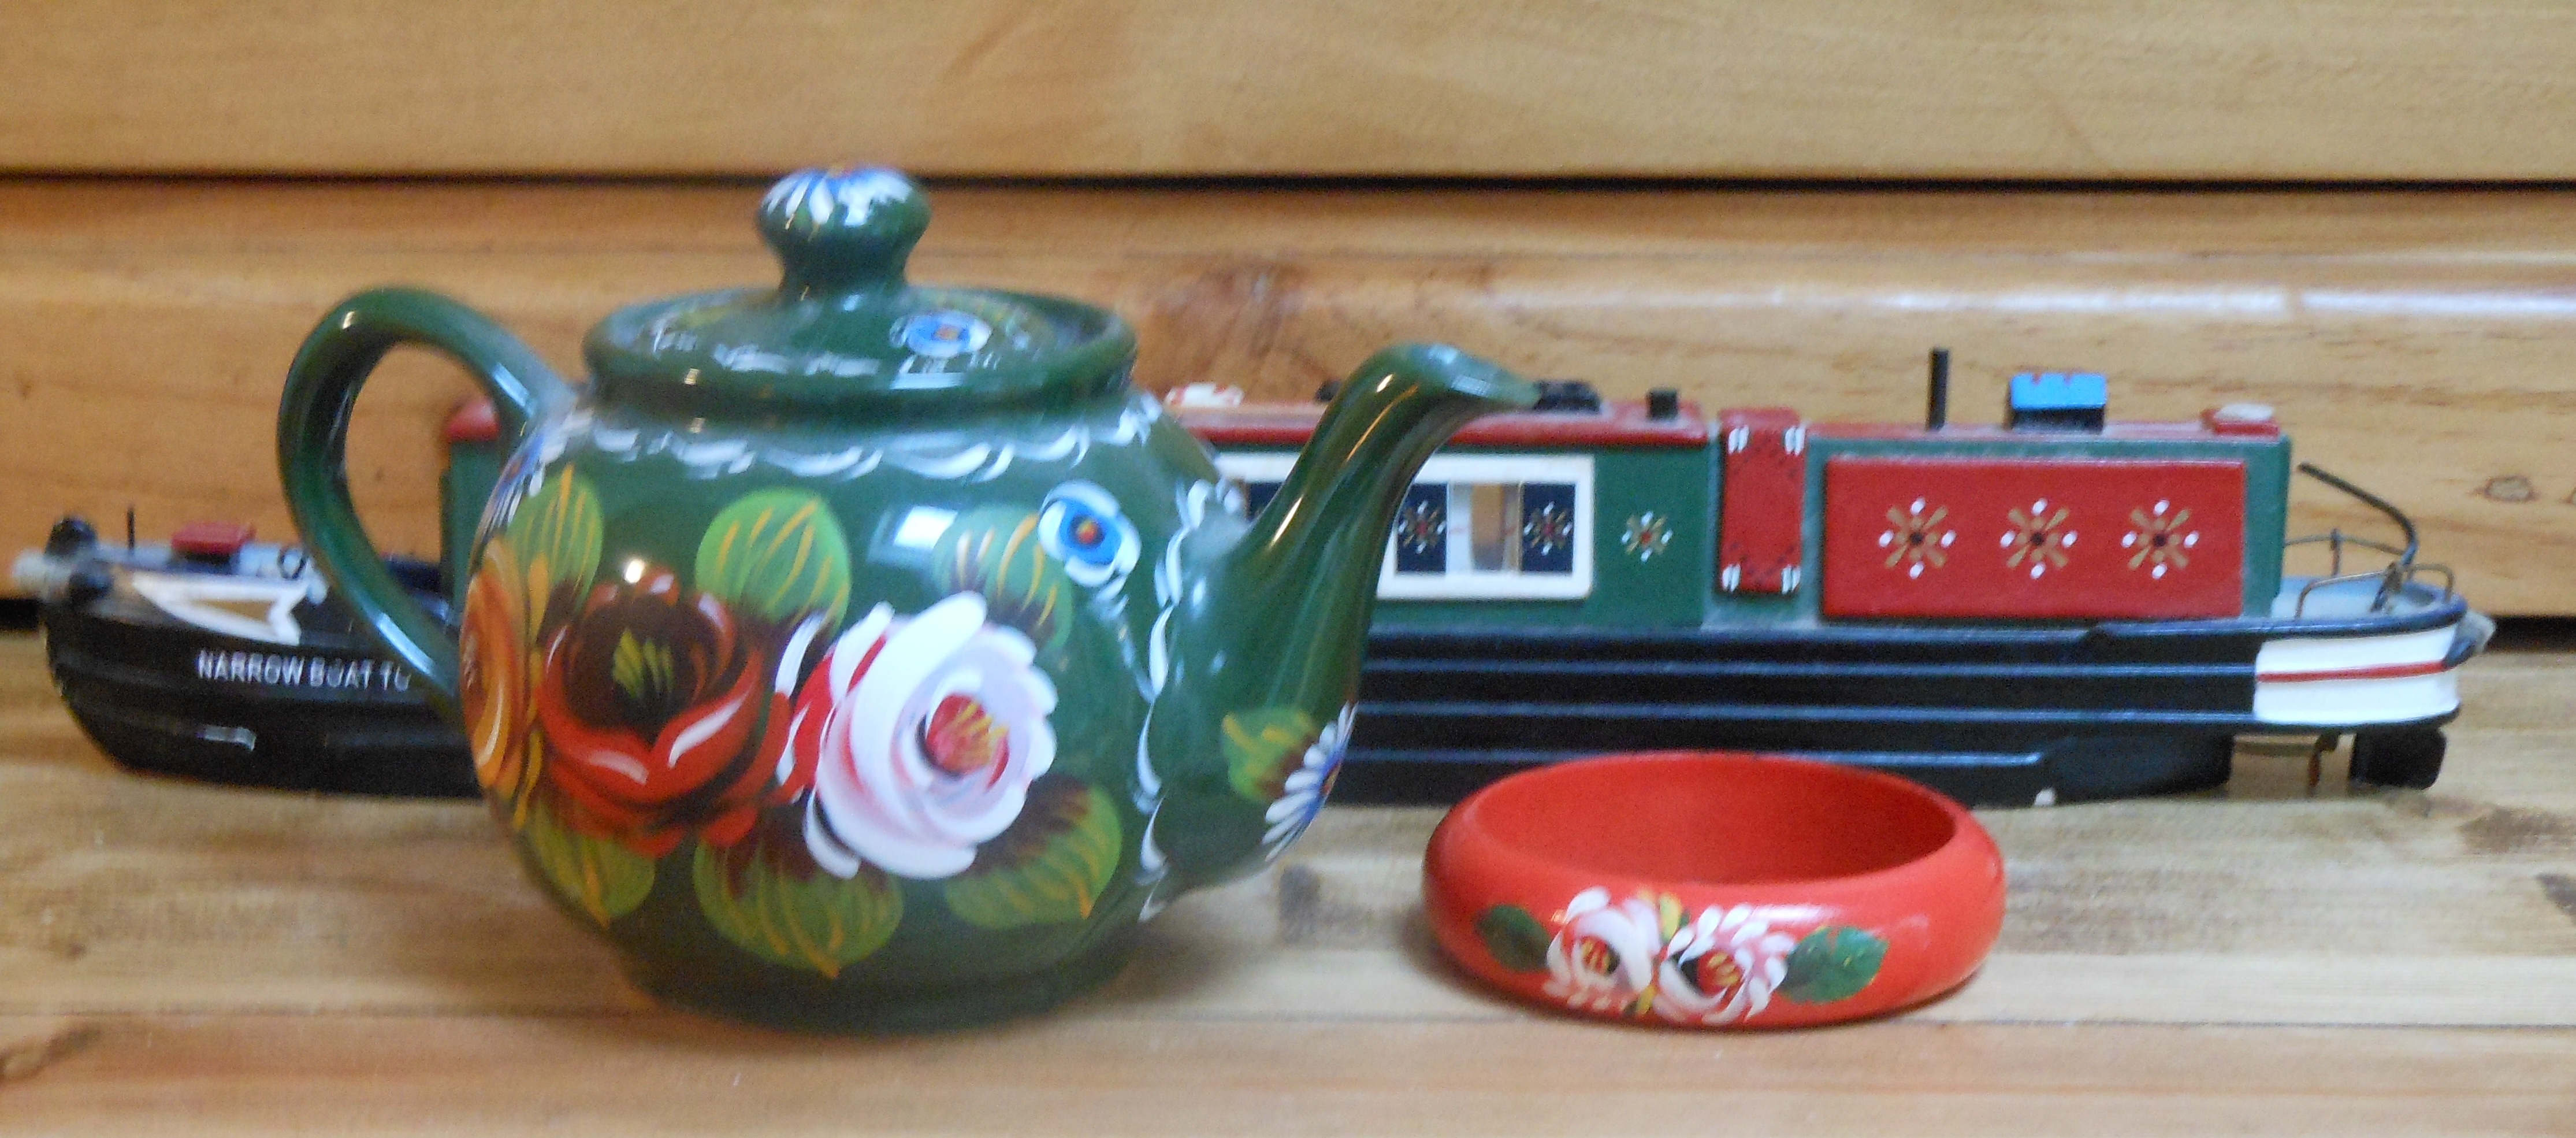
REVAMP A BANGLE WITH NARROW BOAT PAINTING MOTIFS
New Year, near resolutions! Why not learn a new craft to start the year on an interesting note? A shabby bangle can easily be transformed with materials you probably have around the house. Or you can get them at your local craft supplier.
I used an old wooden bangle and began by sanding it down, then painted it with a layer of primer. I left it to dry then painted it with undercoat and when this was dry I painted it with a glossy coat of scarlet oil-based paint as the background colour to my design.
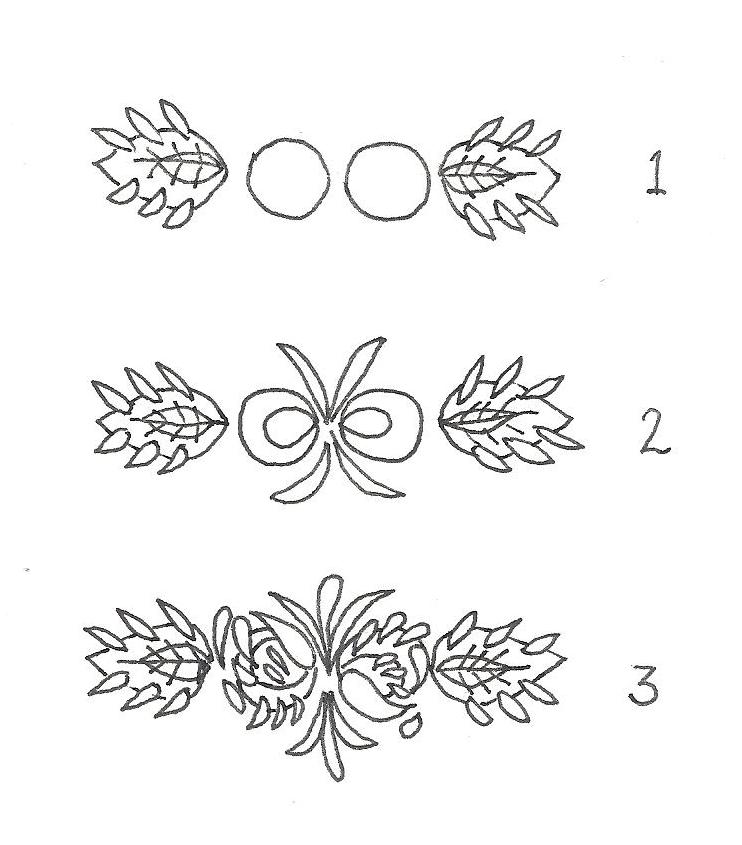
Following instructions in A J Lewery’s fascinating book NARROW BOAT PAINTING, I chose a simple traditional rose and leaf motif which I repeated on both sides of the bangle. See the sketch below to see the different painting stages.
When the scarlet coat was dry, using enamel paints for all the decorative work I began by painting the leaves in some dark green I had left over from another project. When this paint was still wet I brushed in a dark brown shadow to contrast with the green which gives a three dimensional effect and contrasts well with the lighter coloured roses. When this was dry, I added spiky veins in black and little flecks of yellow at the edges.
When the leaves had dried I painted the blobs of maroon enamel paint to form the circular base of the roses. When these were nearly dry I brushed in a smaller circle in dark brown to give an impression of depth to the rose, and added a few flecks of dark green where the two roses in each design meet in the middle. The colour of roses used in traditional narrow boat painting is invariably red, white or yellow and I chose to paint my roses in white. When the base of the roses was dry I brushed in petals in white with stylised brush strokes and finally finished it with a few flecks in yellow. This design is very hard wearing and the paint does not easily chip with use.
You’ll need s variety of brush sizes to get the right effect for the motifs. I used a mop head for the blobs, a round head for the petals and leaves and a linear script for detailing in this project. Don’t forget to clean your brushes afterwards in white spirit and then soap and water to keep them in good condition for the next project.
|
|
DECEMBER 2012
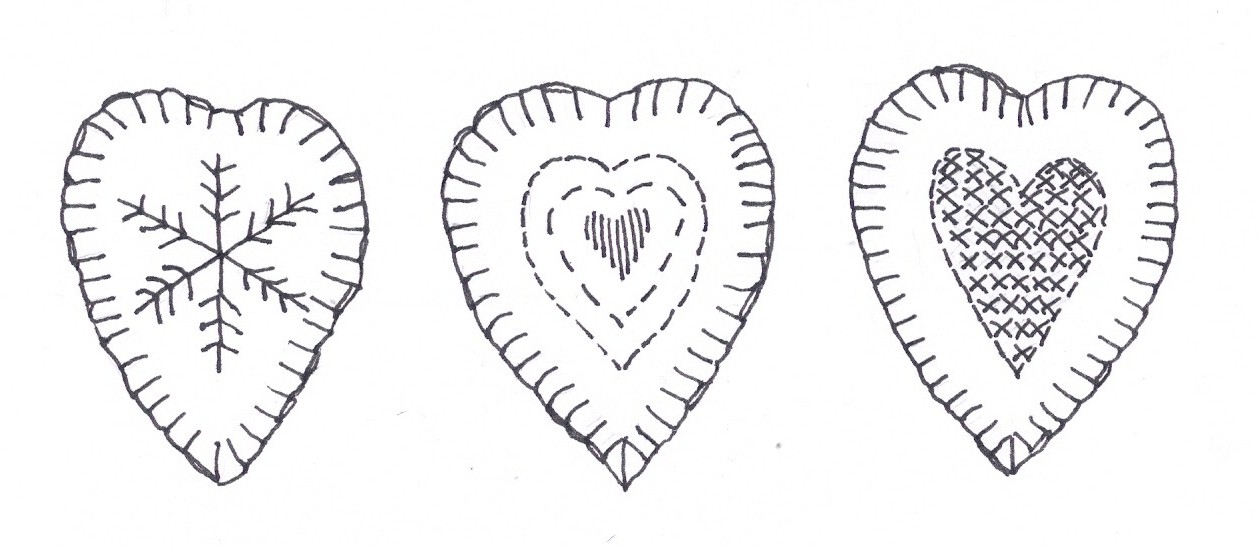
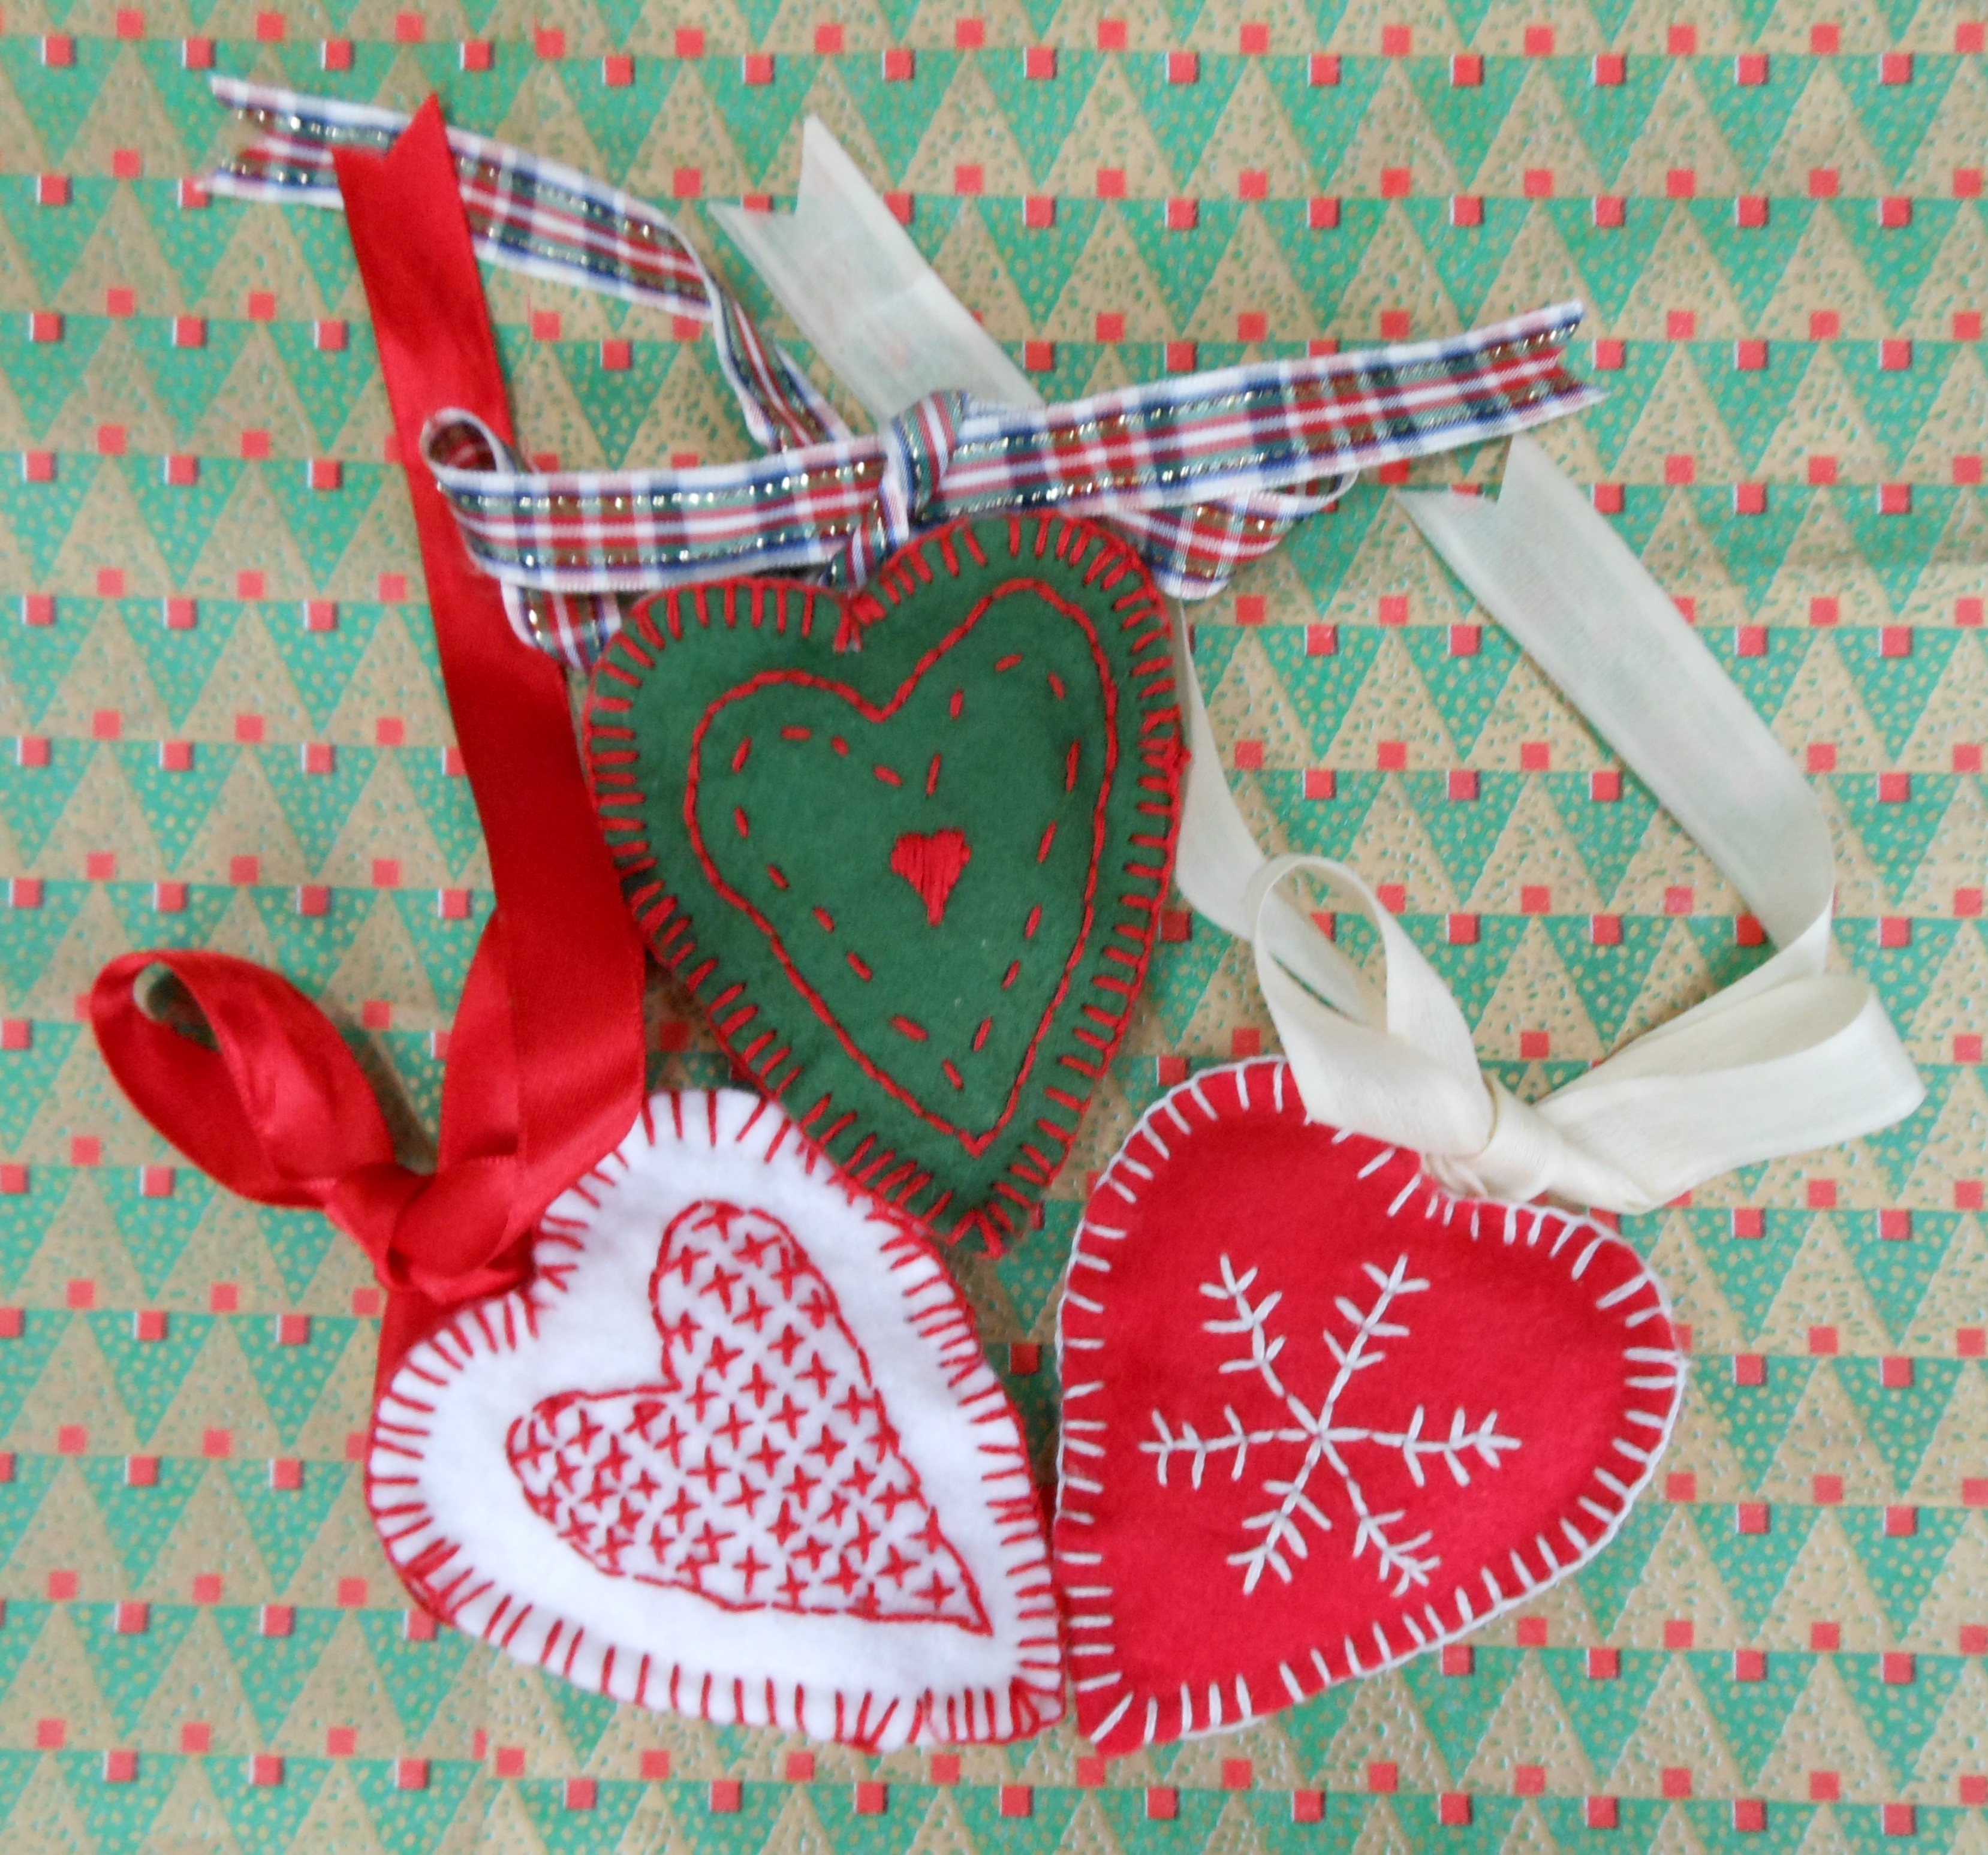
HAND MADE HEARTS CHRISTMAS TREE DECORATIONS
These folksy little Christmas hearts add a natural touch to decorations for the tree. Created from off-cuts of felt and embroidery silks they are easily made and give scope for your own imagination. You could make star or bauble shapes and embroider them with your own traditional designs.
Materials: To make 3 as shown: 3 off-cuts of 12” x 12” (31cm x 31cm) felt scraps in red, green and white; 6-stranded embroidery silks in red, green and white; 3 x 18” (46cm) lengths of oddments of left-over ribbon or raffia to blend in with the hearts; cotton wool wadding.
Needles and notions: Dressmaking scissors and pins; paper and pencil to make pattern template; embroidery needles.
On some paper, draw a heart shape similar to the designs shown in the photograph 3” (8cm) long and 2 ½” (6.5cm) at widest part. Cut out to use as the template. Fold over one of the squares of felt and pin the template onto it. Cut round the edges and you will create two hearts shapes. Because these items are made of felt and are very small you do not need to use an embroidery frame to avoid stretching.
They are only embroidered on one side. Decide what pattern you want to embroider and begin in the centre of one of the felt heart shapes. I used a variety of stitches: satin stitch for the centre heart in the green heart, with back stitch and running stitch borders as shown. For the red heart I used only back stitch to make the snowflake pattern and for the white heart I used a cross stitch interior pattern and edged it with a back stitch border.
When you’ve finished embroidering the motifs, place the decorated heart over its plain matching other half and fill the space between with cotton wool wadding. Holding the wadding in place with one hand, using blanket stitch, sew the two hearts together. Do this with each of the hearts, choosing embroidery silks to contrast with the background colour.
Finally, cut lengths of ribbon or raffia and sew to the back of each heart. Tie into a bow at the front and use the lengths to tie the hearts to the tree.
|
|
NOVEMBER 2012
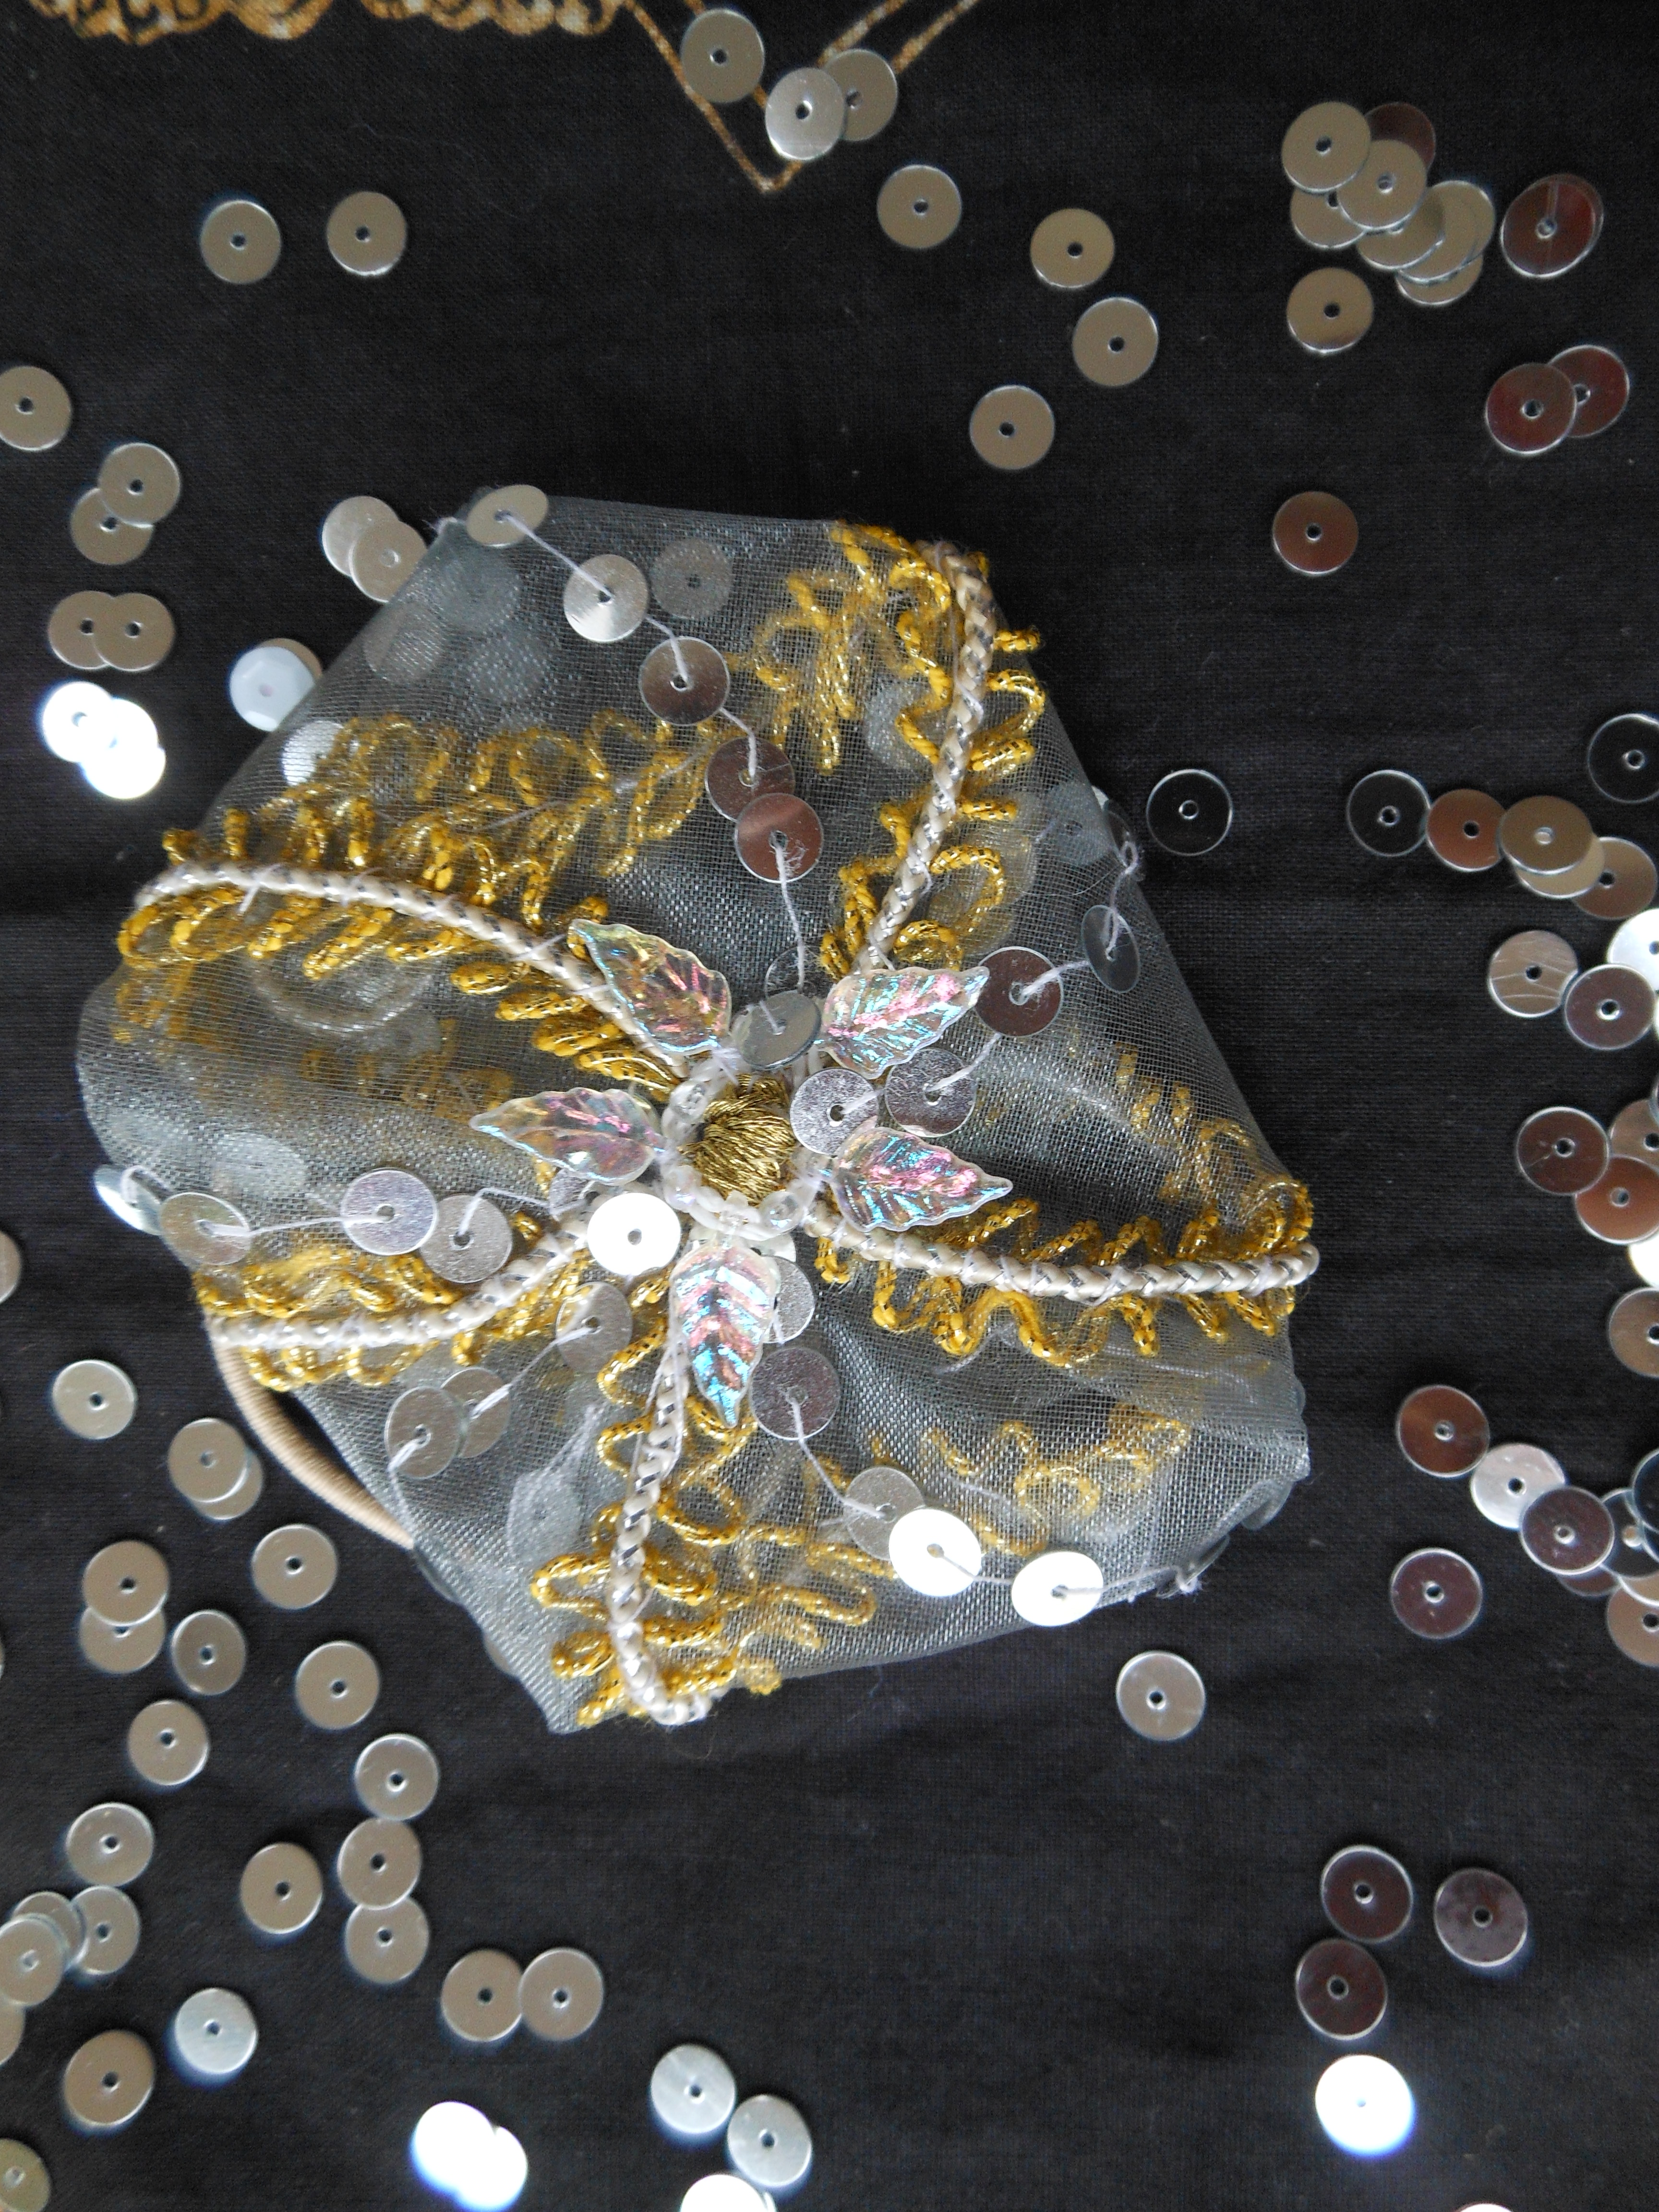
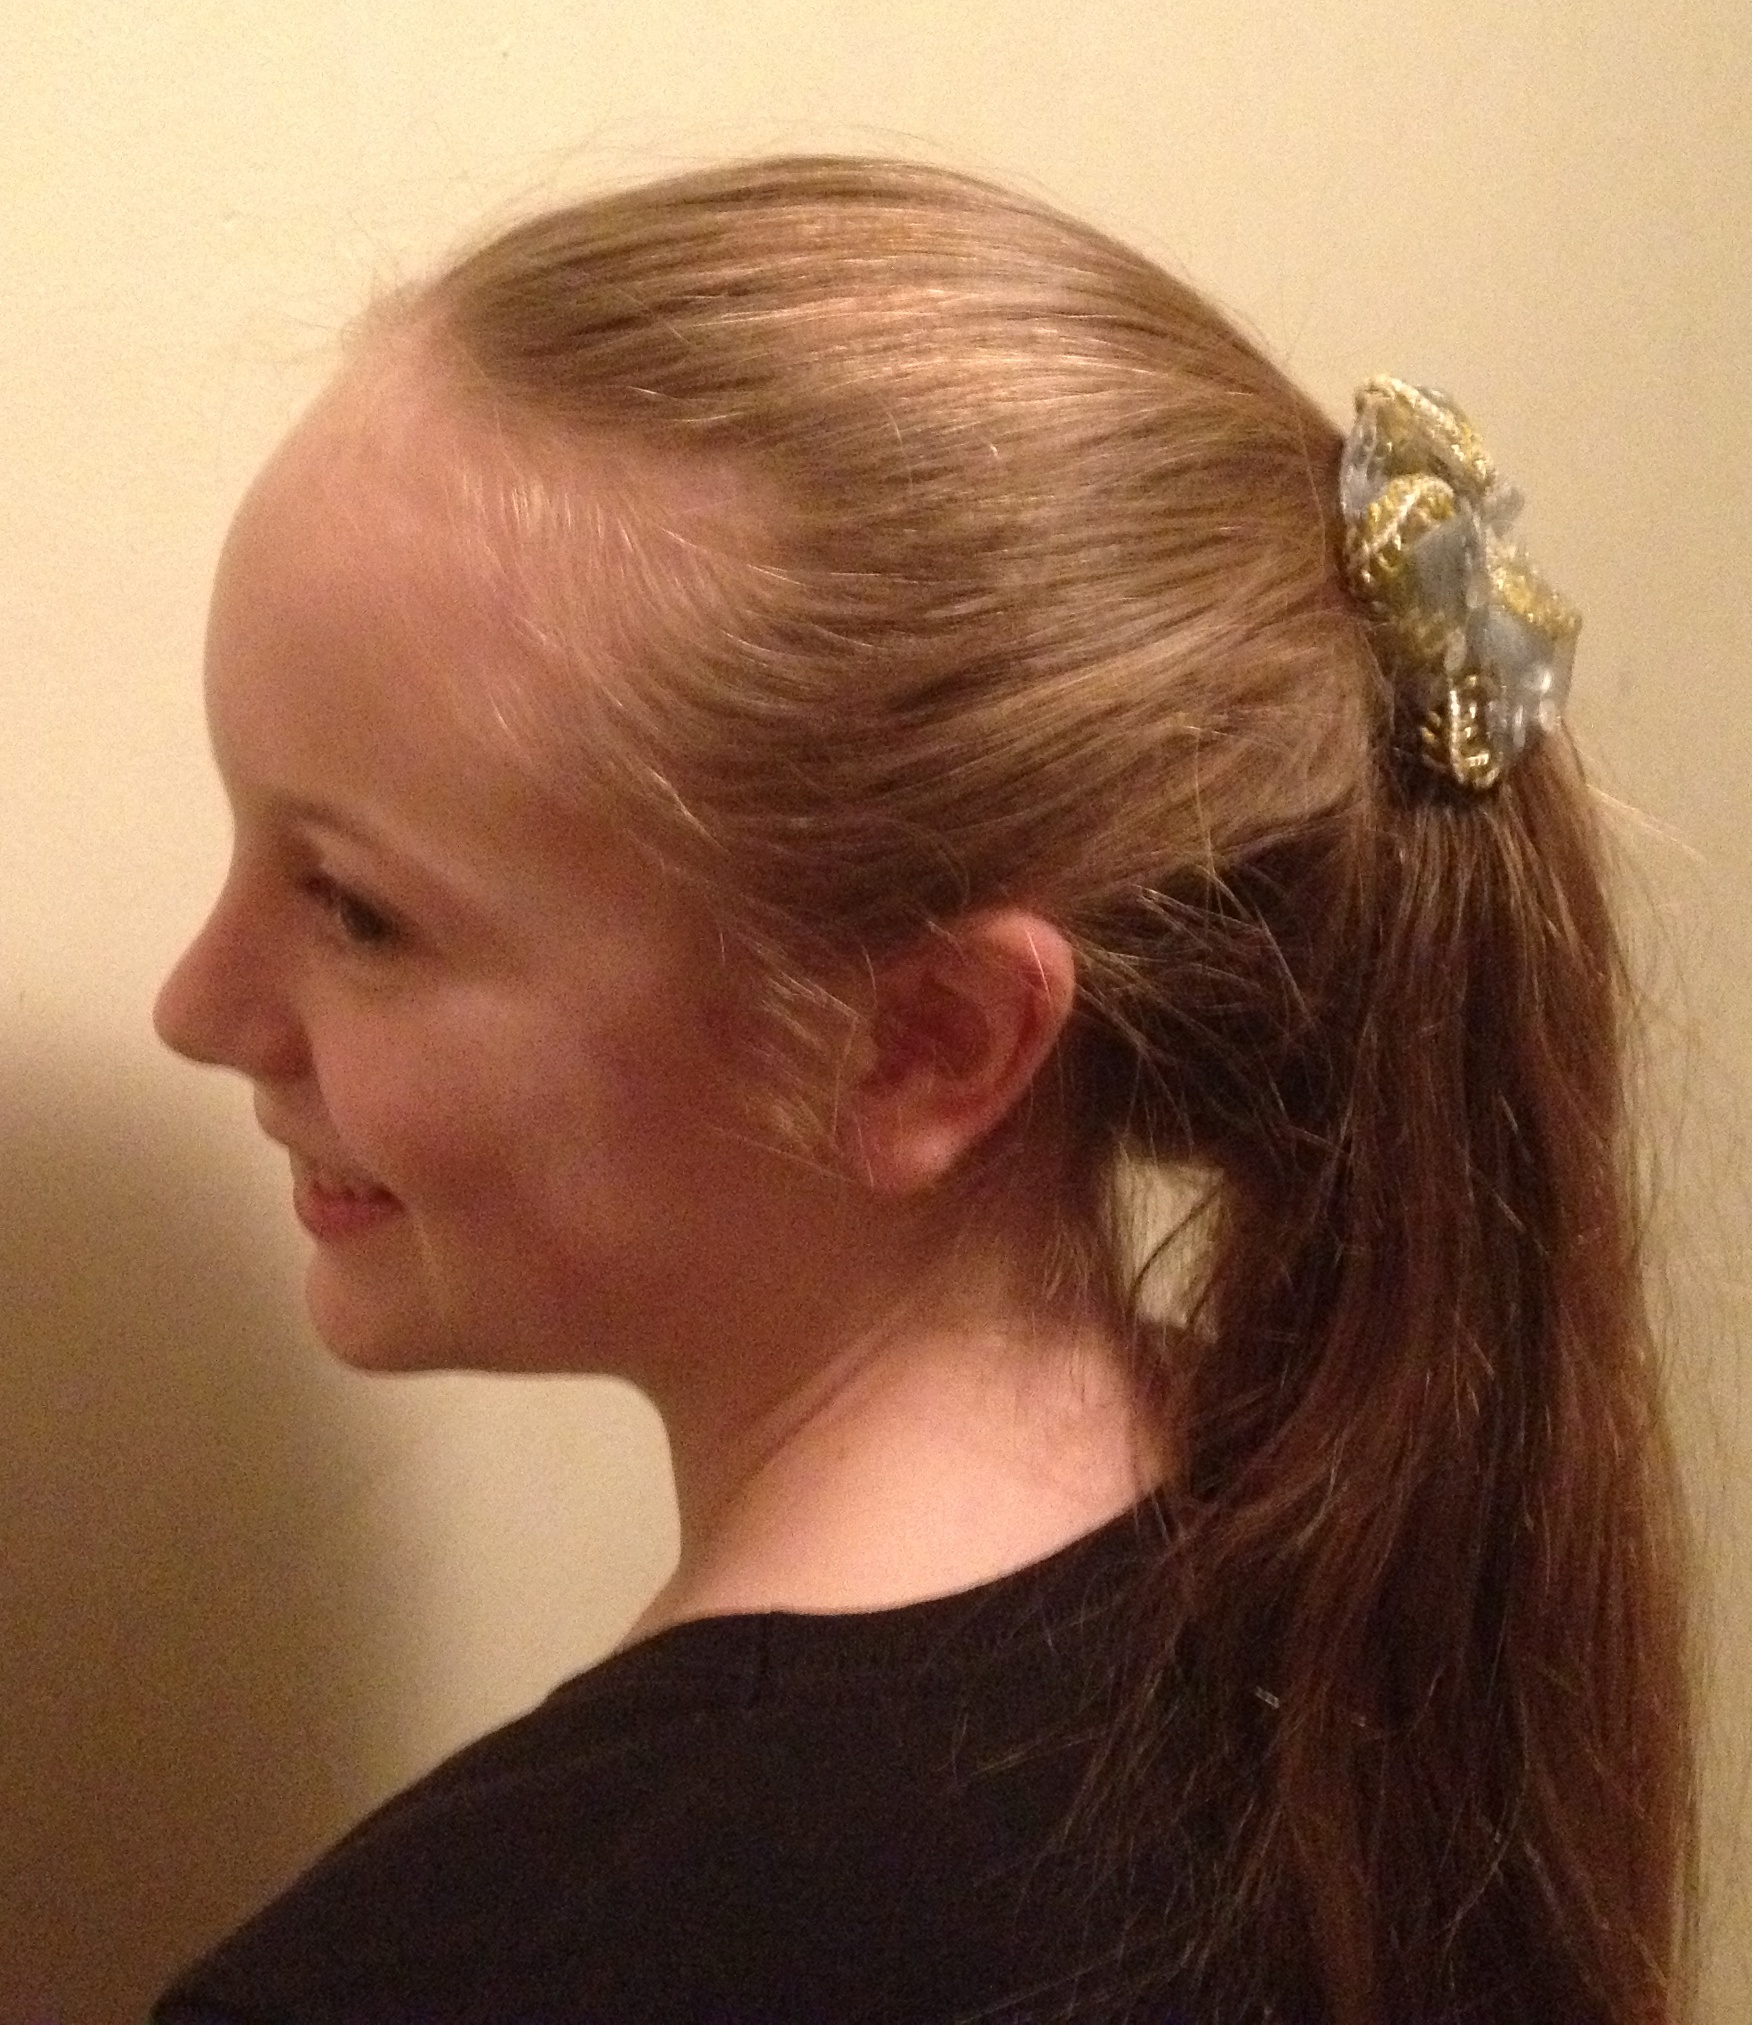
HAIR SPARKLER
I made this sparkly pony-tail hair bobble decorated with sequins for my 10- year-old granddaughter to wear to Bonfire Night parties, using only re-cycled materials I found in my cupboards.
Materials:
14” (35cm) circle of smoky grey gauze
About 60 silver sequins
22”(56cm) sparkly silver elastic cord
22” (56cm) yellow and gold wrapping cord
3” (8cm) iridescent plastic leaf-decorated trimming
White cotton sewing thread
A hair bobble
Pink the edges of the gauze with pinking shears to stop the edges fraying then place the gauze within a 9” (23cm) embroidery hoop. Embroider in firework design as shown in diagram below, then remove from frame and cut out to form a 7” (18cm) circle. Pink these edges then fold the gauze over at the back and sew down to make a hexagonal shape. Turn over and sew a bobble at the front in the gold cord. Arrange the iridescent plastic around this so that the leaves point outward and surround the bobble. Turn over and sew the hair bobble to the back. 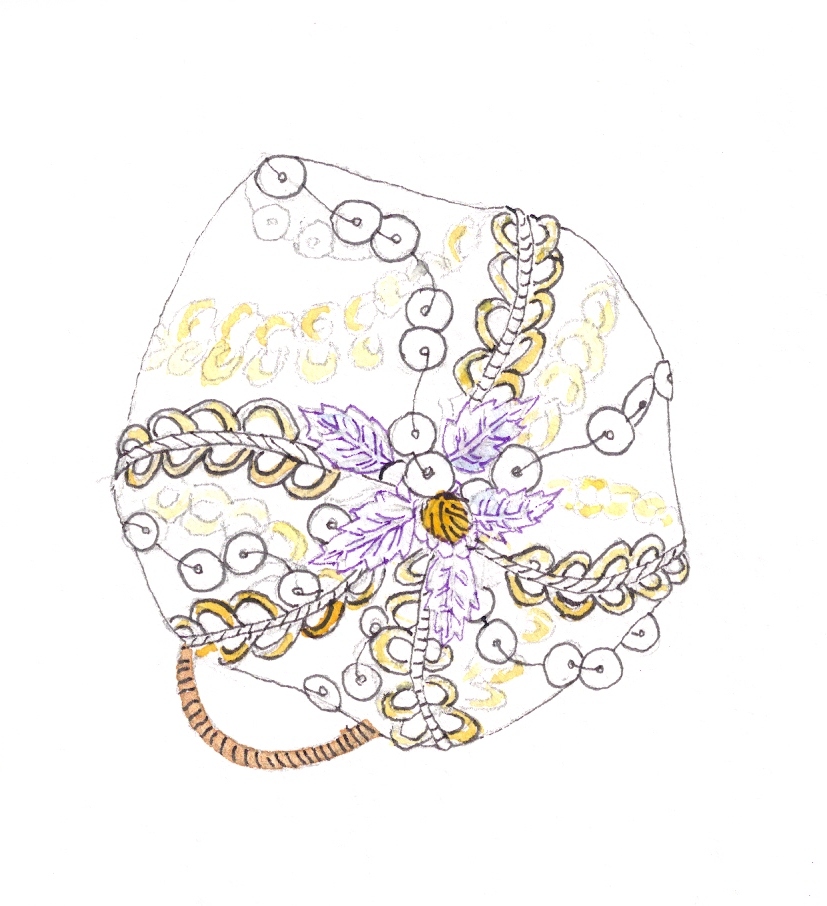 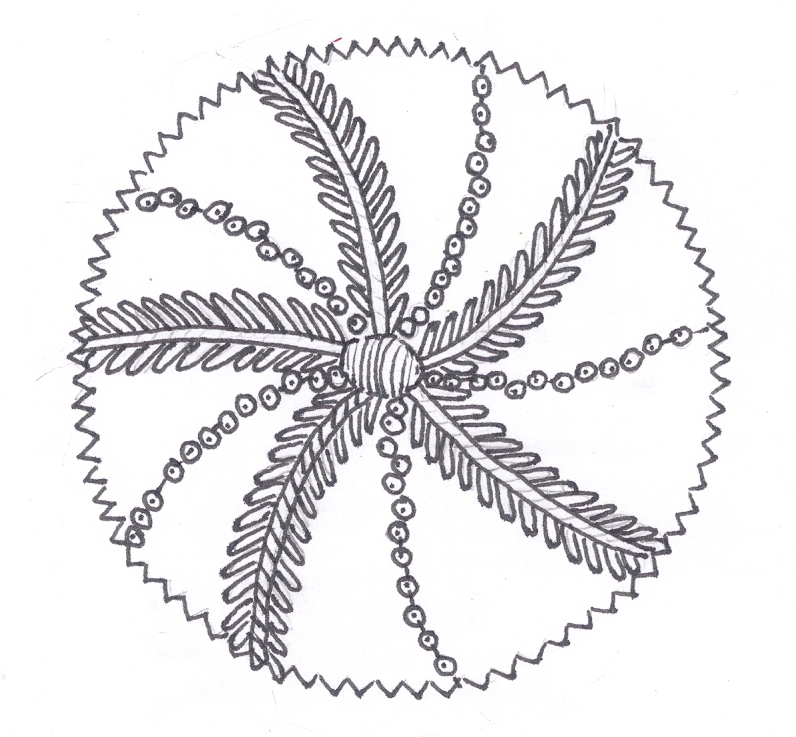
|
|
OCTOBER 2012
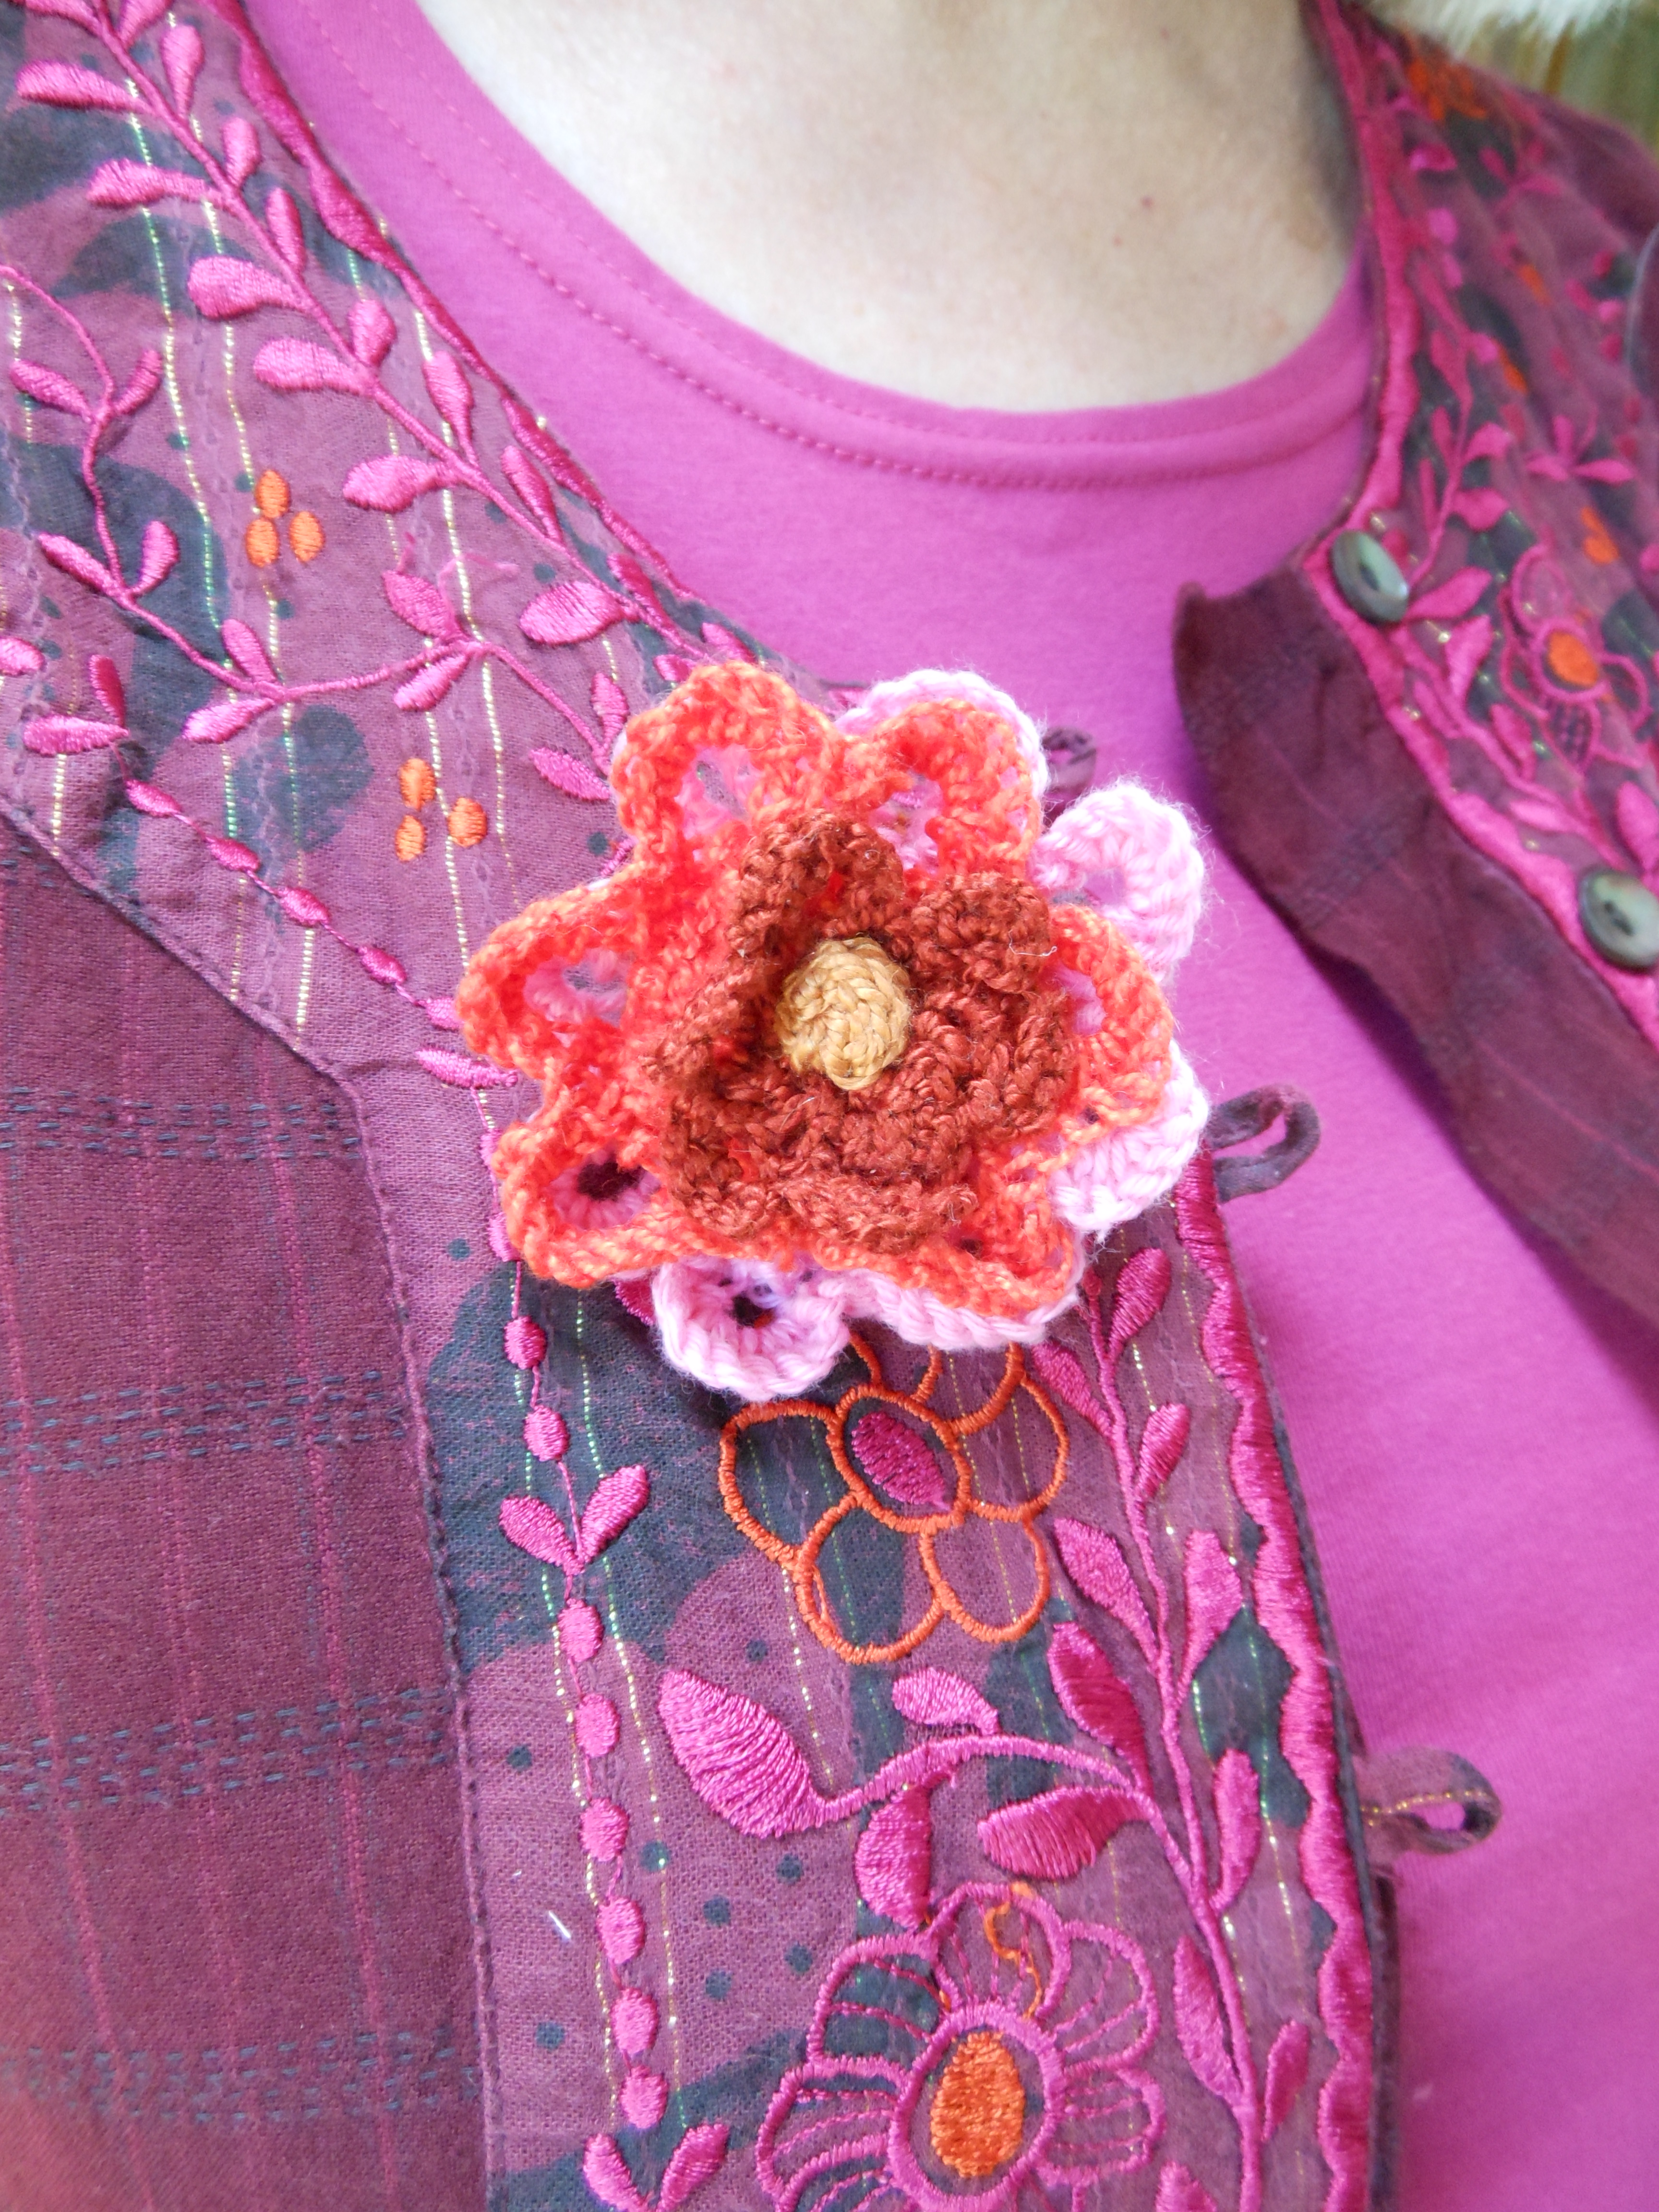
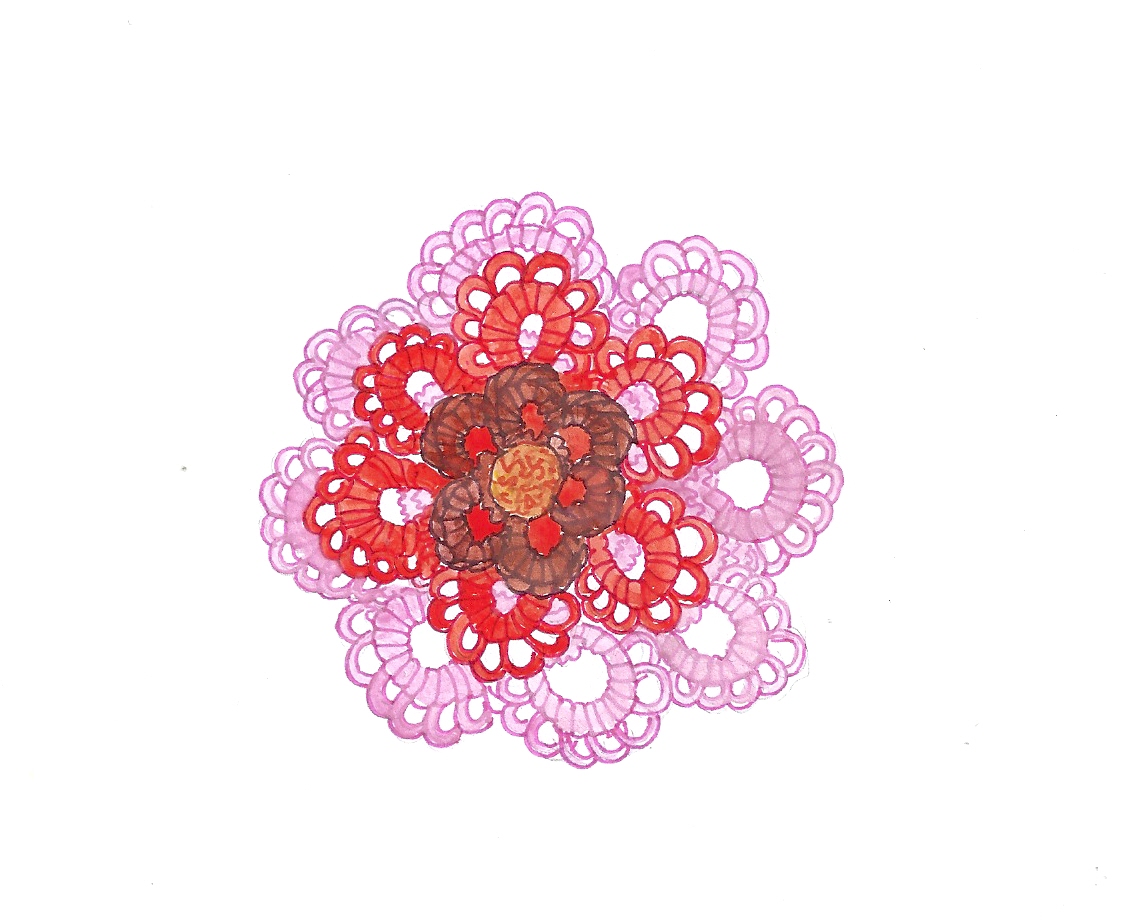
DAHLIA BROOCH
Inspired by the dahlias at Biddulph Grange, the National Trust garden in Staffordshire, I designed this brooch in knitted lace. You could make it in a day and it will brighten up an outfit or make a pretty gift.
Materials: Small quantities (less than 1oz (25g) of cotton oddments in four different colours); I used 4 ply pink cotton, two-ply scarlet mercerised cotton, and 2-ply silk in two different colours: burgundy and gold; 1 pair of 2.75mm, UK12 (US2) knitting needles; 1 pair of 3.25mm UK10 (US3) knitting needles; a wide-eyed embroidery needle; a small piece of felt to match the colour scheme of your choice; a safety pin; dressmaking pins; embroidery scissors.
To make the first outer lacy layer of petals: Using the 2.75mm needles and pink 4-ply cotton cast on 90sts. Row 1: P. Row 2: K2, *k1, sl this st back onto LH needle and lift the next 8 sts over this st and off the needle, y2on, then k first st again, k2.* Repeat from * - * to end. Row 3: K1, * P2tog, drop extra loop of 2 sts made in y2on in Row 2, and into this long loop (k1,K1tbl,) twice, p1* . Repeat from * - * to last st, k1. Rows 4 – 8: K to make garter st edging. Cast off, leaving a long trail of thread. Thread it through a large-eyed embroidery needle and sew both ends of knitting together to form a ring then gather at inner edge to make a flower shape. Join in and then cut off thread.
Make second inner lacy layer of petals: Using scarlet 2-ply mercerised cotton and 2.75mm needles cast on 68 sts. Work as for first layer of petals. When second layer of petals is in a flower shape, sew on top of first layer of pink petals.
Third inner lacy layer of petals: Using 2-ply burgundy silk and 2.76 needles cast on 4 sts. Row 1: K1, P3. Row 2: K1, yon, k1tbl, yon, sl1, k1, psso. Row 3: K1, p2 (k1,p1,k1,p1) into next st, p1. Row 4: cast off 4 sts, k1, yon, sl1, k1, psso. Repeat Rows 1 – 4 6 times, cast off. Join this layer of petals into a ring and sew to the pink and scarlet layers of petals.
Make a bobble: Using size 3.25 mm UK Size10 (US 3) and 2 ply gold silk cast on 1 st.( k1, p1, k1, p1, k1) into this st = (5sts). Work 6 rows in st st on these 5 sts, then pass 4 of the sts over the 5th st until 1 st remains. Leaving a long trail of silk pull this through the last st and cut off. Pull the knitting into a bobble shape, then using the embroidery needle stitch the silk bobble into the centre of the flower.
Finishing: Cut out a 2” (5cm) circle of felt and pin to the back of the flower. Using gold embroidery silk and blanket st attach felt to flower and insert a safety pin.
Abbreviations: k = knit; p = purl; sl = slip; st(s) = stitch(es) ; psso = pass the slipped st over; LH = left hand; yon = wrap yarn round needle once; y2on = wrap the yarn twice round the needle to make 2 sts; p2tog = purl 2 sts together; k1tbl = knit one st through the back of the loop. |
|
SEPTEMBER 2012
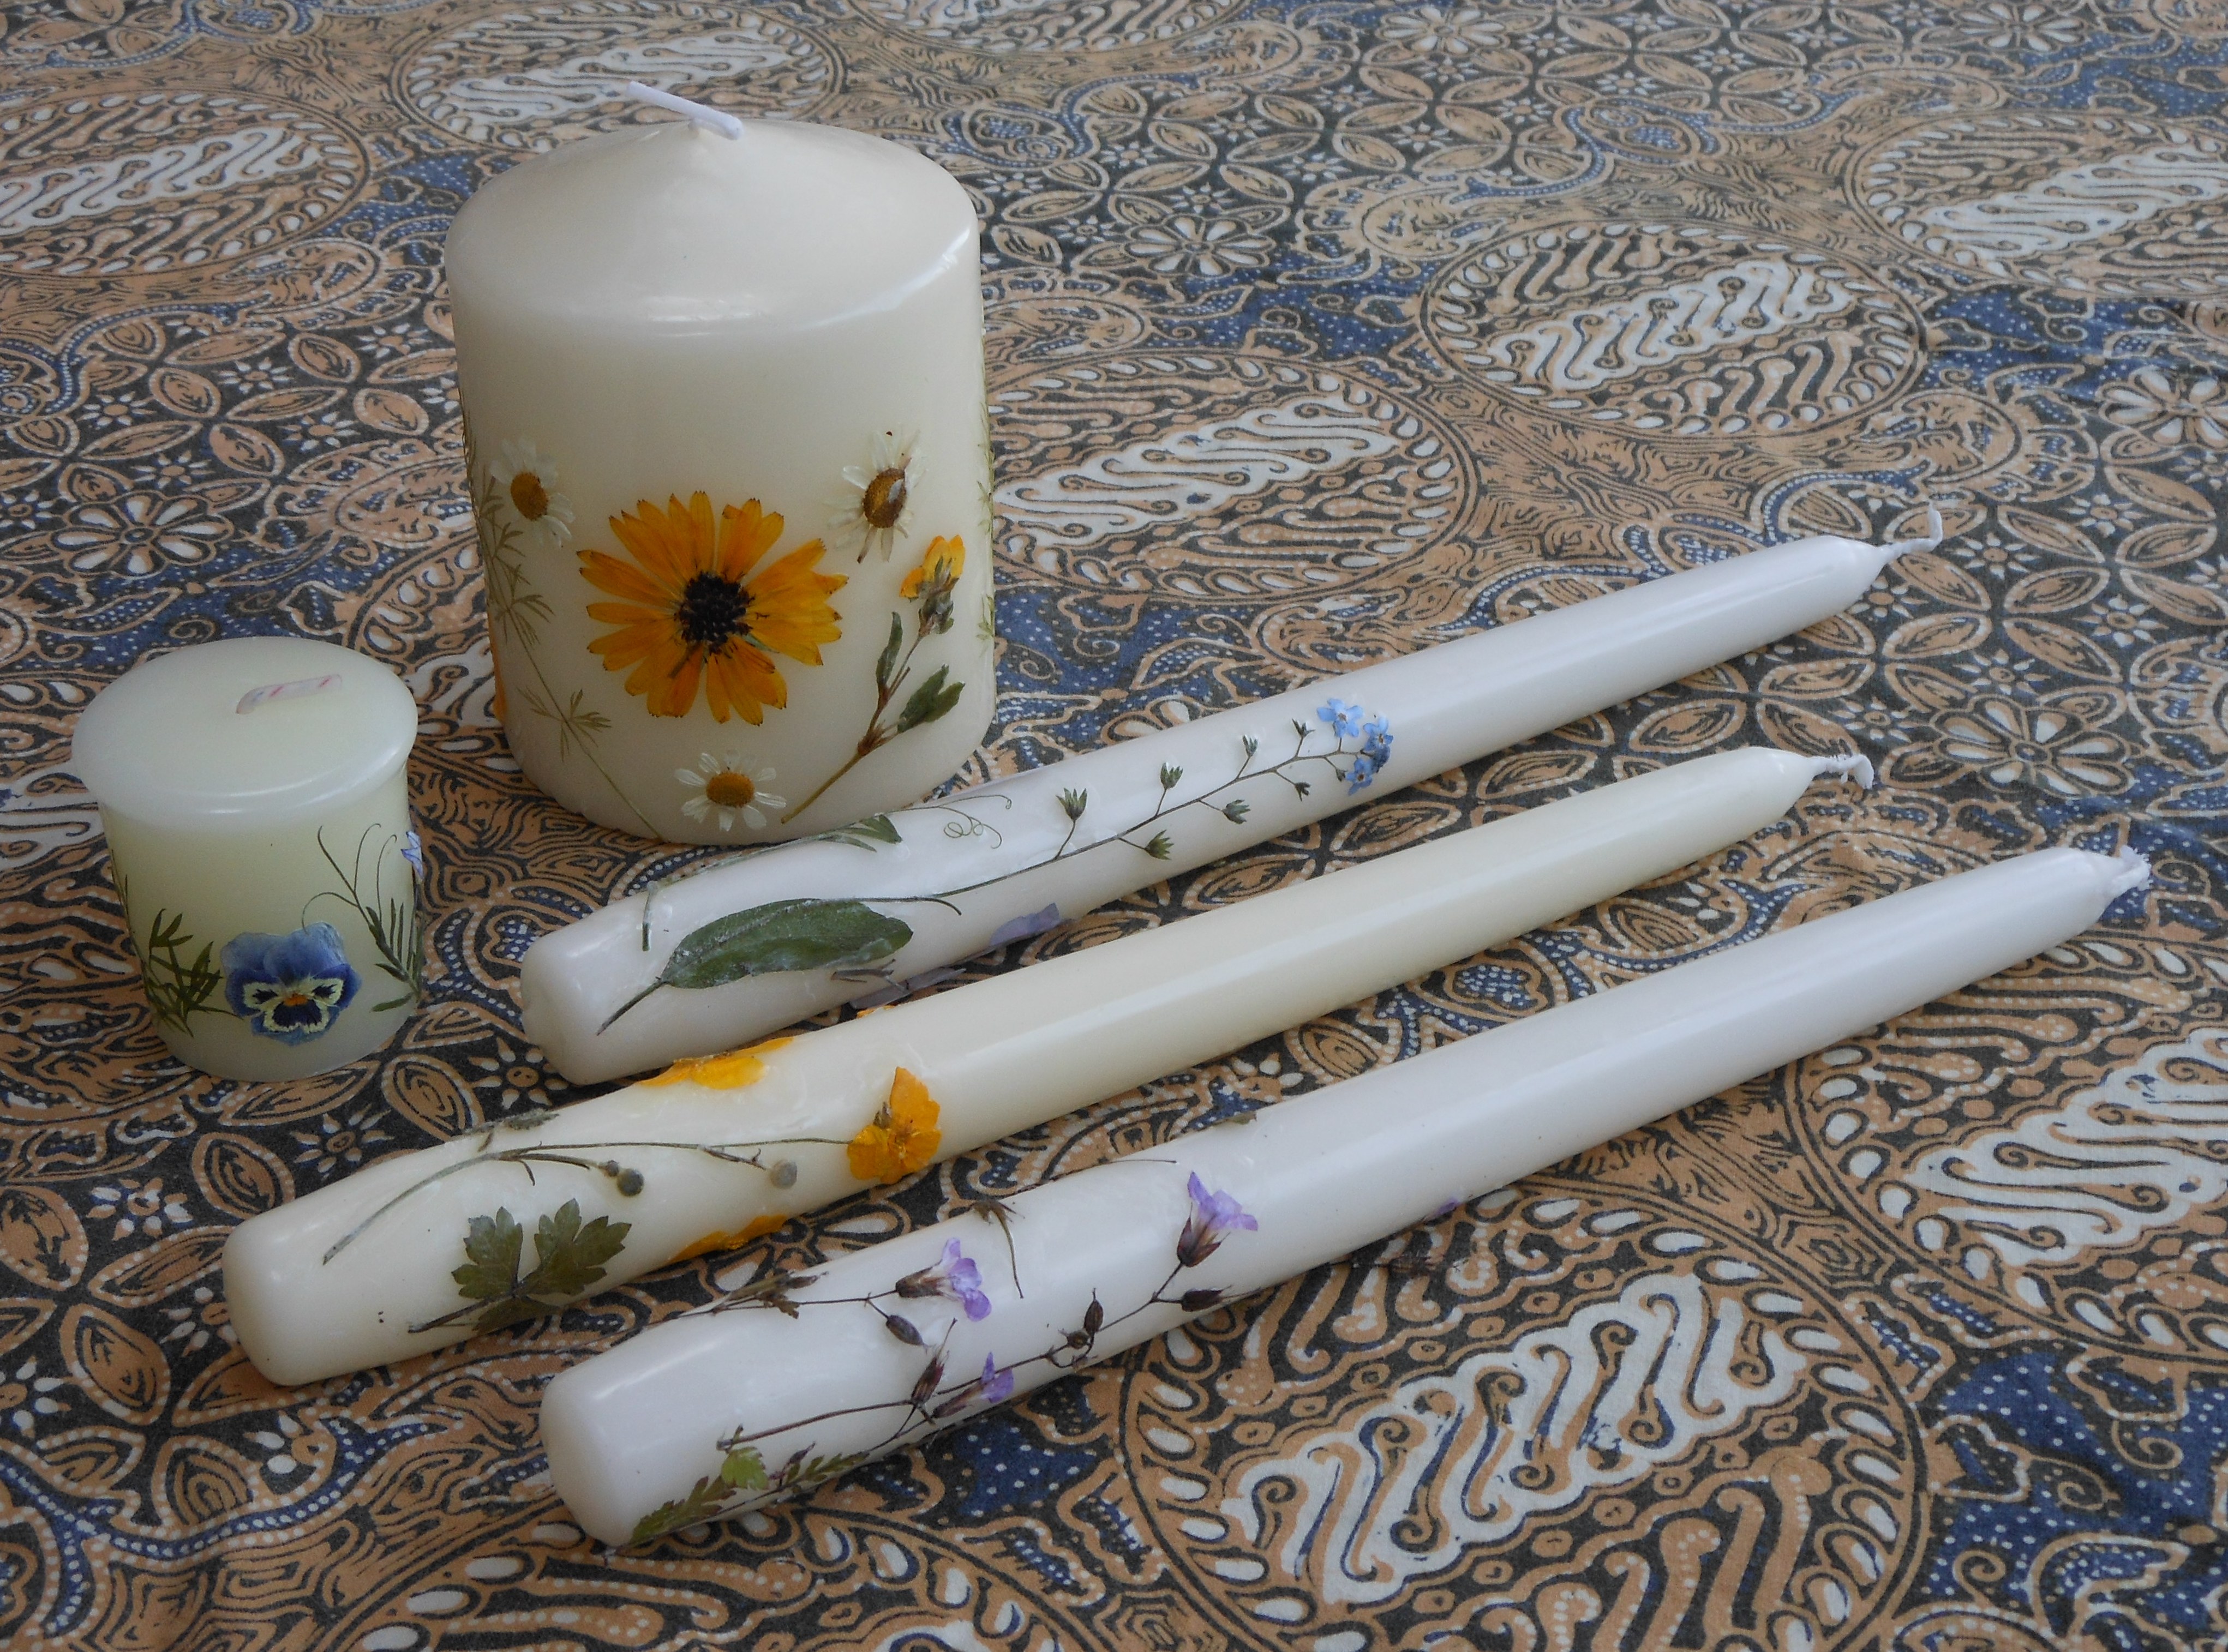
CANDLES DECORATED WITH PRESSED FLOWERS
There’s still time to collect and press flowers from your garden or hedgerow to decorate candles. These make beautiful gifts and delicate fronds and fragile buds and blossoms transform plain white candles into a really special reminder of summer in the darker days to come. Use white or cream candles so that the blooms show up clearly in soft candlelight.
Gather flowers and leaves on a dry sunny day, early afternoon is the best time when most of their moisture has evaporated. Place them in a flower press between two sheets of thick tissue or blotting paper and leave for a few weeks until thoroughly dry and flat. If you don’t have a flower press an old telephone directory squashed under a heavy book will do. Make sure your specimens are laid flat, not touching between the tissues, and layer with old cardboard to distribute the weight.
If you have a batik wax-pot use this, otherwise melt some stubs of white candle wax in a heat-proof bowl over a pan of hot water. To decorate the candles, hold the flowers in place on the candle, then using an old paint-brush, cover the back of the specimens with a thin film of melted wax and immediately stick onto the candle. Press in place with your finger. This can be a bit fiddly so it might be best to practice first. You might find it easier to put the hot wax straight onto the candle and place the plant material on top. It’s best to arrange the flowers, stalks and fronds near the base of the candle rather than higher up to avoid risking them catching fire when the candle is lit. Delicate fronds and small blossoms tend to look more effective than larger specimens unless you are using wide fat candles. Don’t worry if foliage and flowers come from different plants – mix and create as you would in a collage.
|

|
AUGUST 2012
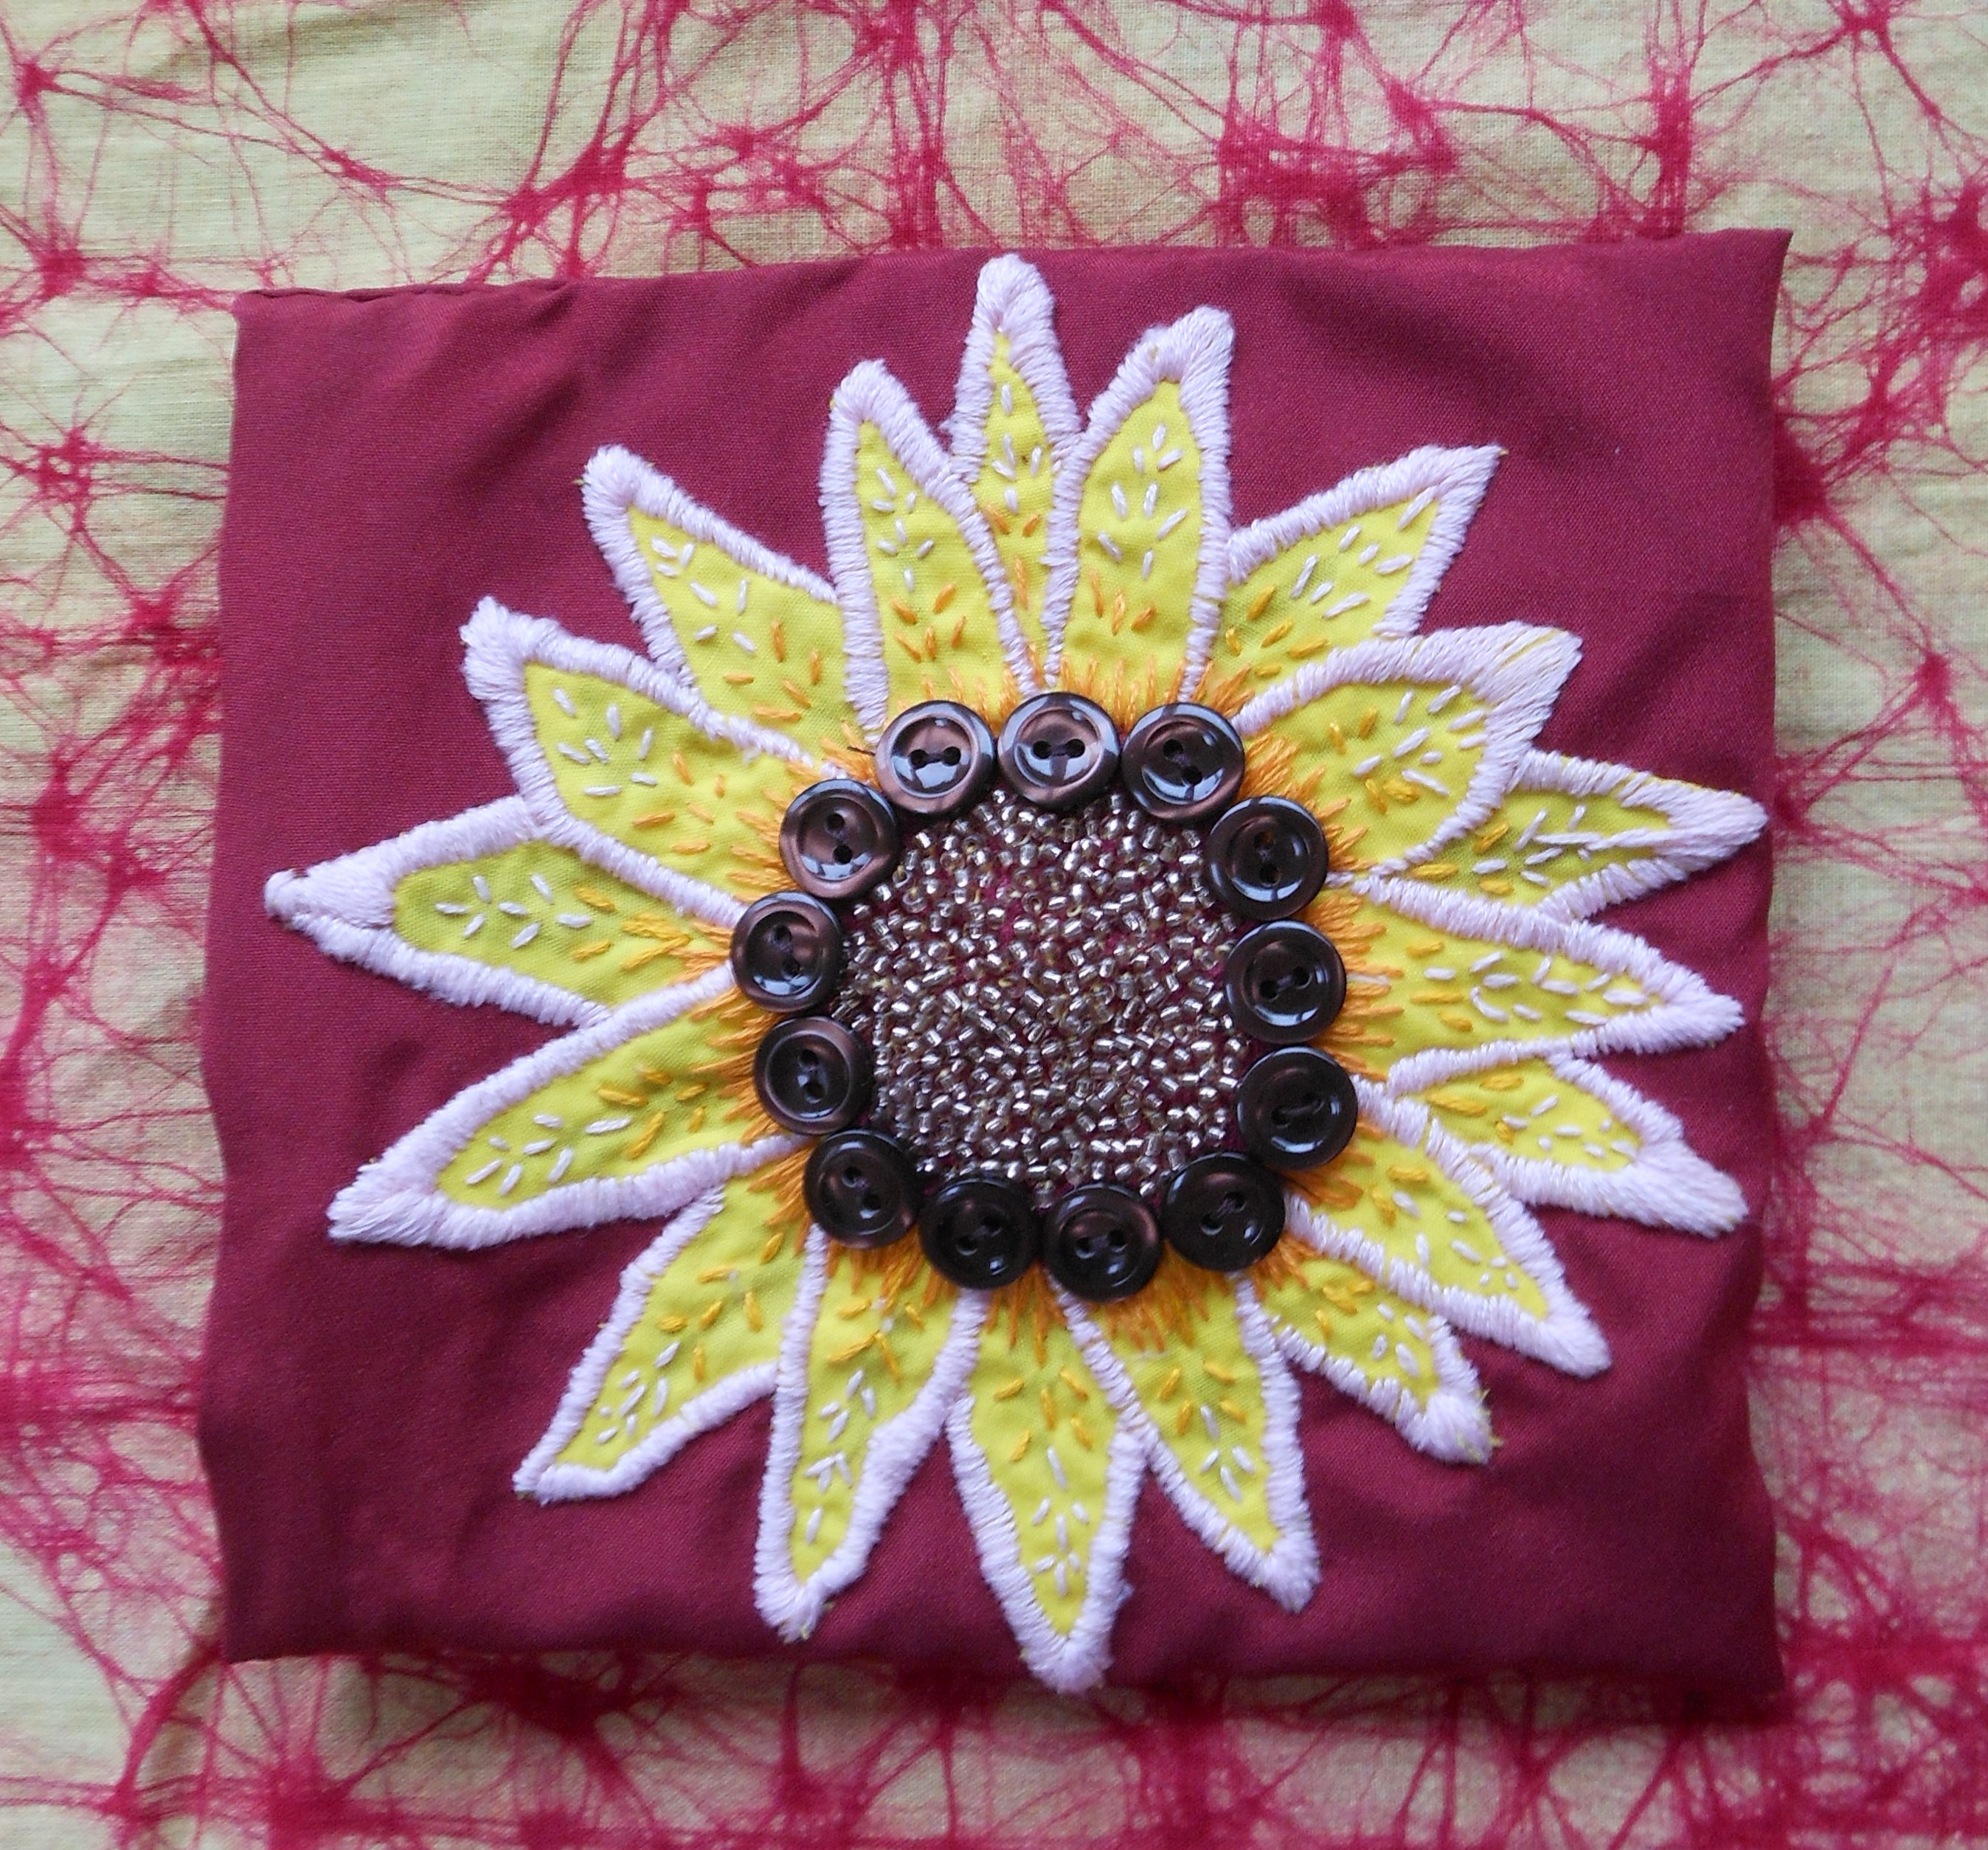
Sunflower Purse
I was inspired to make this little appliquéd purse by some sunflowers I’d never grown before. They’re called Evening Sunset and are amazing shades of mahogany, yellows and gold. I made it from remnants of fabrics, buttons and beads. You could make it in any other colours you preferred.
Materials:
1 x 12 ½ “(32cm x 32cm) piece of mahogany coloured cotton fabric
1 x 12 ½ “(32cm x 32m) piece of yellow coloured cotton fabric
13 x ½ “(1cm) shiny brown buttons
1 packet of small gold-coloured beads
1 skein each of 6-stranded embroidery silks in pale pink, pale yellow and orange
A spool of mahogany sewing thread and a spool of yellow sewing thread
Needles and notions
Dressmaking scissors and pins; 2 sizes of embroidery needles for the silks and stitching and a smaller one for the beads; paper for pattern cutting; 7” (18cm) embroidery hoop.
Method
Stretch the mahogany fabric across the embroidery hoop so the ends of the fabric poke out comfortably with little waste. Reserve 12 ½ “(32cm) yellow fabric for the lining then cut off the rest to make the petals. Draw a 2 ½ “(6cm) long petal shape as a template and cut it out. Pin it to the left-over yellow fabric and cut out 18 petals. Pin these in the centre of the mahogany fabric stretched under the hoop, overlapping as necessary, to form a sunflower.
Using the 3 strands of the pink embroidery silk tuck in and over-sew the edges of each petal to form a satin stitch border which attaches the petal securely to the fabric below. When all the petals are in place, in feather stitch and using pale yellow and orange silks as you wish, pattern the interior of the petal shapes. Finally, with the orange embroidery silk, using long and short stitch, embroider a circle that covers the rough ends of the petals at the inner part of the flower.
Using a smaller-eyed beading needle and the mahogany sewing thread, thread one bead at a time and sew firmly to the centre of the flower shape to represent sunflower seeds. Repeat, but catch down at the back every third stitch using a back stitch to secure the work to prevent all the beads unravelling if one thread becomes snagged and broken. Cover the entire inner part of the flower until a 2” (5cm) circle has been formed. Then, sew the buttons around the outer edge of the beaded circle so that they intersect the embroidered orange circle and form a neat edge to the beading. Remove from the embroidery hoop and open out. Neaten the back of the embroidery and press gently on wrong side under a damp cloth. Fold out so that right side faces.
Then make the lining: fold the reserved yellow cloth in half so that a bag-shape 6 ¼” “(16cm) x 6 ¼ “(16cm) is formed. Using the yellow thread, sew it together on 3 sides, with a ½ “(1cm) seam to make a lining bag 6“(15cm) x 6“(15cm), leaving the 4th side open. Trim the seams and turn inside out so the lining is right side facing then insert into the outer bag and pin into place at the top opening, matching up side seams. Fold under excess fabric at the top so the purse measures 6 ½ “(16cm) square and pin into place. Sew the inner bag to the outer bag with maroon thread. (Just catch the fabric, making sure the needle doesn’t pierce through to the outer maroon fabric). Finally, insert zip and sew securely into place.
|
 |
JULY 2012
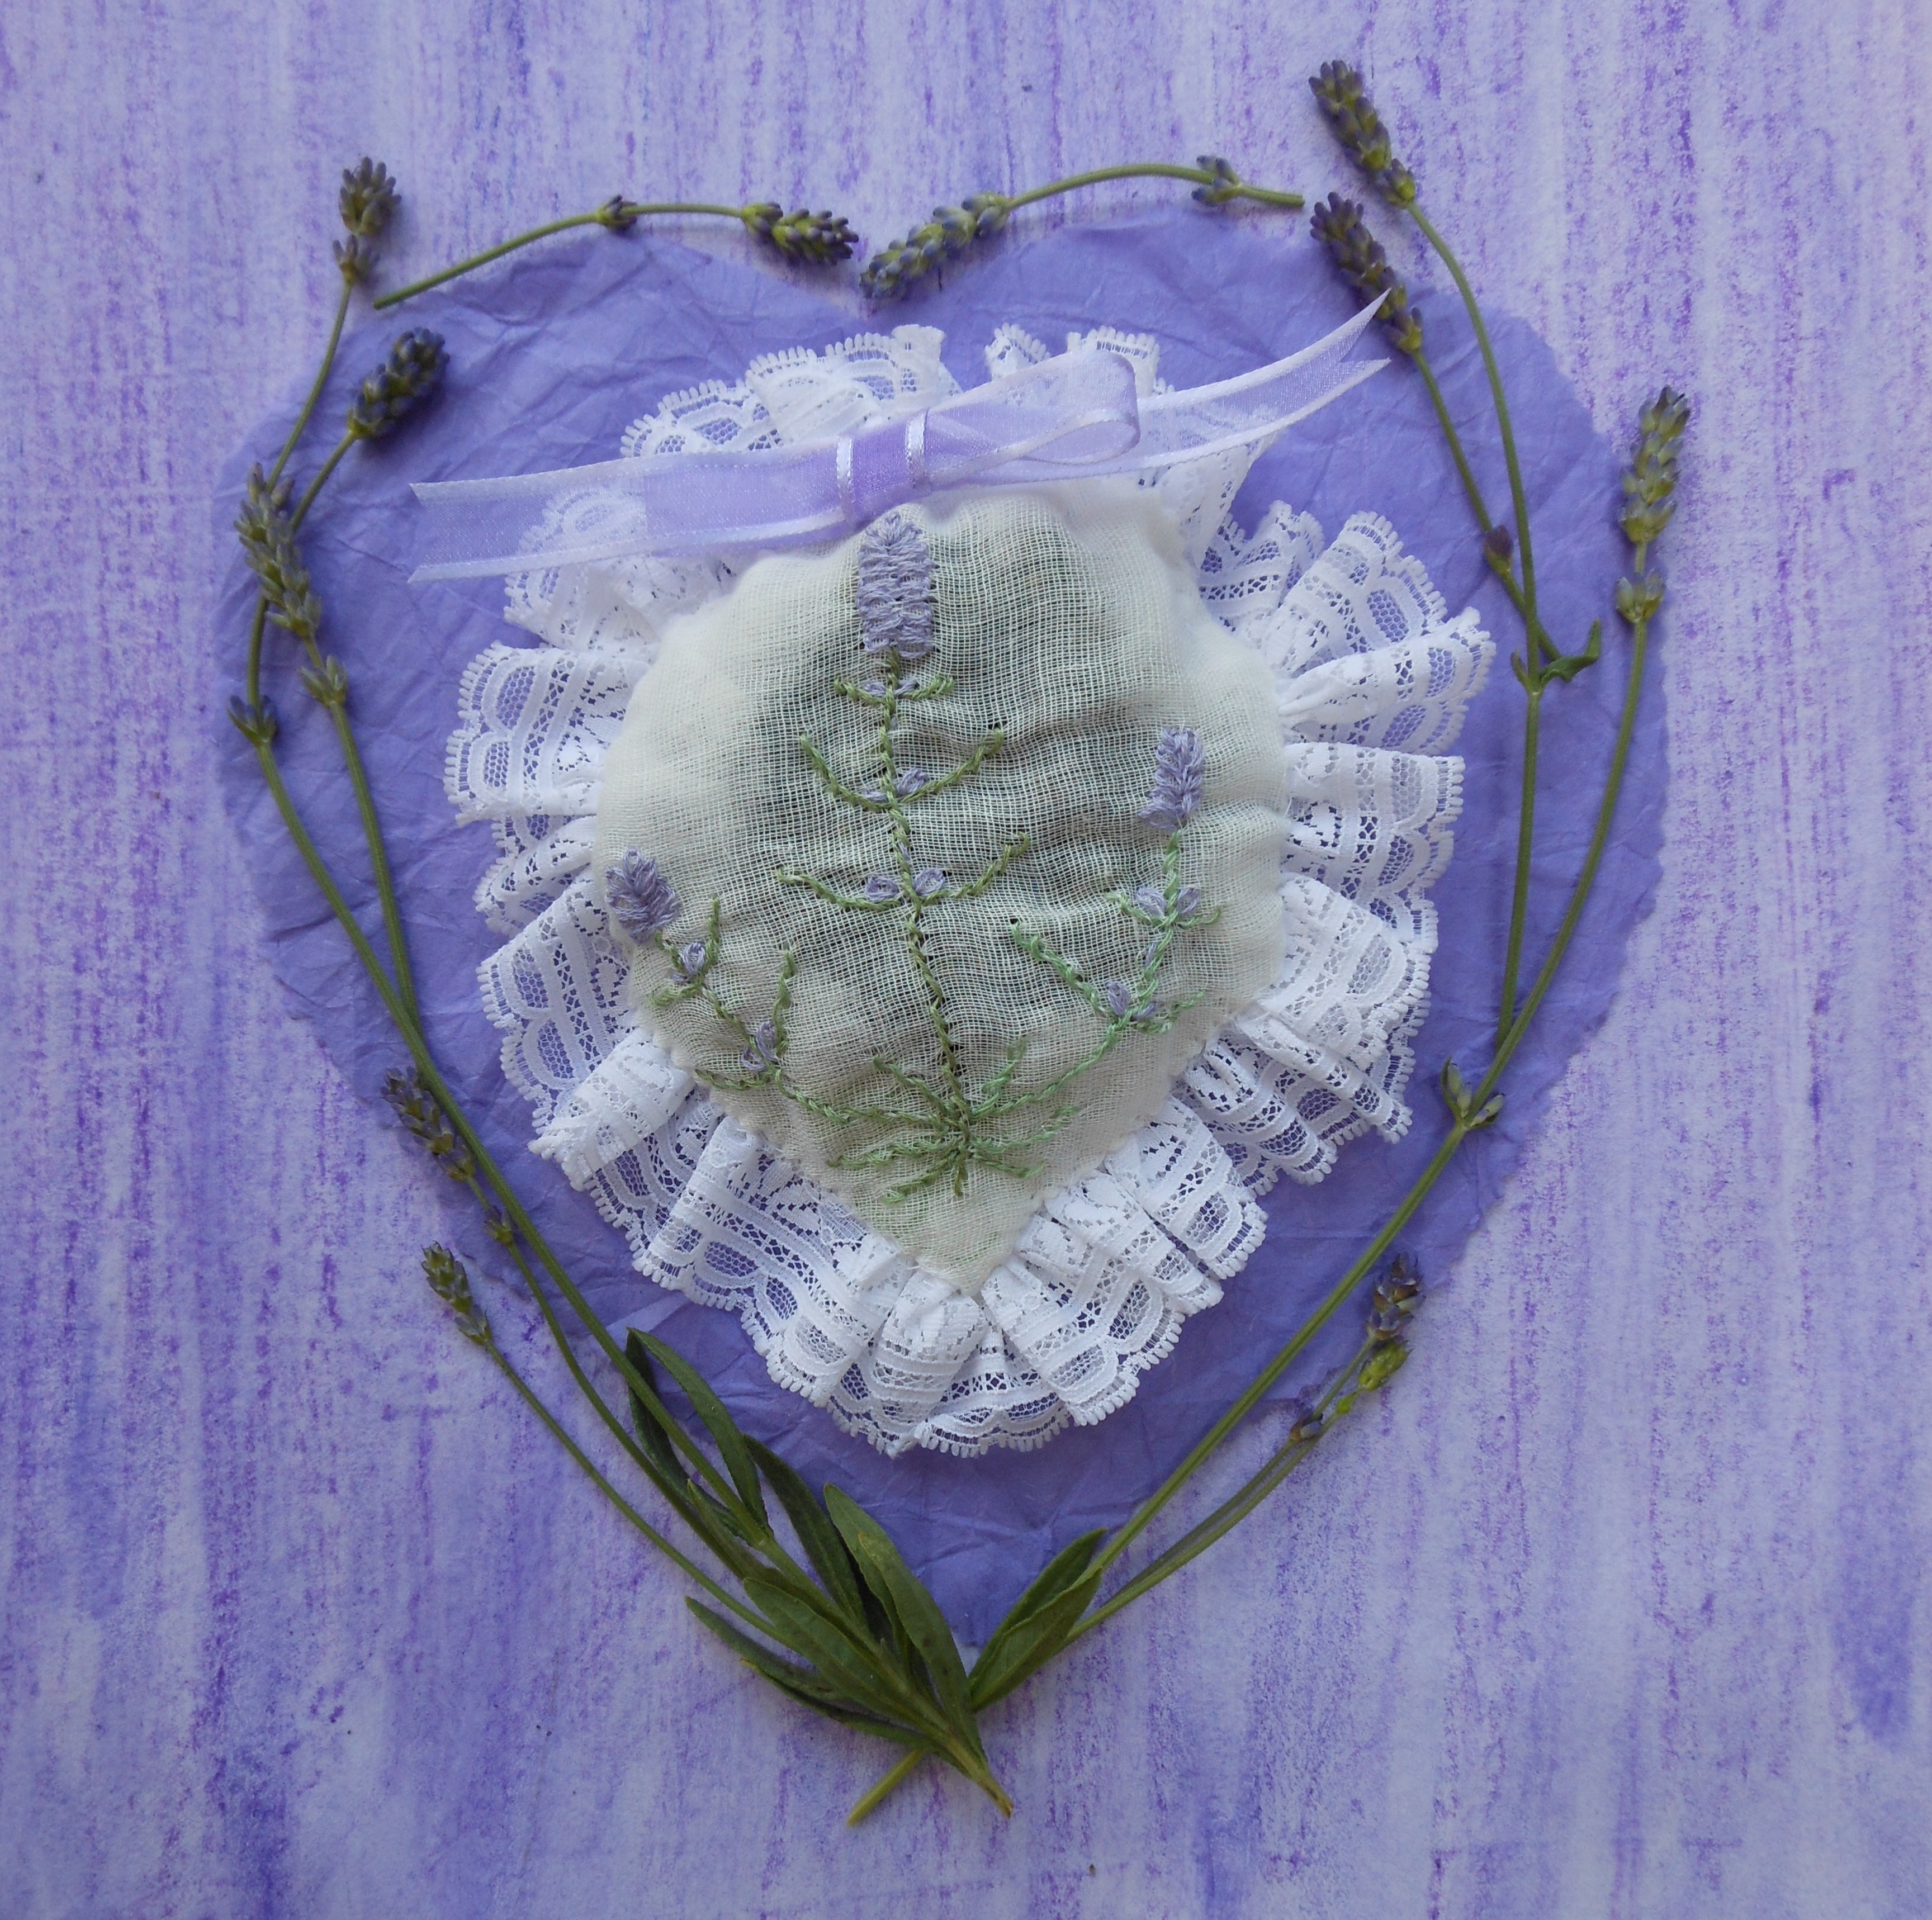
HEART-SHAPED LAVENDER SACHETS: Make these using the flowers of your lavender plants to scent your underwear drawer or linen cupboard.
Materials: 2 pieces of white or cream muslin or gauze 12” (30cm) in a circular or square shape to fit into an embroidery hoop or frame size 7” (18cm) in diameter (I used some I had left over after making a toile for a garment I was designing); 6 stranded embroidery silks in lavender and soft green; 36” (96 cm) remnant of white edging lace; fine white sewing cotton; 24” (62cm) length of lavender-coloured ribbon; 1oz (25g) lavender flowers snipped from their stalks on a sunny day. Leave lavender flowers to dry off overnight before using. Of course you can make them whatever size you like by altering the quantities and amounts.
Needles and Notions: 7” (18cm) embroidery hoop or frame; sewing needle; embroidery needle.
Method: Cut out the muslin squares and place 1 square in the embroidery hoop, adjusting its position so that it is taut between the 2 layers of the hoop or frame.
Using 3 strands of the green embroidery silk and the embroidery needle and using stem stitch, embroider the stems in whatever design pleases you. I embroidered a central stem and 2 side stems then embroidered 3 side shoots on the central stem and 2 side shoots on the 2 side stems. I then completed the green embroidery by adding 3 more side shoots at the base of the central stem. Then using 3 strands of lavender embroidery silk in chain stitch I sewed lavender flowers at the top of the central stems and at the top of the 2 side stems. Finally in lavender silk and chain stitch I embroidered flower buds into the joints of each side shoot on the 3 stems and then neatened the embroidery at the back. You could make your design smaller with less shoots and flowers though.
Remove the embroidered square from the hoop or frame and place it over the other muslin square. Pin together to keep in place, then cut out a heart shape 6 ½” (16cm) deep and 6” (15cm) wide. Unpin. Using running stitch gather the edging lace along one side with white sewing cotton until it forms a ruffle. Then sew this evenly along the edge of the embroidered heart shape, so that a neat edge is formed on the right side of work. Leaving a space open at the top of the heart where the lavender flowers will go, using hem stitch, sew the other heart shape to the embroidered shape and frilled edge, turning the hem under neatly.
Poke the lavender flowers through the hole at the top of the bag and when full, stitch the hole closed. The sachet will smell very pungent. Finally sew the lavender ribbon securely to the top of the embroidered side and tie into a bow. |
|
|
|